Advertisement
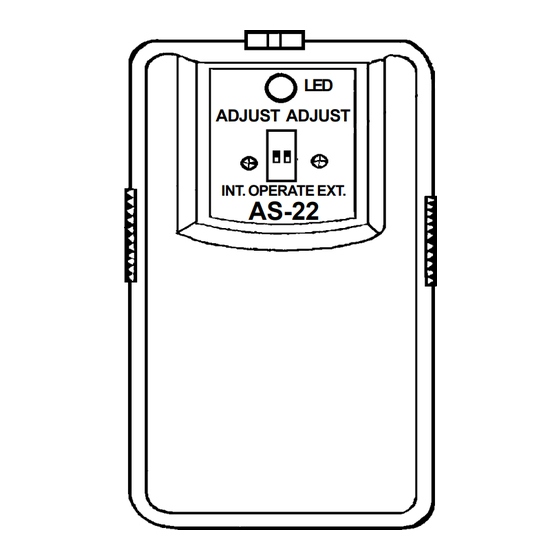
AS-22
INTRODUCTION:
The Audiovox AS-22 has been designed to provide maximum protection for the interior of any vehicle. This
unit will provide a series of pre-warn chirps upon attempted entry into the protected area. If further attempts
to enter the vehicle continue, the unit will provide a pulsed ground output to trigger the alarm system.
MOUNTING THE SENSOR:
Select a mounting location close to the center of the passenger compartment, or the area to be protected.
The sensor should be placed with the LED and adjusting potentiometer facing upward. For best results, the
unit should be placed as close to the steel floor pan of the vehicle as possible. NEVER mount the unit below
metal as the wave form provided by this sensor will not penetrate metals.
WIRING THE UNIT:
RED WIRE : +12 VOLT DC BATTERY SOURCE
Connect the red wire of the sensor to a fused +12 volt constant battery source.
BLACK WIRE : GROUND WHEN ARMED
Connect this wire to a ground when armed source from the alarm system. If the alarm system you are using
has a dedicated "Ground" output when armed, then connect the Black wire directly to it. If the alarm system
has a starter inhibit Ground when armed output, then the diode assembly must be used. Locate the starter
inhibit control wire between the alarm module and the starter inhibit relay. Cut this wire and install the diode
assembly with the orange lead connected to the alarm module and the orange / black lead connected the
starter inhibit relay. Connect the black wire of the sensor to the point where the orange diode assembly wire
and the alarm control wire are joined.
GREEN WIRE : NEGATIVE ALARM TRIGGER OUTPUT
Connect this wire to the instant negative trigger input wire of the alarm system. This wire MUST NOT be
connected to any other sensor directly. If only one negative trigger wire is available from the alarm, be certain
to diode isolate the trigger output of this unit from any other sensors, or trigger may not occur.
WHITE / BLACK WIRE : SIREN CONTROL
Connect this wire to the +12 volt siren control wire of the alarm system. This wire will supply multiple +12 volt
output pulses to the siren upon pre-entry attempts.
ADJUST THE SENSITIVITY OF THE PRE-WARN CHIRPS:
Use CAUTION when making adjustments to this sensor. The sensitivity adjustment has a maximum rotation
of approximately 260 degrees. DO NOT OVERTURN THIS ADJUSTMENT SCREW.
Locate the two dip switches accessed through the hole in the top of the sensor.
Set the two switches as shown IN FIGURE 1 to adjust the pre-warn chirps. The security system must be
armed during the adjustment procedure, however the alarm system will not trigger with the switches set as
shown. You must wait for the green LED to turn off before testing the field adjustment.
Turn the EXT. adjustment potentiometer half way up, exit the vehicle, and wave your arm outside the right,
left, and front windows of the vehicle. The sensor should emit pre-warn chirps. If not, increase the sensitivity
until desired result is achieved.
NOTE : This field should be set as close to the outside of the vehicle as allowed by local law. It is the
installers responsibility to set this sensor to comply with your state's noise abatement laws.Expanding
the predetect field beyond a reasonable predetect point will cause warning chirps during heavy rain
or snow.
INSTALLATION GUIDE FOR:
DUAL STAGE
MICROWAVE SENSOR
Printed in Korea
Form No. 128-4718
Advertisement
Table of Contents

Related Manuals for Audiovox Auto Security AS-22


Summary of Contents for Audiovox Auto Security AS-22
- Page 1 AS-22 INTRODUCTION: The Audiovox AS-22 has been designed to provide maximum protection for the interior of any vehicle. This unit will provide a series of pre-warn chirps upon attempted entry into the protected area. If further attempts to enter the vehicle continue, the unit will provide a pulsed ground output to trigger the alarm system.
- Page 2 Note : During pre-detect, the green L.E.D. will turn on for 3 seconds. During full trigger, the red L.E.D. will turn on briefly. Note : Interior zone must always be set lower than exterior zone for proper operation. DIP SWITCH ADJUST ADJUST FIG 2 FIG 4 FIG 1 FIG 3 INT. OPERATE EXT. AS-22...
Need help?
Do you have a question about the Auto Security AS-22 and is the answer not in the manual?
Questions and answers