Advertisement
Quick Links
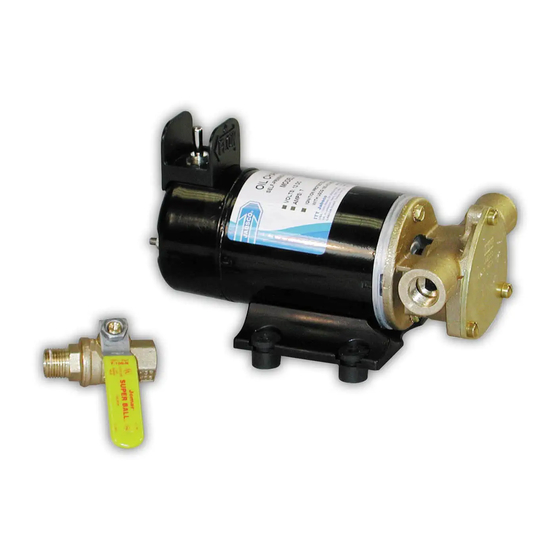
OIL CHANGE PUMP
FEATURES
Bronze
Body
Nitrile
Impeller
Buna Lip Type
Seal
Reversible Permanent Magnet
with Integral Reversing Switch
Motor
3/8" NPT Full Flow Ball Type
Valve
4-7/16" (113mm) Including
Height of Switch Guard
Height
7-7/8" (200mm)
Length
3-3/4" (95mm)
Width
9 lbs. (4.1 kg)
Weight
Rating:
VARIATIONS AVAILABLE
MODEL NO.
DESCRIPTION
17830-0012
17830-0024
APPLICATION
The Jabsco Oil Change Pump is designed to be installed
near a vessel's engine and permanently plumbed to the
engine's oil pan. The pump can be used to remove old oil
from the engine, then with the integral reversing switch,
the flow direction can be changed to pump a measured
amount of new oil back into the engine. The connection
to the engine should be controlled by the 3/8" ball valve
(provided) to guard against accidental oil discharge.
WARNING
!
Caution–Burn Hazard. Heated oil can cause
burns. Wear protective gloves, clothing and
safety glasses during the oil change process.
Failure to do so may result in personal injury.
OPERATION
Before changing oil, run engine about 3 – 5 minutes to
raise the oil temperature to about 100° – 140° F
(38° – 60° C) and reduce its viscosity. Open the security
valve in the oil change system. Ensure the waste oil
discharge hose is securely positioned in a waste oil
receptacle (be aware that during the pumping process
and EMC Compliant
12 Volt
24 Volt
the discharge hose may tend to move slightly) and
switch the pump on by moving the toggle switch in the
direction that the oil needs to flow. Once the pumping
process is complete (flow has stopped), switch the pump
off
immediately. Do not allow the pump to run dry for
more than about thirty seconds or impeller damage may
occur. Using the engine's dipstick; verify that it is in fact
empty and the oil flow was not stopped by sludge. If the
engine oil is empty, a measured amount of the correct
type (per the engine manufacturer's recommendation) of
new oil can be pumped back into the engine. Insert what
was
discharge hose, and for refilling purposes becomes the
intake suction hose, into a container with the measured
amount of oil. Move the pump's toggle switch in the
direction of desired flow toward the engine and pump the
measured amount of oil into it. When the container is
empty immediately turn off the pump. Close the system
security valve and always check the oil level with the
engine's dipstick to ensure the oil level is correct.
INSTALLATION
The Oil Change Pump may be oriented in any position.
However, if mounted to a vertical surface, it should be
oriented with the pump's motor above the pump head.
This will ensure that, should the seal ever develop a
leak, oil from the pump head will not drip onto the motor.
The Oil Change Pump should be located where the
length of hose to the engine can be kept as short and
straight as possible. The pump is self-priming and may
be positioned up to three feet above the oil source.
However, for best operation the pump should be
mounted at a level that is just slightly above the highest
oil level to be changed. Often this is approximately even
with the level of the engine mounts. Secure the pump to
MODEL 17830-SERIES
a
Advertisement

Related Manuals for Xylem Jabsco 17830 Series


Summary of Contents for Xylem Jabsco 17830 Series
- Page 1 MODEL 17830-SERIES OIL CHANGE PUMP FEATURES Bronze Body Nitrile Impeller Buna Lip Type Seal Reversible Permanent Magnet with Integral Reversing Switch Motor 3/8" NPT Full Flow Ball Type Valve 4-7/16" (113mm) Including Height of Switch Guard Height 7-7/8" (200mm) Length 3-3/4"...
- Page 2 a solid mounting surface at the four base attachment WIRE SIZE (AWG [mm ]) for various conductor lengths points. It is recommended that heavy duty reinforced type A fuel hose be used to connect the pump with the Model Fuse/ Length of run in feet (metres)* engine pan.
- Page 3 EXPLODED VIEW PARTS LIST Screw Kit (includes 4 screws) Description 91004-0090 Part No. End Cover 18647-0000 O-Ring 18753-0660 Impeller 9200-0023 Seal 18753-0384 Screw Kit (includes 3 screws) 98019-0020 Body 18646-0000 Slinger 6342-0000 Motor: 12 Volt, EMC 18753-0067 24 Volt, EMC 18753-0636 Toggle Switch Boot 98022-0000...
- Page 4 A. LIMITED WARRANTY: 4. This warranty does not extend to any product Jabsco warrants that at the time of shipment, the manufactured by Jabsco which has been subjected products manufactured by Jabsco and sold hereunder to misuse, neglect, accident, improper installation, or shall be in conformity with applicable written use in violation of instructions furnished by Jabsco.