
Related Manuals for Westcott FJ-X2m


Summary of Contents for Westcott FJ-X2m
- Page 1 FJ-X2m Wireless Trigger User Manual V1.1.0 7/01/2021 PLEASE READ THE INFORMATION ON PAGE 4 BEFORE USING FJ WIRELESS EQUIPMENT...
-
Page 2: Table Of Contents
Contents Contents Introduction FJ-X2m Universal Wireless Trigger (Included components) FJ-X2m Universal Wireless Trigger with Sony Adapter (Included components) Important things to know before starting… Reviewing Firmware Files TTL ±3 Flash Exposure Compensation (FJ400 & FJ-X2m) Canon Continuous Mode Full-stop Increments in Manual Mode... -
Page 3: Menu Selection Button Options: Screen
Menu Selection Button Options: Screen 1 Menu Selection Button Options: Screen 2 Mobile Applications (iOS & Android) Initial Setup Turn ON Bluetooth® on the FJ-X2m Connecting the FJ-X2m to a Mobile Device FJ-X2m: Preparing Your Camera [Brand Specific] Sony Mirrorless Canon DSLR Warranty Information... -
Page 4: Introduction
9-stop output range. When paired with the FJ-X2m Wireless Radio trigger, you can say, “Goodbye,” to the need for multiple brand-specific triggers. The FJ400 and FJ-X2m have you covered with their multi-brand compatibility. This versatile unit offers everything required by professional photographers today to achieve lighting success - including TTL, HSS, Continuous Capture, Freeze Function, and so much more. -
Page 5: Important Things To Know Before Starting
±3 TTL Flash Exposure Compensation (FEC) on the FJ-X2m is independent of the Flash Exposure Compensation (FEC) on the FJ400 Strobe. Meaning, a change of the FEC ±3 on the FJ-X2m will adjust the light output in TTL mode; however, the FJ400 screen will not indicate the FEC changes made on the FJ-X2m. -
Page 6: Fj-X2M Wireless Trigger: Overview
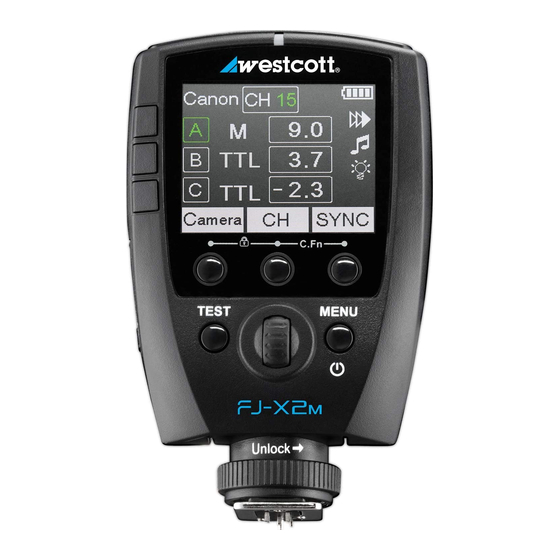
FJ-X2m Wireless Trigger: Overview Get the most out of your FJ400 Strobe by pairing it with the FJ-X2m Wireless Radio Trigger. The FJ400 may work with your existing triggers; however, to achieve optimal performance of the strobe, we strongly suggest using the FJ-X2m Wireless Radio Trigger. Both units operate at 2.4Ghz, ensuring communication... - Page 7 FJ-X2m: LCD Display FJ-X2m: Settings Menu...
-
Page 8: Fj-X2M: Warnings
11. Unplug the USB-A to USB-C cable from your computer and the FJ-X2m. 12. Long press the Power | Menu button on the FJ-X2m to initiate the firmware update and confirm installation was successful by locating the firmware text in the bottom right corner of the screen during the start-up process. -
Page 9: Fj-X2M: Preparing Your Camera
● Only attempt the firmware update installation process when the connected computer’s power level is ≥ 25%. Loss of power of any type during this process could render the FJ-X2m inoperable and require professional repair. ● Removing the USB cable from the FJ-X2m without properly ejecting the device from your computer could render the trigger inoperable and require professional repair. -
Page 10: Fj-X2M: Getting Started
Slide the Sony Adapter (sold separately) into the camera’s hot shoe with the release button facing the camera’s back. 2. Once the adapter is mounted, loosen the FJ-X2m’s Shoe Lock dial and slide the FJ-X2m onto the Sony Adapter. 3. Turn the FJ-X2m Shoe Lock dial to the left to lock into place. Do not overtighten. -
Page 11: Fj-X2M: Powering, Testing & Locking The Fj-X2M
FJ-X2m: Powering, Testing & Locking the FJ-X2m Power On Long press and hold the Power | Menu button for 3 seconds until you see the Westcott logo. The wireless signal indicator will continually flash green. NOTE: Certain camera models may require the FJ-X2m trigger to be turned ON before turning on the camera. -
Page 12: Change M (Manual) Exposure Power Output (Individual Group)
2. Long-press the middle Menu Selection Button [CH] to highlight all groups [A-F]. 3. Quick press the FJ-X2m Selection Wheel to highlight all Group Exposure Boxes in green. 4. Scroll the Selection Wheel to adjust the manual exposure for groups operating in Manual Mode (only). -
Page 13: Sync Functions
● Panasonic Lumix: 1/8000s SYNC-X Mode The FJ-X2m Wireless Trigger also has a single-pin mode that allows the basic triggering of non-compatible camera models with the FJ-X2m. NOTE: Normal Sync Speed is determined by the camera manufacturer and subject to change based upon the camera model. -
Page 14: Fj80 Remote Zoom Control
9. Long-press the middle Menu Selection Button [CH] to highlight all groups [A-F]. 10. Quick press the FJ-X2m Selection Wheel to adjust the FJ80 ZOOM settings [0-5] for all groups. 11. Scroll the Selection Wheel to adjust the FJ80 ZOOM settings. -
Page 15: Menu Button Selection Control
● Bluetooth®: [On/Off] [Scroll down with Selection Wheel to view] ● SYNC-X: [On/Off] [Scroll down with Selection Wheel to view] ● Screen Brightness: [MIN, MID, MAX] ● FJ-X2m Transmitting Power: [MIN, NOR, MAX] ● Channel Recommendations: [Suggested channels vary] Menu Button Selection Control ●... -
Page 16: Menu Selection Button Options: Screen 2
Mobile Applications (iOS & Android) The settings of the FJ400 can be adjusted through a mobile app via the FJ-X2m Wireless Radio Trigger. The app will also allow for different scenes to be created and saved to minimize the same setup in the future. -
Page 17: Connecting The Fj-X2M To A Mobile Device
3. Turn on the FJ400 by long-pressing the Power | MODEL button. 4. Open the app on the mobile device. 5. The app will present a screen titled, “Select Devices,” where you will select the FJ-X2m from the list of available devices. -
Page 18: Canon Dslr
Warranty Period, at its option and to the extent permitted by law, Westcott will either (1) repair the defect at no charge, using new or refurbished replacement parts, or (2) exchange the product with a product that is new or which has been manufactured from new or serviceable used parts and is at least functionally equivalent to the original product. -
Page 19: Legal Information
Shipping: F.J. Westcott Co, 1425-B Holland Rd. Maumee, OH 43537 Legal Information Westcott products are made to the company’s traditionally high standards of quality and comply with all applicable government safety regulations and requirements. In an effort to provide the best quality products possible, we periodically make product modifications.
Need help?
Do you have a question about the FJ-X2m and is the answer not in the manual?
Questions and answers