Advertisement
Quick Links
Thank you for purchasing a Sealey product. Manufactured to a high standard this product will, if used according to these instructions
and properly maintained, give you years of trouble free performance.
IMPORTANT: PLEASE READ THESE INSTRUCTIONS CAREFULLY. NOTE THE SAFE OPERATIONAL REQUIREMENTS, WARNINGS & CAUTIONS.
USE THE PRODUCT CORRECTLY AND WITH CARE FOR THE PURPOSE FOR WHICH IT IS INTENDED. FAILURE TO DO SO MAY CAUSE
DAMAGE OR PERSONAL INJURY, AND WILL INVALIDATE THE WARRANTY. PLEASE KEEP INSTRUCTIONS SAFE FOR FUTURE USE.
1. SAFETY INSTRUCTIONS
! WARNING! Due to the variety in design of vehicles and cycles, it is the
user's full responsibility to ensure no damage occurs whilst using this cycle
carrier. Correct attachment of carrier to a vehicle is therefore critical and is
beyond control of the manufacturer, distributor or supplier.
! WARNING! The user must secure the carrier and any cycles to be carried
properly, checking the security frequently when in use.
# Every time before use check the carrier for security of fittings or any sign of
wear and tear. Replace any worn or damaged parts.
$ DO NOT use the cycle carrier if any parts are missing or damaged as this
may cause failure and/or personal injury.
# Use strong, good quality tie restraints for securing cycles to the carrier. DO
NOT use string, or elasticated straps.
# If the load obscures the vehicle registration plate or lights fit an auxiliary
number plate and/or lighting system.
# Avoid damage caused by hot exhaust fumes. DO NOT position cycles
directly next to the vehicle's exhaust, especially the bicycle tyres. If necessary fit
an exhaust deflector.
# Ensure that bicycles do not come into contact with the vehicle bodywork
and provide protection as required.
# For hatchbacks and estate vehicles ensure the foam protection pads make
contact should the carrier's arms rest on the rear window.
# For hatchback vehicles with glass edges you must ensure the glass is
protected by some form of rubber strip or pad.
# This carrier is designed to carry 2 cycles. Check the vehicle manufacturer's
specification to ensure that you do not overload the rear hatch door.
% WARNING! Remove any loose objects from the cycles i.e pumps, bottles etc.
% WARNING! Avoid any protrusions beyond the side of the car as these may
present a risk of injury to passers-by.
$ DO NOT use the cycle carrier for any purpose other than for which it is
designed.
& DO NOT strap any other items to the carrier, only bicycles.
% WARNING! Drive carefully - Be aware of cross winds, sudden braking or
hard cornering, reduce speed accordingly when using carrier.
% WARNING! This carrier is designed for temporary use only, remove when
not in use or before going through a car wash.
% WARNING! Remember the driver of the vehicle is responsible
for the security and safety of the load carried.
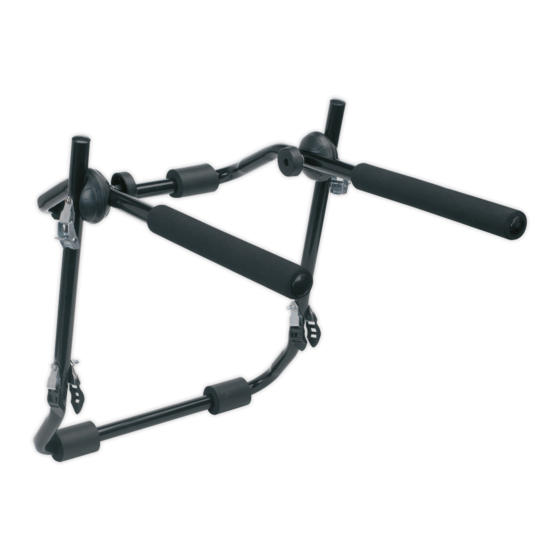
2. CONTENTS
CYCLE CARRIER PARTS
1. Main frame (part assembled)
2. Fixing straps x 6
3. Bike fixing straps x 4
3. CARRIER ASSEMBLY
Unpack product and check contents against
the contents list. Should there be any
damaged or missing parts contact your
supplier immediately.
3.1
The cycle carrier's main frame comes part
assembled and folded flat.
3.2
The side and bottom mounting anchors
share the same fixing bolts and need to be
assembled to the lower part of the frame as
seen in fig.1.
3.3
Hook a metal mounting anchor through
each black plastic buckle as shown in fig.2.
and compress the open end of the anchor
as much as possible by hand.
3.4
Push a fixing bolt through the two holes in
one of the metal anchors and slide the bolt
through one of the holes in the main frame
from the outside. Ensure that the black
buckle is curving away from the frame.
3.5
Slide another metal anchor/plastic buckle
assembly over the bolt protruding from the
frame ensuring again that the black buckle
is curving away from the frame.
3.6
Place a washer over the end of the bolt and
compress the assembly enough to be able
to thread a nut onto the end of the bolt.
Using two M10 spanners compress the
assembly until the open ends of the fixing
banchor are pressed together as shown in
fig.1.
3.7
Assemble the two remaining metal
anchor/plastic buckle assemblies to the
other side of the frame in a similar manner.
3.8
Unfold the main frame by loosening the two
clamping knobs seen in fig.1 until the
clamping cups spring apart. Unfold the frame
to the approximate position shown in fig.1.
Re-tighten the clamping knobs so that
fig.1
the clamping cups are firmly together.
3.9
The padded support legs should be angled
upwards by at least 20° from the horizontal
when the frame is attached to the vehicle.
The actual angle between the two parts of
the frame will vary depending on whether
the car is a hatchback, an estate or a saloon
with a boot. See figs.7 & 8.
3.10
It is important that the fixing straps are
threaded the correct way through the black
plastic buckles in order for them to remain
tight. See fig.2.
3.11
Thread a strap through each of the bottom
and side buckles as shown in figs.2 & 3.
The fixing hooks on the end of the straps
should be facing backwards as shown in fig.3.
3.12
Attach the remaining two straps to the top
anchor fixings as shown in fig.1. The metal
clips are spring loaded shut as shown in
fig.4. Hold the clip open with your thumb as
shown fig.5 and thread the strap through
from the back. Release the clip to grip the
strap as shown in fig.6. The fixing hook at
the end of each strap can be orientated
either way round.
INSTRUCTIONS FOR:
REAR CYCLE CARRIER
MODEL NO:
4. Fixing bolts with washer and nut x 2
5. Black plastic strap fixings x 4
6. Metal mounting clamps x 4
BS17
fig.2
fig.3
fig.4
BS17 - 2 - 220807
Advertisement

Subscribe to Our Youtube Channel
Related Manuals for Sealey BS17


Summary of Contents for Sealey BS17
- Page 1 BS17 MODEL NO: Thank you for purchasing a Sealey product. Manufactured to a high standard this product will, if used according to these instructions and properly maintained, give you years of trouble free performance. IMPORTANT: PLEASE READ THESE INSTRUCTIONS CAREFULLY. NOTE THE SAFE OPERATIONAL REQUIREMENTS, WARNINGS & CAUTIONS.
- Page 2 Sealey dealer for details. Parts support is available for this product. To obtain a parts listing and/or diagram, please log on to www.sealey.co.uk, email sales@sealey.co.uk or phone 01284 757500. NOTE: It is our policy to continually improve products and as such we reserve the right to alter data, specifications and component parts without prior notice.
Need help?
Do you have a question about the BS17 and is the answer not in the manual?
Questions and answers