Advertisement
Quick Links
®
®
TM
iOptron
iGuider
Autoguiding System
Operation Manual
Product #3360
Ver. 1.00 2021.3
iOptron reserves the rights to revise this instruction without notice. Actual color/contents/design/function of a product may differ from
those described in this instruction manual.
Advertisement

Subscribe to Our Youtube Channel
Related Manuals for iOptron iGuider 3360


Summary of Contents for iOptron iGuider 3360
- Page 1 ® ® iOptron iGuider Autoguiding System Operation Manual Product #3360 Ver. 1.00 2021.3 iOptron reserves the rights to revise this instruction without notice. Actual color/contents/design/function of a product may differ from those described in this instruction manual.
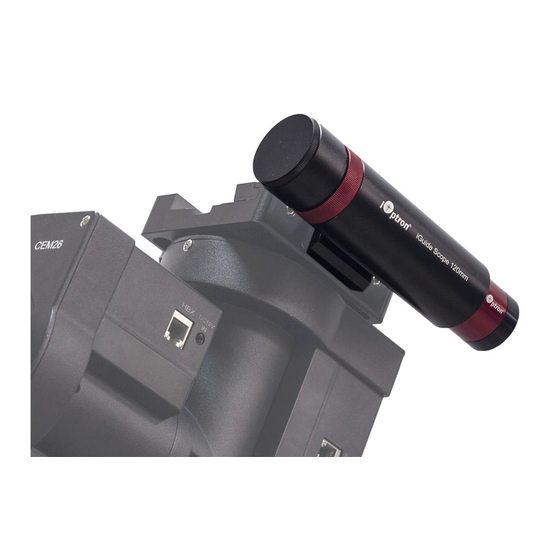
- Page 2 With dielectric AR-coated achromatic lenses, iGuider Scope is sharp in imaging and ensures high quality guiding. iGuider Scope can mate with iOptron CEM26/GEM28/CEM40/GEM45 mounts seamlessly without any adapter . It comes with a standard finder scope dovetail, readily fits with telescopes that have finder scope slot.
- Page 3 An iOptron mount that is ready to mate the iGuider system has two mounting holes on the side of the dovetail saddle, as shown below: Install the guiding scope dovetail saddle onto the mount saddle. Slide the guiding scope into the adapter and tighten the locking screw. Insert iGuider 1 camera into the end...
- Page 4 Click on iGuider ASCOM driver: Please follow mount computer control reference to make sure that a proper ASCOM Drive is installed for the mount. The example shown here is only for connecting via an iOptron mount. Setup PHD2 Guiding (example) Download freeware PHD2 autoguiding software from https://openphdguiding.org/downloads/.
- Page 5 Click on Next. Select “iOptron iGuider (ASCOM Camera)” from the camera selection menu. PHD2 will fill the pixel size (3.75um) automatically, if the camera is connected to the computer Enter 120mm into guide scope focal length tab, and click Next.
- Page 6 If the program displays the following error, please exit “iOptron iPolar” software. Select a mount that connected to the computer via ASCOM from the dropdown menu. Here “iOptron CEM120/70/40/26,GEM45/28 Mount (ASCOM)” is selected. A default guiding speed is 0.5X. Click Next.
- Page 7 Click on Guide/Connect Equipment and connect all the devices. To view the image via iGuider, check “Display Toolbar” and “Display Star Profile” in View menu. Select proper “Exposure Time” in Main tool bar and click on “Continues Exposure”, you should see star images in the main window.
- Page 8 You may also check the iGuider camera during daytime by checking Show Preview in iOptron iGuider ASCOM window. Adjust Exposure Time and focuser to show the image. iGuiding Focus Adjustment To adjust stand alone iGuider 1 focus: (1) Remove iGuider lens cover.
- Page 9 6.44 arcsec/pixel (coupled with iGuide Scope) Guiding method:Support Pulse Guiding (ASCOM Guiding), not support ST-4 Guiding iGuider ASCOM Driver https://www.ioptron.com/Articles.asp?ID=328 After install iGuider ASCOM Driver, you may connect the iGuider using any ASCOM compatible guiding software, not only the PHD2.
Need help?
Do you have a question about the iGuider 3360 and is the answer not in the manual?
Questions and answers