Advertisement
Table of Contents
- 1 Safety Information
- 2 Specifications
- 3 Basic Wiring Diagram
- 4 Description of Digital Keypad
- 5 How to Operate the Digital Keypad
- 6 Power Terminals
- 7 Control Terminal Wiring (Factory Setting)
- 8 Summary of Parameter Settings
- 9 Parameter Explanation
- 10 Factory Setting
- 11 Fault Codes
- 12 Dimensions
- Download this manual
Preface
Thank you for choosing DELTA's high-performance VFD-M Series. The VFD-M Series is
manufactured with high-quality components and materials and incorporates the latest microprocessor
technology available.
Getting Started
This quick start will be helpful in the installation and parameter setting of the AC motor drives. To
guarantee safe operation of the equipment, read the following safety guidelines before
connecting power to the AC motor drives. For detail information, refer to the VFD-M User Manual
on the CD supplied with the drive.
DANGER!
1.
AC input power must be disconnected before any wiring to the AC motor drive is made.
2.
A charge may still remain in the DC-link capacitors with hazardous voltages, even if the power
has been turned off. To prevent personal injury, please ensure that power has turned off before
opening the AC motor drive and wait ten minutes for the capacitors to discharge to safe voltage
levels.
3.
Never reassemble internal components or wiring.
4.
The AC motor drive may be destroyed beyond repair if incorrect cables are connected to the
input/output terminals. Never connect the AC motor drive output terminals U/T1, V/T2, and
W/T3 directly to the AC mains circuit power supply.
5.
Ground the VFD-M using the ground terminal. The grounding method must comply with the laws
of the country where the AC motor drive is to be installed. Refer to the Basic Wiring Diagram.
6.
VFD-M series is used only to control variable speed of 3-phase induction motors, NOT for 1-
phase motors or other purpose.
7.
VFD-M series shall NOT be used for life support equipment or any life safety situation.
WARNING!
1.
DO NOT use Hi-pot test for internal components. The semi-conductor used in AC motor drive
easily damage by high-pressure.
2.
There are highly sensitive MOS components on the printed circuit boards. These components
are especially sensitive to static electricity. To prevent damage to these components, do not
touch these components or the circuit boards with metal objects or your bare hands.
3.
Only quality person is allowed to install, wire and maintain AC motor drive.
CAUTION!
1.
Some parameters settings can cause the motor to run immediately after applying power.
2.
DO NOT install the AC motor drive in a place subjected to high temperature, direct sunlight,
high humidity, excessive vibration, corrosive gases or liquids, or airborne dust or metallic
particles.
3.
Only use AC motor drives within specification. Failure to comply may result in fire, explosion or
electric shock.
4.
To prevent personal injury, please keep children and unqualified people away from the
equipment.
5.
When the motor cable between AC motor drive and motor is too long, the layer insulation of the
motor may be damaged. Please use a frequency inverter duty motor or add an AC output
reactor to prevent damage to the motor. Refer to appendix B Reactor for details.
The rated voltage for AC motor drive must be ≤240V for 230V models (≤120V for 115V models,
6.
≤480V for 460V models, ≤600V for 575V models) and the mains supply current capacity must
be ≤5000A RMS (≤10000A RMS for the ≥40hp (30kW) models).
English-1
Advertisement
Table of Contents

Related Manuals for Delta VFD-M Series


Summary of Contents for Delta VFD-M Series
- Page 1 Ground the VFD-M using the ground terminal. The grounding method must comply with the laws of the country where the AC motor drive is to be installed. Refer to the Basic Wiring Diagram. VFD-M series is used only to control variable speed of 3-phase induction motors, NOT for 1- phase motors or other purpose.
- Page 2 Specifications Voltage Class 115V Class Model Number VFD-XXXM Max. Applicable Motor Output (kW) 0.75 Max. Applicable Motor Output (hp) 0.25 Rated Output Capacity (kVA) Rated Output Current (A) Maximum Output Voltage (V) 3-Phase proportion to twice the input voltage Output Frequency (Hz) 0.1~400 Hz Carrier Frequency (kHz) 1-15...
- Page 3 Voltage Class 575V Class Model Number VFD-XXXM Max. Applicable Motor Output (kW) 0.75 Max. Applicable Motor Output (hp) Rated Output Capacity (kVA) 12.2 Rated Output Current (A) 12.2 Maximum Output Voltage (V) 3-phase Proportional to Input Voltage Output Frequency (Hz) 0.1~400 Hz Carrier Frequency (kHz) 1-10...
- Page 4 General Specifications Self-testing, over voltage, over current, under voltage, overload, overheating, Protection Functions external fault, electronic thermal, ground fault. 6-key, 4-digit, 7-segment LED, 4 status LEDs, master frequency, output frequency, Display Keypads output current, custom units, parameter values for setup, review and faults, RUN, STOP, RESET, FWD/REV Built-in Brake Chopper Built-in for all models...
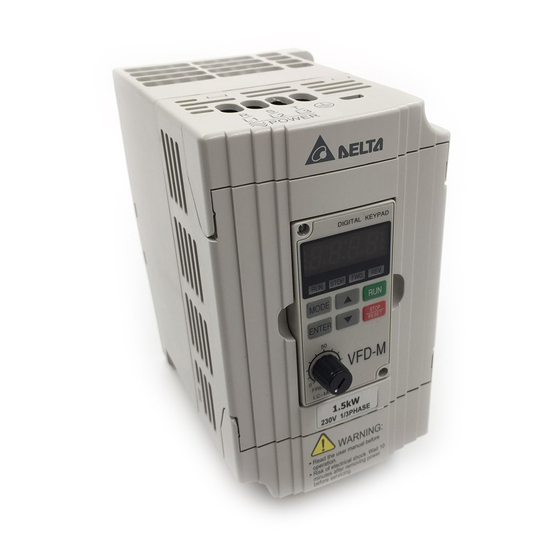
- Page 5 Description of Digital Keypad The digital keypad includes two parts: Display panel and keypad. The display panel provides the parameter display and shows the operation status of the AC drive and the keypad provides programming and control interface. DIGITAL KEYPAD LED Display Indicates motor and drive parameter.
- Page 6 Power Terminals Wire Max. Torque Gauge Current Model Name kgf-cm (input / (in-lbf) output) VFD002M11A 6A/1.6A 12-14 (3.3-2.1) VFD004M11A 9A/2.5A VFD007M11A 16A/4.2A 12 (3.3) VFD004M21A/21B 6.3A/2.5A VFD004M23A 3.2A/2.5A 12-14 (12) (3.3-2.1) VFD007M21A/21B 11.5A/5.0A VFD007M23A 6.3A/5.0A VFD015M21A/21B 15.7A/7.0A 12 (3.3) 12-14 VFD015M23A 9.0A/7.0A (3.3-2.1)
- Page 7 Terminal Explanations Terminal Symbol Explanation of Terminal Function R/L1, S/L2, T/L3 AC line input terminals (three phase) U/T1, V/T2, W/T3 Motor connections B1 – B2 Connections for brake resistor (optional) Earth Ground Control Terminal Wiring (Factory Setting) Wire Type: Copper Only Wire Type: 75 C, Copper Only Wire Gauge: 22-16 AWG Wire Gauge: 24-12 AWG...
- Page 8 Terminal Terminal Function Factory Settings (NPN mode) Symbol Multi-function auxiliary input M0~M5-GND Multi-function input 1 Refer to P38~P42 for programming the multi-function Multi-function input 2 inputs. Multi-function input 3 ON: the activation current is 10 mA. Multi-function input 4 OFF: leakage current tolerance is 10μA. Multi-function input 5 Common Signal +10V-GND...
- Page 9 SUMMARY OF PARAMETER SETTINGS : The parameter can be set during operation Factory Parameter Explanation Settings Customer Setting 00: Master frequency determined by digital keypad (LC-M02E) 01: Master frequency determined by 0 to +10 V input on AVI terminal with jumpers Source of Frequency 02: Master frequency determined by 4 to...
- Page 10 Factory Parameter Explanation Settings Customer Setting Pr.16 Jog Frequency 0.00 to 400.0 Hz 6.00 Pr.17 1st Step Speed Freq. 0.00 to 400.0Hz 0.00 Pr.18 2nd Step Speed Freq. 0.00 to 400.0Hz 0.00 Pr.19 3rd Step Speed Freq. 0.00 to 400.0Hz 0.00 Pr.20 4th Step Speed Freq.
- Page 11 Factory Parameter Explanation Settings Customer Setting 00: M0: FWD/STOP, M1: REV/STOP Multi-function Input 01: M0: RUN/STOP, M1: REV/FWD Pr.38 Terminal (M0,M1) 02: M0, M1, M2: 3-wire operation control mode 00: No Function 01: Output OFF (N.O.) (enabled when running) 02: Output OFF (N.C.) (enabled when running) 03: External Fault (normally open) N.O.
- Page 12 Factory Parameter Explanation Settings Customer Setting 00: AC Drive Operational 01: Maximum Output Frequency Attained 02: Zero Speed 03: Over-Torque Detection 04: Base-Block (B.B) Indication 05: Low Voltage Indication 06: AC Drive Operation Mode 07: Fault Indication 08: Desired Frequency Attained Multi-Function Output Pr.45 09: PLC Program Running...
- Page 13 Factory Parameter Explanation Settings Customer Setting Electronic Thermal Pr.59 30 to 300 sec Motor Overload 00: Over-Torque Detection Disable 01: Enabled during constant speed operation until the allowable time for detection (Pr.62) elapses. 02: Enabled during constant speed Over-Torque Detection Pr.60 operation and halted after detection.
- Page 14 Factory Parameter Explanation Settings Customer Setting 00: No fault occurred Pr.73 Present Fault Record 01: Over-current (oc) 02: Over-voltage (ov) Second Most Recent Pr.74 03: Overheat (oH) Fault Record 04: Overload (oL) 05: Overload 1 (oL1) 06: External Fault (EF) 07: CPU failure 1 (CF1) 08: CPU failure 3 (CF3) 09: Hardware Protection Failure (HPF)
- Page 15 Factory Parameter Explanation Settings Customer Setting Time Duration of 4th Pr.84 00 to 9999 sec Step Speed Time Duration of 5th Pr.85 00 to 9999 sec Step Speed Time Duration of 6th Pr.86 00 to 9999 sec Step Speed Time Duration of 7th Pr.87 00 to 9999 sec Step Speed...
- Page 16 Factory Parameter Explanation Settings Customer Setting 00: AVR function enabled Auto Voltage 01: AVR function disabled Pr.102 02: AVR function disabled when stops Regulation (AVR) 03: AVR function disabled when decel 00: Disable Auto tune Motor Pr.103 01: Auto tune for R1 Parameters 02: Auto tune for R1 + No Load testing Pr.104...
- Page 17 Factory Parameter Explanation Settings Customer Setting Pr.119 Differential Time (D) 0.00 to 1.00 sec 0.00 Integration’s Upper Pr.120 00 to 100 % 100 % Bound Frequency Pr.121 One-Time Delay 0.0 to 2.5 sec PID Frequency Output Pr.122 00 to 110 % Command Limit Feedback Signal 0.0: Disable...
- Page 18 Bias Frequency Width 0.00 to 400.0Hz 0.00 Pr.154 Reserved Compensation 0.0: Disable Pr.155 Coefficient for Motor 0.1 to 5.0 (recommended setting d2.0) Instability Communication Pr.156 0 to 200 (x500us) Response Delay Time Communication Mode 0: Delta ASCII Pr.157 Selection 1: Modbus English-18...
- Page 19 Fault Codes Fault Fault Descriptions Corrective Actions Name 1. Check whether the motors horsepower corresponds to the AC drive output power. 2. Check the wiring connections between the AC drive and Over current motor for possible short circuits. 3. Increase the Acceleration time (Pr.10, Pr.12). Abnormal increase 4.
- Page 20 Fault Fault Descriptions Corrective Actions Name 1. Short-circuit at motor output: Check for possible poor insulation at the output lines. 2. Torque boost too high: Decrease the torque compensation Over-current setting in Pr.54. during acceleration 3. Acceleration Time too short: Increase the Acceleration Time. 4.
- Page 21 Fault Fault Descriptions Corrective Actions Name CC (current clamp) OV hardware error GFF hardware error OV or LV Return to the factory. Current sensor error U-phase error W-phase error Phase Loss Check input phase wiring for loose contacts. Software Return to the factory. protection failure 1.
- Page 22 Unit: mm [inch] Model Name VFD022M21A, VFD037M23A/43A/53A, 125.0 110.0 220.0 205.0 15.0 166.3 VFD055M23A/43A/53A, [4.92] [4.33] [8.66] [8.07] [0.59] [6.55] [0.32] VFD075M43A/53A English-22...
Need help?
Do you have a question about the VFD-M Series and is the answer not in the manual?
Questions and answers