
Related Manuals for Pool Controls SWC Series

Summary of Contents for Pool Controls SWC Series
- Page 1 User Manual Saltwater & Mineral Chlorinators Head Office: 58 Prosperity Avenue, Wangara, WA 6065 Phone: +61 8 9240 4400 Web: poolcontrols.com.au Email: service@poolcontrols.com.au...
-
Page 3: Table Of Contents
Troubleshooting Advanced Settings Menu IMPORTANT If the power cord is damaged the unit must be returned to Pool Controls for repair. Always read the instructions and warnings on chemical containers before using chemicals. Never add salt/minerals before testing levels Serial Number........ -
Page 4: Manufacturers' Warranty
If a defect in workmanship or materials in any Pool Controls product covered by this warranty is discovered during the term of the warranty, and provided the warranty holder follows the procedure set out below, Pool Controls will repair or replace that item at the option of the warranty holder. - Page 5 CALL OUT FEES • This is a “Back to Base” Warranty, which means that if the Pool Controls product needs to be serviced, replaced or repaired at a place other than Pool Controls’ premises, a call out fee will be charged to cover the cost of travel by an authorised Pool Controls technician.
-
Page 6: What's In The Box
This free chlorine is a highly effective sanitiser for your pool. Your Pool Controls Chlorinator constantly adds a dose of chlorine to the water over the operating period of the system. The amount of chlorine added depends upon the cell output and the running time. -
Page 7: Initial Pool Balance
Initial pool balance Before you begin using the Chlorinator, make sure your pool water is balanced as follows: Salt and Minerals – only add salt/minerals after checking the levels For SG and SWC chlorinators there should be between 3000 and 5000ppm of TDS in the pool ideally 4000ppm. - Page 8 Minerals and pH: the magnesium in mineral salts can form a soft scale on the cell even though it is reversing polarity. This is minimised by keeping the pH at the lower range for your pool type. The use of hydrochloric acid is recommended for magnesium mineral systems.
-
Page 9: Installation Guide
Installation Guide Page 6... - Page 10 Choosing a good location Pool Controls chlorinators are manufactured from weather resistant materials and are designed for operation in full sun and rain. However, your machine will benefit if it is protected from the weather. Choose a well-ventilated area to allow for efficient cooling. Installing the unit in a hot and closed shed or box may lead to overheating and activate the internal protective thermal cut-out.
- Page 11 SWC Cell Cable Connection Installing the pH Control System Units with pH control have an injection fitting and a peristaltic pump which must be installed. Refer to the installation diagram on the next page for details. Position the dosing pump as indicated in the installation diagram, ensuring it is NOT too close to other equipment or power outlets (due to corrosive fumes from the acid).
- Page 12 Turn on the Power Supply, which will recognise that a pH Control System has been connected and when first installed the LCD will ask “dilute acid?” If full strength is to be used press “N”. If you are using diluted acid then press “Y”. (See page 17 and also Advanced Menu Settings Supplementary Manual for details of the Acid Dilution Menu) Page 9...
-
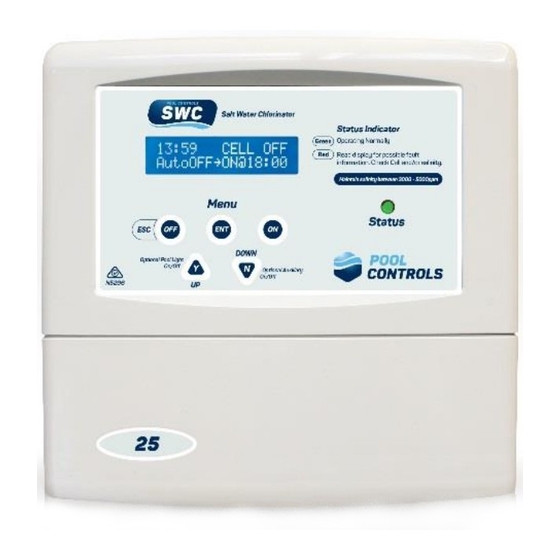
Page 13: Front Panel
Front Panel Display A two-line LCD display is used to provide the user with information. The first line of the display shows the current time and the cell status and output. In the example above the time is 10.15am and the Cell is “OFF”. If the Cell is on, the output of the Cell will be displayed. - Page 14 Increasing Manual Run-time in Hourly Increments: Press the ON button repeatedly (or hold the button down) to increase the manual run time in hourly increments. The run time is displayed on the LCD. When the desired run time has been reached, press the ENT button to confirm your selection and the system will commence operation.
-
Page 15: Navigating The Menu System
Timer Menu Setting the time Once you have installed your Pool Controls chlorinator and turned it on, you will need to check that the correct time is displayed on the LCD. You may need to adjust the factory pre-set time. - Page 16 Select this option by pressing ENT and the LCD will show the start (ON) time of the filter cycle being adjusted. Use the Y/UP and N/DOWN buttons to adjust the start time. Press ENT to confirm your selection and then the LCD will show the end (OFF) time for that filter cycle.
- Page 17 Light Timer Menu You can use your system to turn your pool or garden lighting on and off automatically, you can set the ON and OFF times using the light timer menu. Press ENT to access the Menu system. Press ENT again to select the TIMER menu and then scroll down using the N/DOWN button until LIGHT MENU is displayed on the LCD.
-
Page 18: Controlling Chlorine Residual
Controlling the Chlorine Residual There are two ways of controlling the amount of chlorine entering the pool – by altering the running times and by reducing the chlorine output. If the pool chlorine residual tests high you can reduce the operating time and/or decrease the output. If the chlorine residual tests low and the output is already at maximum you will need to increase the operating time and/or add supplementary chlorine. -
Page 19: Ph Control - Navigating The +Acid Menu
Navigating the +Acid Menu As chlorine is produced the pool pH will go up slowly. This can be offset by small doses of acid added to the pool. An algorithm calculates the amount of acid per dose that is needed to maintain the pH, and once the system has been adjusted to suit your pool, maintenance should be minimal. - Page 20 Automatically Dose Acid – the ADJUST AutoDOSE Sub- MENU Note: fibreglass and liner pools are unlikely to need to need adjustment of auto dose amounts. This sub-menu allows you to adjust the amount of acid added as an automatic dose. Adjustment of the DOSE# is in increments of 10. PressY/UP when Line 2 of the LCD asks “ADJUST Auto DOSE?”...
-
Page 21: Status Indicator, Warnings And Safety Shutdowns
Status Indicator, Warnings and Safety Shutdowns There is a STATUS indicator on the front panel that simply shows green (OK) and red (WARNING). The reason for any WARNING will be written on the LCD display. Possible warnings are explained below. Low Water Temperature &... - Page 22 The Status LED will alternate orange (red + green) when COVER is displayed. Operation Following a Power Failure Pool Controls’ chlorination systems come with a timer function built into the operating software. The timer is a 24-hour type with quartz-crystal control. This Timer is backed-up by a Real-Time Clock (RTC) similar to those found in computers.
-
Page 23: Maintenance
Maintenance Like all equipment your chlorinator will look better and last longer if it is maintained and operated in accordance with these instructions. Power Supply The Power Supply has been designed for operation in full sun and weather. However, it will benefit from being under cover. -
Page 24: Cell Cleaning
Cell Cleaning Pool Controls’ cells are self-cleaning, however, some conditions such as very hard water can cause the cell to become scaled over time. The self-cleaning system uses an electronic means (polarity reversal) to remove scale from its cathodes. This system works very well in most pools unless there is extreme hardness and/or mineral levels. -
Page 25: Troubleshooting
Trouble-shooting Before requesting service, you may wish to run through the check list below but feel free to call Pool Controls Service on +61 8 9240 4400 or log a service call via our website – www.poolcontrols.com.au. If there appears to be low or no Chlorine Residual: 1. -
Page 26: Advanced Settings Menu
Advanced Settings Menu If you are interested in learning more about the Advanced Settings, please download a copy of the Advanced Settings Supplementary User Manual from www.poolcontrols.com.au Advanced Settings comprise: • FULL MANUAL MODE – allows you to change from AUTO MODE •...
Need help?
Do you have a question about the SWC Series and is the answer not in the manual?
Questions and answers