Manta 5 HYDROFOILER XE-1 Quick Start Manual
Hide thumbs
Also See for HYDROFOILER XE-1:
- Owner's manual (24 pages) ,
- Initial assembly manual (16 pages) ,
- Tutorial (16 pages)
Advertisement
Quick Links
HYDROFOILER
Q U I C K S T A R T G U I D E
PLEASE REVIEW WARNINGS ON BACK PAGE.
1.
Charge your battery.
WARNING! - ALWAYS ENSURE:
Battery power is first switched OFF (there should not be an illuminated ring around the
switch) and then switch the battery ON.
WARNING! - RISK OF FIRE:
Lithium-ion battery packs can be dangerous if charged incorrectly. Use only the battery
charger supplied by Manta5 for charging the Hydrofoiler XE-1 lithium-ion battery.
Do not use the battery charger with any other batteries.
Never connect the charger to an unregulated generator.
Never let a battery be charged unattended. The battery and charger can get hot while
charging. Do not charge near any sources of heat, humidity or flammable materials and
never cover the charger or battery with clothes or other objects.
The battery will not charge if it is 0°C (32°F) or less and greater than 65°C (149°F).
CAUTION - RISK OF INJURY:
Do not allow children to handle the battery or charger.
XE-1
™
CYCLING'S NEW FRONTIER.
TOOL LIST
• 4 mm hex key
• 5 mm hex key
• 6 mm hex key
• 17 mm spanner
Advertisement

Related Manuals for Manta 5 HYDROFOILER XE-1


Summary of Contents for Manta 5 HYDROFOILER XE-1
- Page 1 WARNING! - RISK OF FIRE: Lithium-ion battery packs can be dangerous if charged incorrectly. Use only the battery charger supplied by Manta5 for charging the Hydrofoiler XE-1 lithium-ion battery. Do not use the battery charger with any other batteries. Never connect the charger to an unregulated generator.
- Page 2 HYDROFOILER XE-1 ™ Q U I C K S T A R T G U I D E Battery state of charge indications Once safely connected by ensuring that the red dot is not visible. Now, turn the battery on to charge.
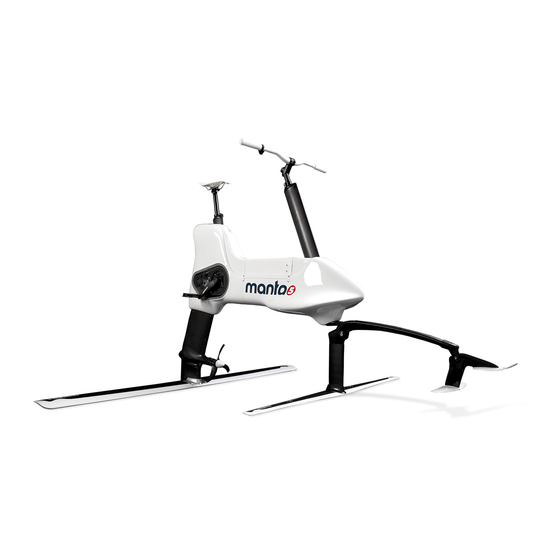
- Page 3 Turn bike upside down. Attach rear foil using 6 mm hex key . Attach the front tiller to the steering fork by tightening the countersunk screw into nylock nut (use 5 mm hex key).
- Page 4 HYDROFOILER XE-1 ™ Q U I C K S T A R T G U I D E Rotate Hydrofoiler into upright position. Check for ‘flanged bushings and hex block press-fitted into the propeller. Attach propeller using a 17 mm spanner. NYLOC NUT PROPELLER (DP00032) (HP00063 M10)
- Page 5 Install battery into battery tray and Perform a function check - ensure battery secure using 4mm hex key. is off, turn pedals two full rotations and feel WARNING: Do not connect resistance. the battery without ensuring that the battery is off. Next, turn the battery on and re-perform Check saddle height and stem length.
- Page 6 HYDROFOILER XE-1 ™ Q U I C K L A U N C H G U I D E Platform launch CHALLENGE LEVEL 1. Place Hydrofoiler into the water at jetty 4. Using your dominant foot, give a big push off edge.
- Page 7 Beach Launching- Solo CHALLENGE LEVEL 1. Once familiar with the assisted beach launch 3. Once you find your balance here, begin technique try solo launching. pedalling as you shift your weight forward launching yourself and the bike to get up and 2.
- Page 8 WARNING USE OF THIS PRODUCT AND PARTICIPATION IN THE SPORT INVOLVES INHERENT RISKS OF INJURY OR DEATH. TO REDUCE RISKS: • Ride in water conditions that do not exceed the skills of the rider. • Riders should remain within reasonable swimming distance to shore at all times. •...
Need help?
Do you have a question about the HYDROFOILER XE-1 and is the answer not in the manual?
Questions and answers