Manta 5 HYDROFOILER XE-1 Initial Assembly Manual
Hide thumbs
Also See for HYDROFOILER XE-1:
- Owner's manual (24 pages) ,
- Tutorial (16 pages) ,
- Quick start manual (8 pages)
Table of Contents
Advertisement
Quick Links
ENGLISH - ORIGINAL INSTRUCTIONS:
This manual was drafted in English language and may have been translated
into other languages (Translation of the original instructions) accompanying the original instructions.
AS00009 REV 2 MANTA5 XE-1 INITIAL ASSEMBLY GUIDE
1 | AS00009 REV 1 MANTA5 XE-1 INITIAL ASSEMBLY GUIDE
Advertisement
Table of Contents

Related Manuals for Manta 5 HYDROFOILER XE-1


Summary of Contents for Manta 5 HYDROFOILER XE-1
- Page 1 ENGLISH - ORIGINAL INSTRUCTIONS: This manual was drafted in English language and may have been translated into other languages (Translation of the original instructions) accompanying the original instructions. AS00009 REV 2 MANTA5 XE-1 INITIAL ASSEMBLY GUIDE 1 | AS00009 REV 1 MANTA5 XE-1 INITIAL ASSEMBLY GUIDE...
- Page 3 WE ENCOURAGE YOU TO VISIT OUR WEB SITE WWW.MANTA5.COM FOR A DIGITAL VERSION OF THIS MANUAL AND UPDATED TECHNICAL SUPPORT INFORMATION. WARNING USE OF THIS PRODUCT AND PARTICIPATION IN THE SPORT INVOLVES INHERENT RISKS OF INJURY OR DEATH. TO REDUCE RISKS: •...
-
Page 4: Table Of Contents
....................................... . . 3.3.8 UPRIGHTING THE HYDROFOILER XE-1 CAREFULLY RESTING ON ITS FOILS . -
Page 5: Part 1. Introduction
2.1 INTRODUCTION to your ride location. More complete product information is located within the Hydrofoiler XE-1 Your Hydrofoiler XE-1 arrives fitted with the motor, battery tray and battery as Owners Manual document. well as the rear buoyancy modules. The following is the basic layout of this document in order to complete the initial... -
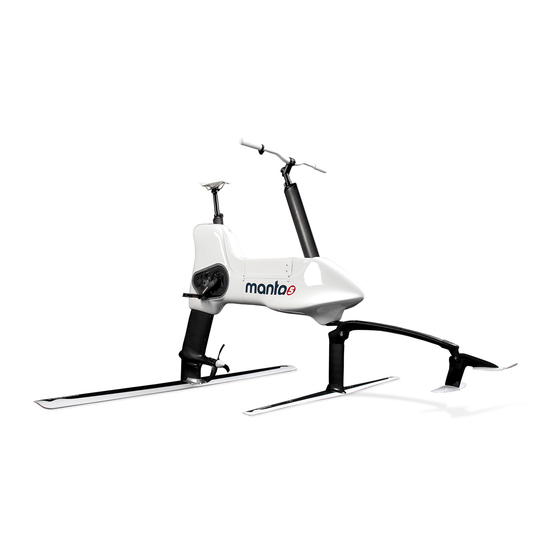
Page 6: Hydrofoiler Xe-1 Parts Map & List
2.3 HYDROFOILER XE-1 PARTS MAP & LIST Common Parts List: IMAGE COMMON NAME PART NO Front buoyancy modules BA00001 (RH) BA00002 (LH) Rear buoyancy modules BA00003 (RH) BA00004 (LH) Buoyancy clips - short BP00004 (Black) Buoyancy clips - long BP00003... - Page 7 Rear foil WA00004 Front foil WA0003 Mini tiller WP00008, WP00009, WP00010, WP00011, WP00012 Front tiller assembly WA00005 Steering fork SA00001 Battery EA00001 Propeller drive shaft DA00005 Propeller DA00011 Hex block DP00030...
- Page 8 Propeller nose cone DP00031 Grintech battery charger EA00049 Seat and seat post assembly HA00016 8 | AS00009 REV 1 MANTA5 XE-1 INITIAL ASSEMBLY GUIDE...
-
Page 9: Part 3. Hydrofoiler Xe-1 Pre-Assembly
Never strain to lift, manoeuvre or handle the items or the Hydrofoiler XE-1. NOTICE: Take care to place the Hydrofoiler XE-1 in a location where it won’t be accidentally knocked over or blown over in the wind. -
Page 10: Attach The Front Tiller Section
Now that the rear foil is attached and the Hydrofoiler XE-1 is upright, it is more stable and you can continue with the assembly. 3.3.9 ATTACH THE FRONT BUOYANCY MODULES... -
Page 11: Install The Pedals
Offer up the left hand front buoyancy module making sure to engage the male bullet shape pin guide fasteners with their female counterparts. This is easiest done by holding the lower edge outward and again engaging the top edge of the buoyancy under the battery tray lip. -
Page 12: Part 4. Battery Configuration And Pairing
Lithium-ion battery packs can be pedals coming loose during your ride. dangerous if charged incorrectly. Use only the battery charger supplied by Manta5 for charging the Hydrofoiler XE-1 lithium- ion battery. PART 4. BATTERY CONFIGURATION AND PAIRING WARNING! - RISK OF FIRE: Do not use the Manta5 battery charger with any other batteries. -
Page 13: Pairing Garmin® Ebike Remote
On the GARMIN® eBike remote, hold two keys simultaneously until the status LED starts alternating green and red, and release the keys. The remote searches for your Hydrofoiler XE-1. After the remote pairs successfully, the status LED flashes green 6 times. After the remote is paired, it FAST CHARGE connects to your XE-1 whenever it is in range and turned on. -
Page 14: Part 5. Install The Propeller
PART 6. DISSASSEMBLY FOR TRANSPORT The Hydrofoiler XE-1 is modular to enable easy transportation. When transporting the Hydrofoiler XE-1 there are items that will need to be removed INFORMATION: Requires 17 mm spanner. to enable safe and easy transportation. These items are detailed below: 6.2.1 DISCONNECT &... -
Page 15: In-Car Transportation
6.2.5 IN-CAR TRANSPORTATION For in-car transportation please go to HYDROFOILER XE-1 OWNERS MANUAL SECTION 2.6 TRANSPORTATION AND HANDLING. - Page 16 WWW.MANTA5.COM...
Need help?
Do you have a question about the HYDROFOILER XE-1 and is the answer not in the manual?
Questions and answers