Table of Contents
Advertisement
Advertisement
Table of Contents

Related Manuals for Center 374


Summary of Contents for Center 374
- Page 1 Data Logger THERMOMETER SE-374...
-
Page 2: Table Of Contents
6.8 External DC 9V power supply jack…………………......... 5 6.9 Using the offset to compensate for probe errors…………………....5 7. Data Logger………………………………………………………...……………….. 6 8. Setting the Time…………………………………………………………......7 9. Power Preparation…………………………………………………………………..7 10. Testlink SE-374 Software………………………………………………….……..8 11. Maintenance .…….……………………………………………………………….…… 16... -
Page 3: General Description
DATALOGGER THERMOMETER 1. GENERAL DESCRIPTION Thank you for choosing our Data Logger thermometer. To ensure the safety and the best performance of this instrument, we recommend you to read and follow the manual carefully before any operation. Measurement settings and results are shown on the backlit LCD panel. Data can be stored in the meter or directly saved on a computer through PC interface. -
Page 4: Specifications
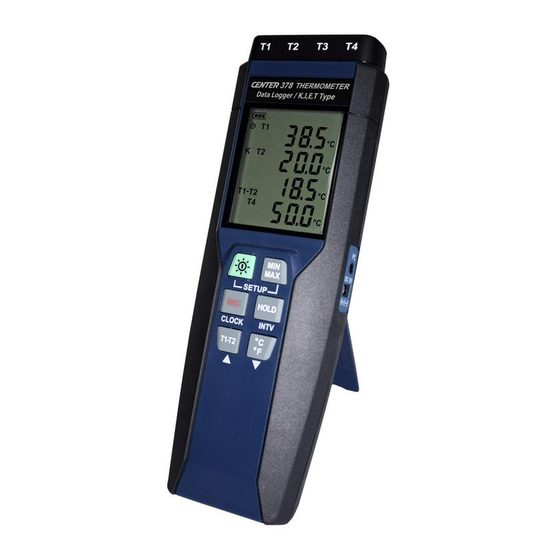
DATALOGGER THERMOMETER 4. SPECIFICATIONS Measurement range: - 200 to +1372°C (- 328 to +2501°F) 0.1°C/°F < 1000∘, 1°C/°F ≧1000∘ Resolution: ±(0.1% of reading+0.7°C) Accuracy: ±(0.1% of reading+1.4°F) Temperature coefficient: 0.01% of reading + 0.05°C per °C (<18°C or >28°C) Sample rate: 1 times per second Battery type:... - Page 5 DATALOGGER THERMOMETER ○ ○ Thermocouple input DATA HOLD button ○ ○ Display screen °C , °F button ○ ○ Power ON/OFF and Back light button PC Interface ○ ○ REC button External DC 9V power supply jack ○ ○ T1-T2 button Tilt stand ○...
-
Page 6: Operation Instructions
DATALOGGER THERMOMETER 6. OPERATION INSTRUCTIONS 6.1 Power ON/OFF & Backlight Operation: 6.1.1 Power on/off: Press the button to turn on the unit. To turn the unit off, press and hold button down until the screen shows “OFF 3, 2, 1,” then the LCD screen goes off. Note: When the unit is on, the LCD will show the following initial information before entering the main function: Current date/time Available memory... -
Page 7: Data-Hold Mode
DATALOGGER THERMOMETER (4) Press button again, the MAX and MIN symbol blinks together. The reading shows present T1 temperature. (5) Press button again, MAX symbol lights up, and the mode returns to (1). To exit: Press and hold button for 2 seconds to stop storing maximum and minimum and average data. -
Page 8: Data Logger
DATALOGGER THERMOMETER 7. DATA LOGGER This section will explain how to store data (data logger) in memory and how to recall data from memory. 7.1 Setting interval time for data storing: (1) Turn off the unit. (2) Enter SETUP mode by pressing and holding button and then press power button to turn on the unit. -
Page 9: Setting The Time
DATALOGGER THERMOMETER 8. SETTING DATE AND TIME The unit incorporates a clock so that the data logger function can also record the data and time along with the measurement value in the memory. 8.1 Setting date and time: (1) Turn off the unit. (2) Enter SETUP mode by pressing and holding button and then press... -
Page 10: Testlink Se-374 Software
At least 50 MB hard disk space available to install SE374 Recommended screen resolution 1024X768 or above 10.4 Install SE-374 and USB-120 connector driver: (1) We recommend close all other application before installing SE374. (2) Insert setup CD disk to CD disk drive to display install screen. You may also run mainsetup.exe in the directory of the CD. - Page 11 DATALOGGER THERMOMETER (8) After finish installing USB-120 connector driver, it will install SE374 software automatically. It will copy SE374.exe ( executable file ) and help file to your hard disk ( default is c:\program files\SE374) (9) After finish installation, plug USB-120 connector to PC usb port, execute ”start”→...
- Page 12 DATALOGGER THERMOMETER (5) When the connection is successful, click “Real Time | run” or from main menu to start recording real time data and there will be a waveform on the Real Time Graph Window. (6) Click “Real Time | Stop” or to stop recording.
- Page 13 DATALOGGER THERMOMETER 10.7 How to load the recorded data from the memory of 4 Channel Thermometer and save it to a file? (1) Power on the 4 Channel Thermometer. (2) Press the REC button of the meter to start recording data. (3) After a while, press REC button again to stop recording data.
- Page 14 DATALOGGER THERMOMETER DataLogger: By opening the DataLogger Window, the user can load recorded data of meter to PC in this window. Output To Graph - Graphing tabular data. 10.8 DataLogger: When you have 4 Channel Thermometer Data Logger meter connected to PC and select "DataLogger"...
- Page 15 DATALOGGER THERMOMETER It will transfer first data set to graph and tabular on the right hand side every time after you load recorded data from the meter and you can click at any data set to change the set for graph.
- Page 16 DATALOGGER THERMOMETER - Seperate the four channel. - Combine the four channel. -Graph Customization -Change the Y axis extention Note: When the Split is unchecked, graph will use T1 as the Y axis display range.
- Page 17 DATALOGGER THERMOMETER -To Undo the Zoom You can Zoom this graph by using mouse: To Zoom: (1) Press the left mouse button and drag the cursor to select the new extents. (2) Release the mouse button. You can choose channel number showing in the graph. a.
-
Page 18: Maintenance
DATALOGGER THERMOMETER (2) How can I save the graph to a file which can be used in EXCEL? Answer: When you save a graph to a file, the default file format is "*.ghf" and you can select *.csv to save files. CSV is an EXCEL file format.You can open it in EXCEL. Note: If decimal separator is comma in your country, this file format will be disabled, because .CSV file also use comma to be data separator. - Page 20 CENTER TECHNOLOGY CORP. 4F, NO.415, Jung-Jeng Rd., Shu-Lin Dist., New Taipei City 238, Taiwan TEL: 886-2-26763926 E-Mail : center@centertek.com FAX: 886-2-26763925 http : / / www.centertek.com GCA000374-02000...
Need help?
Do you have a question about the 374 and is the answer not in the manual?
Questions and answers