Table of Contents
Advertisement
Available languages
Available languages
Quick Links
Installation Instructions
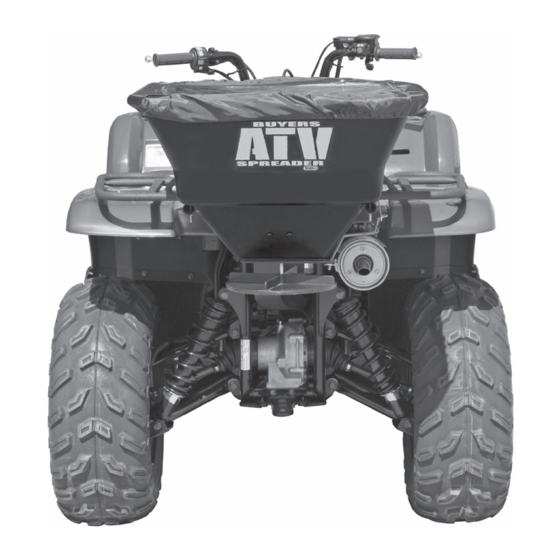
ATVS100 ATV Spreader
A multipurpose spreader designed to distribute
feed, seed, and other free flowing materials while
mounted on an ATV.
Mounting Instructions
1. Use (4) M6 x 20 bolts, flat washers and locknuts
to attach the Motor Assembly to the Hopper (as
shown in fig. 1).
2. Put connector end of the motor wire through the
hole in the Hopper and insert the grommet to keep
material from falling out
3. Use a cotter pin to attach the Spinner Disc to the
motor shaft (as shown in fig. 1).
4. Use (4) M6 x 40 bolts and locknuts to attach the
Hopper Assembly to the straight Frame pieces (as
shown in fig. 2)
5. Place spreader on ATV and use M6 x 40 bolts to
attach the Crossmember. You may need to feed the
straight frame sections through the rack's upright
crossmember.
6. Make sure the Frame and Crossmember line
up with sections of the ATV's rack. (There are
two mounting positions for the crossmember. Use
whichever lines up best with a section of the rack)
7. Fasten spreader frame to the ATV rack using the
U-bolts, washer plates, lock washers and jam nuts.
8. Use (2) M6 x 40 bolts and locknuts to attach
Control Plate to frame
9. Insert bent end of Control Rod into restrictor
plate and then insert flattened end into the control
handle
10. Use the wing nut to attach Control Handle to
Control Plate
11. Insert carriage bolt, plastic spacer and wing
nut into the Control Plate to provide a stop for the
Control Handle
12. Connect Wire Harness to motor and then plug
the accessory adapter into the ATV's accessory plug
Phone (440) 974-8888 • Fax 800-841-8003
Email: orders@buyersproducts.com • buyersproducts.com
Vehicle tailpipe temperatures can exceed 500° F. Ensure that
the vehicle tailpipe is properly shielded so that material
cannot contact or rest on any portion of the exhaust system.
Operating Instructions
1. Close the Restrictor Plate completely by pushing
the Control Handle forward. Load material into the
Hopper and put on the Rain Cover. Turn the "ON/
OFF" switch to the "ON" position. While moving,
use the Control Handle to open the Restrictor Plate
and begin spreading material.
2. Adjust the opening of the Restrictor Plate using
the wing nut and plastic spacer to increase or
decrease the amount of material being spread.
PLEASE NOTE
1. Take precautions to operate the ATV in a safe manner.
Follow precautions and guidelines as outlined in the ATV
Owner's Manual.
2. Spinner should rotate counter clockwise.
3. In the event the spreader motor is not operating, check
fuse in accessory adaptor and replace if blown.
4. Clean the hopper and brackets after use. Some material
can cause corrosion to metal parts, thus reducing the life of
the Spreader Assembly.
9049 Tyler Blvd. • Mentor, Ohio 44060
WARNING
—continued on back
Advertisement
Table of Contents

Subscribe to Our Youtube Channel
Related Manuals for Buyers ATVS100


Summary of Contents for Buyers ATVS100
- Page 1 9049 Tyler Blvd. • Mentor, Ohio 44060 Phone (440) 974-8888 • Fax 800-841-8003 Email: orders@buyersproducts.com • buyersproducts.com Installation Instructions ATVS100 ATV Spreader A multipurpose spreader designed to distribute feed, seed, and other free flowing materials while mounted on an ATV.
- Page 2 fig. 1 FASTEN MOTOR ASSEMBLY TO THE HOPPER (4x M6x20) USE FLAT WASHERS WITH M6 LOCKING NUTS TO SECURE MOTOR ASSEMBLY TO HOPPER INSERT THIS END OF CONTROL ROD INTO THE RESTRICTOR PLATE, THEN INSERT OTHER END INTO GROMMET ON MOTOR WIRE CONTROL HANDLE MUST BE INSERTED INTO THIS HOLE TO PREVENT MATERIAL...
- Page 3 fig. 2 ATTACH SPREADER FRAME TO ATV RACK USING U-BOLTS 4X M6X40 TO MOUNT HOPPER TO FRAME MOUNTING OPTIONS FOR CROSSMEMBER (USE SAME HOLE, A OR B, ON M6X40 BOTH SIDES) (2X) M6X40 M6X40 SPINNER SHOULD ROTATE COUNTER CLOCKWISE. ATTACH CONTROL ROD HERE AFTER OTHER END IS ATTACHED TO THE RESTRICTOR PLATE USE (2) M6X40 BOLTS TO...
-
Page 4: Bill Of Materials
Normal wear is excluded. The sole responsibility of 3008795 Frame, Crossmember Buyers Products Co. under this warranty is limited to repairing or 3008803 Control Handle replacing any part or parts which are returned, prepaid, and are... -
Page 5: Instrucciones De Instalación
9049 Tyler Blvd. • Mentor, Ohio 44060 Teléfono (440) 974-8888 • Fax 800-841-8003 Correo electrónico: orders@buyersproducts.com • buyersproducts.com Instrucciones de instalación ATVS100 Esparcidor de vehículo todo terreno Esparcidor para usos múltiples diseñado para esparcir alimentos, semillas y otros materiales de flujo libre mientras está... - Page 6 Fig. 1 FIJE EL ENSAMBLAJE DEL MOTOR EN LA TOLVA (4 VECES, M6x20) USE LAS ARANDELAS PLANAS CON LAS TUERCAS DE SEGURIDAD M6 PARA FIJAR EL INSERTE ESTE ENSAMBLAJE DEL EXTREMO DE LA MOTOR EN LA BARRA DE CONTROL TOLVA EN LA PLACA DE RETENCIÓN Y LUEGO INSERTE EL...
- Page 7 Fig. 2 UNA EL MARCO DEL ESPARCIDOR CON EL BASTIDOR DEL VEHÍCULO TODO TERRENO CON LOS TORNILLOS EN U 4 VECES M6X40 PARA MONTAR LA TOLVA AL MARCO OPCIONES DE MONTAJE DEL TRAVESAÑO (USE EL MISMO ORIFICIO, A O B, M6X40 EN AMBOS LADOS) (2 VECES) M6X40...
-
Page 8: Lista De Materiales
Marco, travesaño la garantía. Está excluido el desgaste normal. La única responsabilidad que 3008803 tendrá Buyers Products Co. bajo esta garantía se limitará a reparar o sustituir Palanca de control cualquier pieza o piezas que se devuelvan, se hayan pagado anticipadamente... -
Page 9: Instructions D'installation
9049 Tyler Blvd. • Mentor, Ohio 44060, États-Unis Tél. : 1-440-974-8888 • Téléc. : 1-800-841-8003 Adr. électronique : orders@buyersproducts.com • buyersproducts.com Instructions d’installation Épandeur pour VTT ATVS100 Un épandeur à usages multiples conçu pour distribuer de la moulée, des semences et d’autres matières s’écoulant librement lorsqu’il est monté sur un VTT. - Page 10 Figure 1 FIXER LE BLOC MOTEUR À LA TRÉMIE (4x M6X20). UTILISER DES RONDELLES PLATES AVEC DES ÉCROUS DE BLOCAGE M6 POUR FIXER LE BLOC MOTEUR À LA TRÉMIE. INSÉRER LE BOUT DE LA TIGE DE COMMANDE DANS LA PLAQUE DE LE PASSE-FIL SUR LE CÂBLE RÉDUCTION, PUIS DU MOTEUR DOIT ÊTRE...
- Page 11 Figure 2 FIXER LE CADRE ÉPANDEUR AU CADRE DU VTT À L’AIDE DE BOULONS EN U. 4X M6X40 POUR MONTER LA TRÉMIE SUR LE CADRE. OPTIONS DE MONTAGE M6X40 POUR TRAVERSE (UTILISER LE MÊME TROU, A OU B, DES DEUX CÔTÉS) (2X) M6X40 M6X40 LE DISQUE D’ÉPANDEUR...
-
Page 12: Garantie
DESCRIPTION 3008791 Trémie Garantie 3008792 Plaque de réduction La société Buyers Products Co. garantit que tout le matériel pour 3007863 Disque d’épandeur camion ou remorque qu’elle fabrique ou distribue est exempt de 3008793 Moteur, ATVS100 défauts de matériaux et de fabrication, pendant une période d’un an...
Need help?
Do you have a question about the ATVS100 and is the answer not in the manual?
Questions and answers