Comau E.DO Service Manual
Hide thumbs
Also See for E.DO:
- User manual (66 pages) ,
- Safety requirements, technical features and assembly and integration instructions (28 pages)
Table of Contents
Advertisement
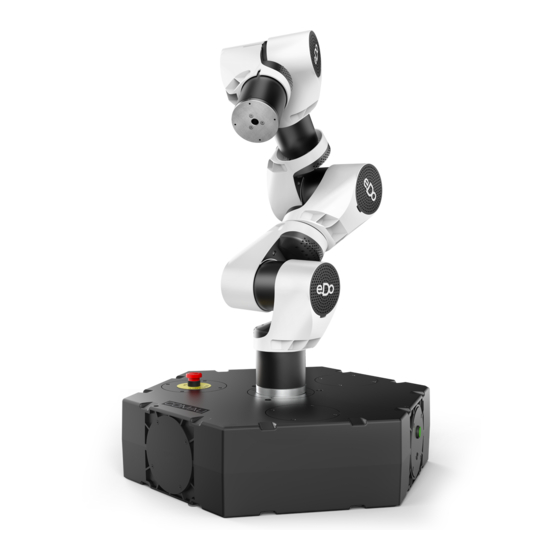
e.DO Robot
Rel. 00 - Versions
- 6 central axes
- 6 side axes
- 6 central axes, with Gripper
- 6 side axes, with Gripper
Service Manual
- Detailed technical characteristics of the Robot
- Robot configuration customization
- Robot maintenance
- Methods and procedures for contacting the
Service Center
- Instructions for decommissioning and disposal of
the Robot
CR00758211-en_00/2019.04
Advertisement
Table of Contents

Related Manuals for Comau E.DO


Summary of Contents for Comau E.DO
- Page 1 Robot Rel. 00 - Versions - 6 central axes - 6 side axes - 6 central axes, with Gripper - 6 side axes, with Gripper Service Manual - Detailed technical characteristics of the Robot - Robot configuration customization - Robot maintenance...
- Page 2 The contents of this handbook are the property of COMAU S.p.A. Any reproduction, even partial, is prohibited without prior written authorization from COMAU S.p.A. COMAU S.p.A. reserves the right to modify, without notice, the features of the product presented in this hand- book.
-
Page 3: Table Of Contents
Flange hole diagram for e.DO Gripper fixing ........32... - Page 4 List of allowed and not-allowed operations, in order to preserve the warranty ... . . 58 HOW TO CONTACT THE COMAU SERVICE CENTER ......59 Main steps to be followed in the event of Robot malfunctioning or anomaly .
- Page 5 TO WHOM IS THIS HANDBOOK ADDRESSED? This handbook is addressed to a trained personnel authorized to carry out maintenance, assembly/disassembly of components, and customization of e.DO configuration. It contains technical information useful and necessary for the correct performance of the...
- Page 6 Comau Robotics Product Instruction PREFACE PREFACE This chapter contains: – Documentation storage – Limits on the handbook contents – Symbols used in the handbook – Modification History.
-
Page 7: Documentation Storage
All documents supplied with e.DO must be stored in the immediate vicinity of the area in which e.DO is in use and kept available to all persons operating on the machine. The documentation must be kept intact for the entire operational life of e.DO. - Page 8 Comau Robotics Product Instruction MODIFICATION HISTORY MODIFICATION HISTORY The following table shows the history of the Handbook release, with related changes / improvements made. Edition of the Date Contents Handbook 2019/03 00/2019.03 First release of the handbook 2019/04 00/2019.04 Improvement of paragraphs related to “Control Switch”...
-
Page 9: Safety Requirements
Comau Robotics Product Instruction SAFETY REQUIREMENTS SAFETY REQUIREMENTS Carefully read this document before carrying out any operation on the Robot. Comau will not be responsible for any damages or injuries caused by improper/unauthorized installations, uses or operations carried out on the Robot. -
Page 10: Detailed Technical Features Of The Robot
Comau Robotics Product Instruction DETAILED TECHNICAL FEATURES OF THE ROBOT DETAILED TECHNICAL FEATURES OF THE ROBOT The following paragraphs contain the main detailed technical features of the Robot: – Robot workspaces, calibration and transport position – Robot wrist features... -
Page 11: Robot Workspaces, Calibration And Transport Position
– Robot workspaces in configuration of 6 axes - e.DO standard – Robot workspaces in configuration of 6 axes - e.DO standard with e.DO Gripper – Robot workspaces in configuration of 6 axes - e.DO Offset –... - Page 12 Comau Robotics Product Instruction DETAILED TECHNICAL FEATURES OF THE ROBOT Fig. 2.1 - Robot workspaces in configuration of 6 axes - e.DO standard Calibration Position Calibration Position Ax.5 Ax.3 Ax.2 261.3 261.3 +/-179° Ax.6 +/-179° Ax.1 -179° +179° * = Calibration position...
- Page 13 Comau Robotics Product Instruction DETAILED TECHNICAL FEATURES OF THE ROBOT Fig. 2.2 - Robot workspaces in configuration of 6 axes - e.DO standard with e.DO Gripper Dimensions in millimetres...
- Page 14 Comau Robotics Product Instruction DETAILED TECHNICAL FEATURES OF THE ROBOT Fig. 2.3 - Robot workspaces in configuration of 6 axes - e.DO Offset Ax.5 Ax.3 Ax.2 261.3 261.3 +/-179° Ax.6 +/-179° Ax.1 -179° +179° * = Calibration position Dimensions in millimetres...
- Page 15 Comau Robotics Product Instruction DETAILED TECHNICAL FEATURES OF THE ROBOT Fig. 2.4 - Robot workspaces in configuration of 6 axes - e.DO Offset with e.DO Gripper * = Calibration position Dimensions in millimetres...
- Page 16 Comau Robotics Product Instruction DETAILED TECHNICAL FEATURES OF THE ROBOT Tab. 2.1 - Calibration and transport position for Robot in configuration of 6 axes (central and side) Joints in calibration position Axis 1 Axis 2 Axis 3 Axis 4 Axis 5 Axis 6 0°...
-
Page 17: Robot Wrist Features
Comau Robotics Product Instruction DETAILED TECHNICAL FEATURES OF THE ROBOT 2.2 Robot wrist features The following drawings and graphs show the main Robot technical features: – Diagram of holes on Robot flange for tool fixing – Wrist loads 2.2.1 Diagram of holes on Robot flange for tool fixing Fig. - Page 18 Comau Robotics Product Instruction DETAILED TECHNICAL FEATURES OF THE ROBOT On the Robot flange there is also a special information label, showing data useful for correctly fixing the tool on the flange itself. In particular, there is shown the maximum length of the screws to be used, depending on the thickness of the flange of the tool to be fixed.
-
Page 19: Wrist Loads
Comau Robotics Product Instruction DETAILED TECHNICAL FEATURES OF THE ROBOT 2.2.2 Wrist loads Max load (Q ) applicable to the flange is defined depending on the Lz and Lxy coordinates of the load barycentre (P), represented in the following figure. -
Page 20: Robot Configuration Customization
Comau Robotics Product Instruction ROBOT CONFIGURATION CUSTOMIZATION ROBOT CONFIGURATION CUSTOMIZATION – Use of connectors on Robot base – Hardware customization – Software customization... -
Page 21: Use Of Connectors On Robot Base
Connection of any additional emergency push-buttons, Connection of any interlocking devices associated with guards or for Connecting e.DO to Desk Simulator and use through Teach Pendant TP5. For details on the pinout and how to use the 9-pin D-Sub connector, refer to par. 3.2... -
Page 22: Hardware Customization
– e.DO Marker Holder assembly – Connecting e.DO to Desk Simulator and use through Teach Pendant TP5 3.2.1 Connection of any additional emergency push-buttons The Robot is equipped for connection of additional emergency devices, through “E-Stop” input on a specific connector (used also for Connecting e.DO to Desk Simulator... - Page 23 Comau Robotics Product Instruction ROBOT CONFIGURATION CUSTOMIZATION Fig. 3.3 - “E-Stop” input connection diagram - side e.DO Hexagonal base (internal connections) E-stop Mating connector Tab. 3.1 - Connector pinout (pins relative to the input for additional emergency push-buttons connection) Name / function...
-
Page 24: Connection Of Any Interlocking Devices Associated With Guards
The “Fence” input opening makes the Robot to stop safely. If not used, the “Fence” input must be closed again with a special cap connector. The following figure shows the diagram of the “Fence” input connection. Fig. 3.4 - “Fence” input connection diagram - central e.DO Hexagonal base (internal connections) Fence... - Page 25 Comau Robotics Product Instruction ROBOT CONFIGURATION CUSTOMIZATION Fig. 3.5 - “Fence” input connection diagram - side e.DO Hexagonal base (internal connections) Fence Mating connector Tab. 3.2 - Connector pinout (pins relative to the input for guard interlocking devices connection) Name / function...
-
Page 26: Simultaneous Connection Of Additional Emergency Push-Button And Interlocking Device
Comau Robotics Product Instruction ROBOT CONFIGURATION CUSTOMIZATION 3.2.3 Simultaneous connection of additional emergency push-button and interlocking device associated with guards The simultaneous connection of the additional emergency push-button and interlocking device associated with guards can be carried out by wiring both devices on the 9-pole D-Sub connector as shown in the previous par. -
Page 27: E.do Gripper Assembly
Gripper diagrams and drawings – e.DO Gripper connection electrical circuit diagram – Equipment and material required – e.DO Gripper installation procedure – Check of the correct functioning after the installation – Arrangement for integration of perimeter guards for use of the e.DO Gripper... -
Page 28: Packaging Removal And Preliminary Checks
1 socket hex head screw M3x8 for fixing the guard from the motor side (already screwed on the guard) – q.ty 2 socket hex head screws M3x10 for fixing of the e.DO Gripper to the Robot (captive, already screwed on the e.DO Gripper) –... - Page 29 – after removing the packaging, make sure the e.DO Gripper does not show signs of damage during transport; if it does, do not install the e.DO Gripper and contact the Comau Service Centre (see Chap.5. - How to contact the Comau Service Center on page 59);...
-
Page 30: E.do Gripper Diagrams And Drawings
– Flange hole diagram for e.DO Gripper fixing 3.2.4.2.1 e.DO Gripper mechanical drawings (dimensions, workspaces) The following drawings show the dimensions of the e.DO Gripper (dimensions in mm): – Dimensions of open e.DO Gripper – Dimensions of closed e.DO Gripper Fig. - Page 31 Comau Robotics Product Instruction ROBOT CONFIGURATION CUSTOMIZATION Fig. 3.9 - Dimensions of closed e.DO Gripper...
-
Page 32: Flange Hole Diagram For E.do Gripper Fixing
Flange hole diagram for e.DO Gripper fixing The following drawing shows the diagram of holes present on the e.DO Gripper flange to be used for the e.DO Gripper fixing to the e.DO Robot (dimensions in mm). Fig. 3.10 - Flange hole diagram for e.DO Gripper... -
Page 33: E.do Gripper Connection Electrical Circuit Diagram
Gripper connection electrical circuit diagram In the following diagram there are given the electrical connections necessary to be performed on the e.DO Gripper electronic board (PCB), in order to allow its correct operation. Fig. 3.11 - Electrical diagram of e.DO Gripper connection... -
Page 34: Equipment And Material Required
For e.DO Gripper installation the following equipment is necessary: – e.DO Gripper – q.ty 2 hex spacers M3 l=12 (included and already screwed on the e.DO Gripper) – q.ty 2 socket hex head screws M3x10 (included and already screwed on the e.DO Gripper) –... -
Page 35: E.do Gripper Installation Procedure
Comau Robotics Product Instruction ROBOT CONFIGURATION CUSTOMIZATION 3.2.4.5 e.DO Gripper installation procedure The installation procedure of the e.DO Gripper on the e.DO Robot is given below. Operating procedure Through the app, move the e.DO Robot calibration position. Representative figure illustrating e.DO Robot in calibration position. - Page 36 (D) (CAN SUPP and CAN SIGN) of the CAN network connection cable and power supply cable (E) (included with e.DO Gripper) inside the hole of the last Robot joint, as indicated by the arrow in the figure. Remove the two connectors from the hole of the last Robot joint.
- Page 37 Insert the end with 2 connectors (D) (CAN SUPP and CAN SIGN) of the CAN network connection cable in the hole (G) present at the e.DO Gripper base. Representative figure Unscrew the four screws (H) (2 socket hex head screws M3x10...
- Page 38 M3x8 and remove the plastic protective cover of the e.DO Gripper rear side. Using a 2.5 mm Allen wrench, fix the e.DO Gripper to the flange of the last Robot joint using 2 screws (K) M3x10 (side opposite to the electronic PCB board).
- Page 39 Connect the 2 connectors (P) (2 PIN) and (Q) (4 PIN) of the power supply cable terminating resistor respectively to the connectors (S) and (T) of the e.DO Gripper electronic board (PCB), as shown in the figure. SUPPLY BUS OUT BUS OUT...
- Page 40 (PCB) fixing it with the 2 socket hex head screws M3x10. Reposition the plastic protective cover of the e.DO Gripper rear area, fixing it with the socket hex head screw (J) M3x8. During the repositioning of the plastic protective cover, pay particular attention not to pinch the cables.
- Page 41 (W) M3x8. Tighten the screws to a 0.5 Nm torque. After the mechanical installation of the e.DO Gripper, it is necessary to perform some identification and setup operations via dedicated app (see par. 4.5 e.DO configuration on page...
-
Page 42: Check Of The Correct Functioning After The Installation
ROBOT CONFIGURATION CUSTOMIZATION 3.2.4.6 Check of the correct functioning after the installation Before proceeding with the use of e.DO equipped with the e.DO Gripper, it is necessary to check the correct functioning: – connect e.DO to the power supply mains and perform the power-up;... -
Page 43: Arrangement For Integration Of Perimeter Guards For Use Of The E.do Gripper
Gripper diagrams and drawings; – Fig. 2.1 - Robot workspaces in configuration of 6 axes - e.DO standard on page – Fig. 2.2 - Robot workspaces in configuration of 6 axes - e.DO standard with e.DO Gripper on page –... - Page 44 Comau Robotics Product Instruction ROBOT CONFIGURATION CUSTOMIZATION Fig. 3.12 - Example of perimeter protective guards installation 1220 Minimum dimensions of perimeter protective guards; dimensions in mm – A: Perimeter protective guards (to be carried out by the User) – B: Safety limit switch to control the correct positioning of the guard (to be installed by the User) –...
-
Page 45: E.do Marker Holder Assembly
• q.ty 1 marker holder (CR82435502) – q.ty 4 socket hex head screws M3x8 (with as many washers) for fixing the e.DO Marker Holder directly to the e.DO flange Fig. 3.13 - Content within the e.DO Marker Holder packaging View... -
Page 46: Equipment And Material Required
– after removing the packaging, make sure the e.DO Marker Holder does not show signs of damage during transport; if it does, do not install the e.DO Marker Holder and contact the Comau Service Centre (see Chap.5. - How to contact the Comau Service Center on page 59);... -
Page 47: E.do Marker Holder Installation Procedure
ROBOT CONFIGURATION CUSTOMIZATION 3.2.5.3 e.DO Marker Holder installation procedure This procedure is valid only for the installation of the e.DO Marker Holder on a Robot without e.DO Gripper. The installation procedure of the e.DO Marker Holder on an e.DO Robot without e.DO Gripper is given below. - Page 48 ROBOT CONFIGURATION CUSTOMIZATION Operating procedure (Continued) Fix the base flange (A) of the e.DO Marker Holder on the e.DO flange (B), using 4 socket hex head screws (E) M3x8 and interposing the corresponding washers, supplied with the e.DO Marker Holder.
-
Page 49: Connecting E.do To Desk Simulator And Use Through Teach Pendant Tp5
Simulator and e.DO. 3.2.6.2 Procedure for connecting e.DO to the Desk Simulator Below is the procedure for connecting e.DO to the Desk Simulator in order to make it possible to control it through the Teach Pendant TP5. Operating procedure Make sure that e.DO and the Desk Simulator are powered off. - Page 50 3.5 First power-up of the Robot on page 23 of the User Manual. Perform Configuration and connection of the command interface (tablet) (connection to the Wi-Fi network, select the e.DO configuration) as indicated in User Manual. Perform e.DO calibration as indicated in the User Manual.
- Page 51 Perform the calibration of the virtual machine as indicated below; the following steps will allow you to align the position of e.DO virtual model present in the Simulated Desk to the actual position of the previously calibrated “physical” Robot. Failure to carry out the...
- Page 52 Comau Robotics Product Instruction ROBOT CONFIGURATION CUSTOMIZATION Operating procedure (Continued) Confirm with “OK”. MOVE instruction moving to $CAL_SYS position is indicated in the “Execute” field. Confirm the execution of the instruction by pressing “Exec” on the lower left side of the window.
- Page 53 Comau Robotics Product Instruction ROBOT CONFIGURATION CUSTOMIZATION Operating procedure (Continued) Connect the network cable (F) between e.DO (RJ45 connector on Robot base) and Desk Simulator (RJ45 connector identified with the abbreviation ETH). On “Home Page” of the Teach Pendant, press on the RJ45 connector icon with the IP address next to it.
- Page 54 •Subnet Mask 255.255.255.0 •Gateway 10.42.0.40 In case of changes to IP addresses, take into consideration the following: –the IP addresses of e.DO and the Desk Simulator must be different, but belonging to the same subnet; –DHCP is not present; –in the previous steps t.
- Page 55 Comau Robotics Product Instruction ROBOT CONFIGURATION CUSTOMIZATION Operating procedure (Continued) It will now be possible to carry out e.DO movement through the Teach Pendant TP5. Check Robot proper functioning: • provide the “DRIVE ON” to the Robot by holding one...
-
Page 56: Software Customization
Comau Robotics Product Instruction ROBOT CONFIGURATION CUSTOMIZATION 3.3 Software customization e.DO is equipped with Open Source Software which can then be modified and customized by the user. The user has the right to customize the following 2 software “macro blocks”, in accordance with the authorizations established by the relevant user licenses: –... -
Page 57: Robot Maintenance
List of allowed and not-allowed operations, in order to preserve the warranty 4.1 Signalling LEDs meanings On the electronic control board of each e.DO joint there are signalling LEDs, whose lighting can be used to identify any anomalies or faults on the board itself. -
Page 58: List Of Allowed And Not-Allowed Operations, In Order To Preserve The Warranty
The execution of any operation / modification to the Robot not indicated in this paragraph or not authorized in writing by Comau, entails the forfeiture of the warranty. The operations indicated below refer to the main elements that make up the e.DO Robot: –... -
Page 59: How To Contact The Comau Service Center
4.1 Signalling LEDs meanings on page 57 of this handbook; – lastly, if the anomaly could not be resolved, a physical inspection on the Robot will be necessary, to be carried out by the Comau technicians at a Comau Centre... -
Page 60: Assistance And Maintenance Interventions During Warranty Period
(as indicated in the previous par. 5.1) by its Technicians, Comau may propose: – a repair or replacement offer, or – to send a part or the whole S/N to a Comau Centre for further information. Shipping costs are charged to the Customer. -
Page 61: Robot Repackaging Procedure And Shipping To Comau For Technical Assistance
The procedure described in the following paragraphs describes the correct positioning inside the original packaging (for shipment to Comau for assistance) and the operations to be carried out if the Robot presents damage such as to prevent its movement in transport position. -
Page 62: Robot Disassembly And Repackaging Procedure
Comau Robotics Product Instruction HOW TO CONTACT THE COMAU SERVICE CENTER 5.4.2 Robot disassembly and repackaging procedure This procedure requires the reuse of the e.DO original box and packaging. Operating procedure Before proceeding with the disassembly, make sure that you have: –powered off the Robot... - Page 63 Comau Robotics Product Instruction HOW TO CONTACT THE COMAU SERVICE CENTER Operating procedure (Continued) Disconnect the connectors (B) “BRAKE”, “P. SUPPLY” and “CAN BUS” from the e.DO arm. Position the base of e.DO inside the appropriate housing in the original packaging.
- Page 64 Comau Robotics Product Instruction HOW TO CONTACT THE COMAU SERVICE CENTER Operating procedure (Continued) Position a suitable protective packaging over the base (e.g. bubble wrap sheet) then position the e.DO arm inside the box, protecting it with the packaging, as shown in the figure.
-
Page 65: Decommissioning And Disposal
Comau Robotics Product Instruction DECOMMISSIONING AND DISPOSAL DECOMMISSIONING AND DISPOSAL The disposal operations must be carried out in compliance with the law in force in the country where the machine is installed: dispose of the batteries, electronic boards and various components in an environmentally correct way and in accordance with the regulations in force transferring them to the appropriate collection facilities. - Page 66 Comau Robotics Product Instruction DECOMMISSIONING AND DISPOSAL...
- Page 68 Original instructions Made in Comau...
Need help?
Do you have a question about the E.DO and is the answer not in the manual?
Questions and answers