Dürr Technik SICOLAB mini ENDO Installation And Operating Instructions Manual
Hide thumbs
Also See for SICOLAB mini ENDO:

Related Manuals for Dürr Technik SICOLAB mini ENDO


Summary of Contents for Dürr Technik SICOLAB mini ENDO
- Page 1 SICOLAB mini ENDO Installation and operating instructions 1015100100L02 ...
-
Page 3: Table Of Contents
Contents Quick-release coupling – operat- ing panel ....13 Establishing the compressed air Important information connection ....13 About this document . -
Page 4: Important Information
Important information About this document The signal word differentiates between four levels of danger: These installation and operating instructions – DANGER represent a part of the unit. They correspond to Immediate danger of severe injury or death the relevant version of the unit and the status of –... -
Page 5: Copyright Information
2.1 Intended purpose The unit is an oil-free compressor for com- 1.2 Copyright information pressed air. SICOLAB mini ENDO is intended to be used with attachments for the drying of MIC All names of circuits, processes, names, soft- instruments and their accessories, including... -
Page 6: Specialist Personnel
The original packaging provides optimum pro- 2.7 Essential performance charac- tection for the unit during transport. teristics The SICOLAB mini ENDO unit does not have Dürr Technik will not accept any respon- any essential performance characteristics in ac- sibility or liability for damage occurring cordance with EN/IEC 60601-1 section 4.3. -
Page 7: Disposal
Important information Ambient conditions during storage and transport Ambient conditions during storage and transport temperature °C -20 to +70 Rel. humidity 0 to 99 Air pressure 100 to 1100 Please refer to the labels on the packaging pad- ding. 2.11 Disposal Unit The unit must be disposed of properly. -
Page 8: Product Description
Fuses (mains fuse) SICOLAB mini ENDO ........ -
Page 9: Accessories For The Compressed Air Pistol
Product description 3.3 Accessories for the compressed air pistol The compressed air pistol is available as an accessory for SICOLAB mini ENDO units and is operated with compressed air. Operating instructions for safe handling of the compressed air pistol and cleaning and repro- cessing instructions are available as a download "Operating instructions for cleaning pistols... -
Page 10: Technical Data
Product description Technical data 4.1 Basic data Electrical data SICOLAB mini ENDO 1015100001 Electrical frequency Nominal voltage Rated power P1 (kW) Nominal current Nominal pressure bar / MPa 1 / 0.1 1 / 0.1 Mains fusing General data Pressure vessel volume... -
Page 11: Eu Declaration Of Conformity
D-74321 Bietigheim-Bissingen Reference number: 1015 Article designation: SICOLAB mini ENDO From the serial number: 000000000 We hereby declare that the product described above conforms to the requirements of the valid ver- sion of the Medical Devices Directive 93/42/EEC. The conformity procedure was carried out in ac- cordance with Council Directive 93/42/EEC, Annex VII (class I medical device). -
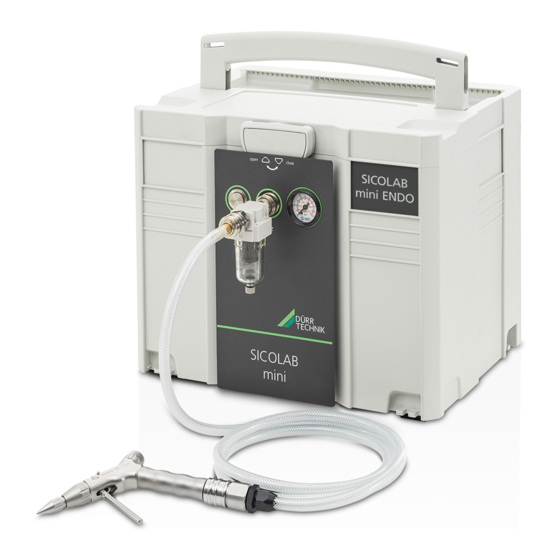
Page 12: Operation
When the cut-off pressure is reached, the unit is automatically switched off. A safety valve prevents the maximum permissible vessel pressure from being exceeded. 5.1 Unit details Figure 2: SICOLAB mini ENDO – view of the front Quick-release coupling On/Off switch 10 Pressure gauge... -
Page 13: Type Plate
Product description Type plate The type plate is located on the rear of the unit. REF Order number Serial number This information is also required when order- ing spare parts. 1015100100L02 1910V003... -
Page 14: Assembly
Assembly Requirements The unit must only be operated on a stable, even base. The unit must not be used as a 7.1 Installation/setup room climbing aid. Danger of breakage! Place a col- lector tray under the condensate drain (14) on The room chosen for set up must fulfil the fol- the rear of the unit to collect any condensate lowing requirements: that is blown out. -
Page 15: Commissioning
Assembly Commissioning 8.4 Condensate When air from the surrounding atmosphere is 8.1 Remove the packaging compressed, different amounts of condensate The unit is securely protected with packaging will accumulate in the pressure vessel depend- material to ensure safe transportation. ing on the humidity and temperature of the air. This condensate is collected via the integrated Remove the packaging material. -
Page 16: Overtemperature Protection
Assembly 8.7 Checking the safety valve DANGER The safety valve must be checked to establish Risk of electric shock due to dam- aged power cord or plug that it is working correctly when the unit is start- ed up for the first time. Electric shocks can cause severe inju- ries. -
Page 17: Usage
Usage Operation Protect the unit against moisture, dirt and ex- treme temperatures during transport (refer to Prior to working on the unit or in case of the section on "Ambient conditions"). danger, disconnect it from the mains. Only store the unit when it has been com- pletely emptied. -
Page 18: Notes On The Compressed Air Pistol
Risk of material damage due to at- tachments becoming detached from The compressed air pistol is available as the compressed air pistol during an accessory for SICOLAB mini ENDO operation. units and is operated with compressed If the attachments become detached air. -
Page 19: Setting The Pressure Reducer
Usage 9.5 Setting the pressure reducer The compressed air connection to the pressure reducer has a constant pressure of 1 bar (set at the factory). Pressure reducer Quick-release coupling On/Off switch 10 Pressure gauge The pressure reducer (5) regulates the desired working pressure at the quick-release coupling (8). -
Page 20: Maintenance
Usage 10 Maintenance De-energise the unit prior to working on it or in the event of potential danger (e. g. pull the mains plug) and prevent it from being switched back on again. Perform an inspection and maintenance no later than after one year or 5000 operating hours. If needed, service the unit at shorter intervals. -
Page 21: Disinfecting And Cleaning The Sur
Usage 10.2 Disinfecting and cleaning the surfaces The surface of the unit can be disinfected with disinfectant wipes. Preparations from the group of surface disinfectants should be used for this purpose. For reasons of materials compatibility, preparations based on the following agents are suitable: - Aldehydes - quaternary ammonium compounds. -
Page 22: Troubleshooting
Troubleshooting 11 Tips for operators and service technicians Perform an inspection and maintenance no later than after one year or 5000 operating hours. If needed, service the unit at shorter intervals. Maintenance and repair work may be done only by Dürr Technik or Dürr Technik-qualified per- sonnel/service engineers. -
Page 23: Contact
Contact 12 Addresses 12.1 Returns / Repairs Dürr Technik GmbH & Co. KG Pleidelsheimer Straße 30 74321 Bietigheim-Bissingen -Germany- WARNING Risk of explosion of the pressure tank and pressure hoses The pressure tank and the pressure hoses must be vented before they are stored or trans- ported. - Page 24 Dürr Technik GmbH & Co. KG Pleidelsheimer Strasse 30 74321 Bietigheim-Bissingen Germany Fon: +49 7142-90 22 -0 www.duerr-technik.com office@duerr-technik.de...
Need help?
Do you have a question about the SICOLAB mini ENDO and is the answer not in the manual?
Questions and answers