
Related Manuals for HBX SNO-0550


Summary of Contents for HBX SNO-0550
- Page 1 Installation Manual Snow Melt Unit 0550 Version 2.14.1 SNO-0550 HBX Control Systems Inc.
-
Page 2: Table Of Contents
WiFi Settings....................13 WiFi Network Setup................... 14-17 Connecting to a Wireless Network iOS........... 14-15 Connecting to a Wireless Network Android.......... 16-17 Adding the SNO-0550 to the HBX App........... 18 HBX App Functionality................19 Sample Wiring and Diagrams..............20-21 Troubleshooting Guide................22-23 Testing and Troubleshooting Procedure.......... -
Page 3: Introduction
QR CODE Each SNO-0550 is labeled with a QR code, which when scanned will link to a digital version of this manual. If this manual is ever lost or damaged, simply scan this with a compatible device to download the latest manual version. -
Page 4: Description
The SNO-0550 can also be controlled remotely using your smartphone or tablet device with the free HBX ThermoLinx App. The ThermoLinx App allows you to control your snow melt system with the ability to set snow fall rates, adjust/monitor targets, set slab demands , and the ability to turn on/off your snow melt system anytime, anywhere. -
Page 5: Technical Data And Dimensions
Front View Rear View Top View 66 mm 70.19 mm (2.60 in) (2.76 in) 188 mm 167 mm (7.40 in) (6.57 in) Bottom View 121 mm 100 mm (4.76 in) (3.94 in) © HBX Control Systems Inc. 2020 Page 3... -
Page 6: Wiring
Mounting Holes • Identify the four mounting holes on the SNO-0550, mark on the wall the desired location of mounting. • Predrill, anchor and fasten four screws for mounting. -
Page 7: Status Screen
Check the wiring of the control. Refer to testing procedure on page 23, and inspect the SNO-0110 Sensor for signs of damage or improper drainage. Reset control when issue has been corrected to eliminate error code. © HBX Control Systems Inc. 2020 Page 5... -
Page 8: Status & Mode Descriptions
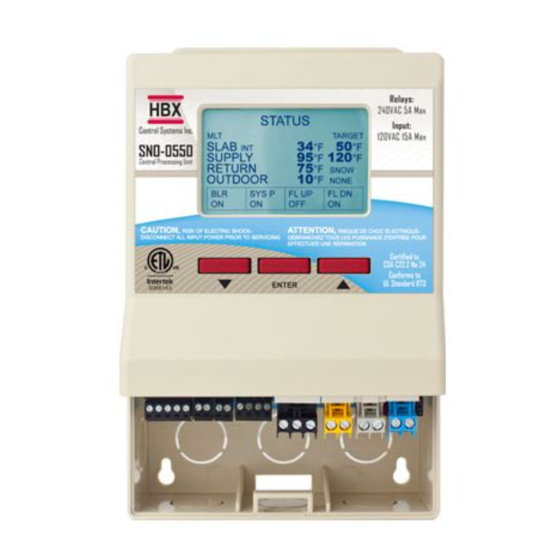
CONTROL SETUP Multicolour backlit Display Relays: 240VAC 5A Max STATUS The Multicolour Backlit Display is one of the key features Input: of the HBX Controls stand-alone SNO-0550 Control. TARGET 120VAC 15A Max SLAB °F °F SNO-0550 Depending on which mode of operation is selected the SYSTEM °F... -
Page 9: Navigating The Sno-0550
H B X S N O - 0 5 5 0 S n o w M e l t C o n t r o l V e r s i o n 2 . 1 4 . 1 NAVIGATING THE SNO-0550 Relays: All programming steps within the SNO-0550 240VAC 5A Max STATUS are achieved by using the three buttons (and... -
Page 10: Snow Rate Settings
H B X S N O - 0 5 5 0 S n o w M e l t C o n t r o l V e r s i o n 2 . 1 4 . 1 PROGRAMMING GUIDE 1) SNOW RATE Snow Rate Setup SETUP MENU... -
Page 11: Design Temperature Settings
°F DESIGN TEMPERATURES 50°F 2) MIN SYSTEM 0°F 5) CWSD This is used to set the temperature in which the SNO-0550 will go into WWSD. If the 25°F 1) DELTA T 120°F 3) MAX SYSTEM 6) °C OR °F °F DESIGN TEMPERATURES outdoor temperature rises above this temperature, the control will turn OFF. -
Page 12: Slab Settings
H B X S N O - 0 5 5 0 S n o w M e l t C o n t r o l V e r s i o n 2 . 1 4 . 1 3) SLAB SETTINGS Slab Setup SETUP MENU This setting is used to configure your slab options. -
Page 13: System Settings
SYSTEM SETUP 2) DEMAND 2) DESIGN TEMPS 6) WIFI FORCE MELT 4) SYSTEM SETUP you connect the return and supply sensors to the SNO-0550 as it will not SLAB INTO MELT MODE 3) SLAB SETUP 1) MIXING INJECTION 5) TESTING function without these installed. - Page 14 H B X S N O - 0 5 5 0 S n o w M e l t C o n t r o l V e r s i o n 2 . 1 4 . 1 5) TESTING Testing Setup SETUP MENU This setting is used to test and view functionality of the control.
-
Page 15: Wifi Network Setup
3) SCAN FOR NETWORKS 4) SEND TO WIFI SYNC-CODE ACPU-1234 SETUP WIFI SYNC-CODE ACPU-1234 1) SSID SETUP WIFI © HBX Control Systems Inc. 2020 Page 13 2) PASSWORD 1) SSID SETUP WIFI 3) SCAN FOR NETWORKS 2) PASSWORD 1) SSID... - Page 16 AB12 3) SCAN FOR NETWORKS WIFI SETTINGS screen. CONNECTION should change from WIFI to SERVER. Once this 2) SETUP WIFI 4) SEND TO WIFI happens the SNO-0550 is now connected to the network. 3) CONNECTION READY SYNC-CODE ACPU-1234 SYNC-CODE ACPU-1234...
- Page 17 2. Add the name of your SNO-0550. Leave this option blank if the SNO-0550 itself is already displaying a name. 1) PASSWORD AB12 2) SETUP WIFI 3. Enter sync code for SNO-0550 Control. The sync code can be found in the Wifi Setup Menu on the SNO- 3) CONNECTION READY 0550.
-
Page 18: Hbx App Functionality
This allows you to turn Melt Mode off. 4. Advanced Settings Allows you to have access to all the settings on the SNO-0550 control including snow rate setup, Design temperatures, Slab and System setup. A contractor code is required for Advanced Settings. Contact HBX Technical Support for this code. - Page 19 WIRING DIAGRAMS 1) Snow Melt with Injection Mixing and WiFi Connection SNO-0550 Central Processing Unit DO NOT DO NOT CONNECT 24 VAC MAX CONNECT POWER POWER HERE HERE 12 13 PW TM TM TM System Pump System Sensor Return Sensor...
- Page 20 3) Snow Melt with Floating Action Valve Mixing Central Processing Unit SNO-0550 DO NOT DO NOT CONNECT 24 VAC MAX CONNECT POWER POWER HERE HERE 12 13 PW TM TM TM System Pump System Sensor Return Sensor Optical Sensor Boiler...
-
Page 21: Troubleshooting Guide
Display button is stuck Switching Display Screen is Flickering • Up/down/enter button is stuck Control does not power up • Check power supply (120V) Damaged PCB. Resolution: contact HBX Technical Support. • © HBX Control Systems Inc. 2020 Page 19... - Page 22 H B X S N O - 0 5 5 0 S n o w M e l t C o n t r o l V e r s i o n 2 . 1 4 . 1 SNO-0550 TROUBLESHOOTING GUIDE ISSUE POSSIBLE CAUSES &...
-
Page 23: Testing And Troubleshooting Procedure
SNO-0110 Sensor for signs of damage or improper drainage. Reset control when issue has been corrected to eliminate error code. For additional assistance with the SNO-0550, please contact our Technical Support Department toll free at: +1 (855) 410-2341 ©... - Page 24 Limitation of Liability In no event will HBX be liable for any damages, including loss of data, loss of profits, costs of cover or other incidental, consequential or indirect damages arising out of the installation, maintenance, commissioning, performance, failure or interruption of an HBX product, however caused and on any theory of liability.
- Page 25 H B X S N O - 0 5 5 0 S n o w M e l t C o n t r o l V e r s i o n 2 . 1 4 . 1 Notes: © HBX Control Systems Inc. 2020 Page 23...
- Page 26 H B X S N O - 0 5 5 0 S n o w M e l t C o n t r o l V e r s i o n 2 . 1 4 . 1 Notes: Page 24...
- Page 27 H B X S N O - 0 5 5 0 S n o w M e l t C o n t r o l V e r s i o n 2 . 1 4 . 1 Notes: © HBX Control Systems Inc. 2020 Page 25...
- Page 28 Phone: +1 (403) 720-0029 Fax: +1 (403) 720-0054 Email: info@hbxcontrols.com Web: www.hbxcontrols.com Toll Free Technical Support: +1 (855) 410 2341 HBX Control Systems Inc. 4516 - 112 Avenue SE © HBX Control Systems Inc. 2020 Calgary, AB Canada T2C 2K2...
Need help?
Do you have a question about the SNO-0550 and is the answer not in the manual?
Questions and answers