Sylvac -SCAN S145 Quick Start Manual
Optical measuring machines
Hide thumbs
Also See for SYLVAC-SCAN S145:
- Automation manual (40 pages) ,
- Automation manual (40 pages)

Related Manuals for Sylvac SYLVAC-SCAN S145


Summary of Contents for Sylvac SYLVAC-SCAN S145
- Page 1 Quickstart SYLVAC-SCAN S145 & S145L Optical measuring machines Original version drafted in French...
- Page 2 QUICKSTART...
-
Page 3: Table Of Contents
1.3.5. Removing the security parts (locking for transport) 1.4. Electrical connections 2. Safety advice 3. Overview and configuration 4. Quickstart of the Sylvac-Reflex SCAN+ Software 4.1 Software 4.2. Calibration of the tailstock 5. Maintenance and servicing 6. Packing up the machine (moving or sending the machine) 6.1 Secure the moving parts... -
Page 4: Unpacking And Installation Of The Machine
QUICKSTART 1. UNPACKING AND INSTALLATION OF THE MACHINE The procedures of this quickstart are valid for the machines Sylvac SCAN S145 and S145L. 1.1. Necessary material for the installation Strap L=2m, weight 1000kg Screwer and nozzle Torx Tx20 Allen key 12mm Allen key 10-1.5mm... -
Page 5: Depalletising Methods
The machine is lifted by a strap. 1.3.1.1 Commissioning The SYLVAC-SCAN S145(L) can be lifted with the dedicated loops and a strap device. Ensure that general and local accident prevention regulations are complied with. The removal of the side skirts has to be done after the unpacking (magnet fasteners). -
Page 6: Depalletising With Crutches (Without Bridge Crane Or Elevator)
QUICKSTART 1) Preparation : setting the two 2) Lifting the machine : 3) Remove the pallet. provided loops (M20). use appropriate straps (L=2m / weight >1000kg, not provided). Figures 4 Once suspended, remove washers (used for securing machine to pallet) from under machine. The machine is suspended and ready for the options A or B (see point 1.3.3) 1.3.2. - Page 7 QUICKSTART STEP B) STEP C) 1) Insert the 4 crutches in the 1) Uncoupling the machine/ dedicated channels until the pallet by unscrewing the 4 ’’STOP’’ marks. locking nuts M12 linking the machine to the pallet. Figures 6 STEP D) 1) Set the backing plate on 2) Set the crutch in manual 3) Operate the crutches with...
-
Page 8: Options A Or B
QUICKSTART Result Front view Side view Figures 9 The machine is suspended on the crutches and is ready for the alternative A or B. 1.3.3. Options A or B A) The machine can be installed on the delivered table an be moved where you want (moving of the complete group machine + table). - Page 9 QUICKSTART STEP 2 Result (has to be done on the 3 feets) : Screw the 3 feets out until you get an overta- king between 10 and 12 mm from the base. Figures 11 STEP 3 Unpacking, preparation and fairing of the table Unpack the table 1) Packed table.
- Page 10 QUICKSTART 2) Move the table from the pallet to the ground by flipping up the tubular frame (has to be done by 2 persons) 3) Unscrew the 4 lateral back screws, then slide all the fairing forward, as a drawer principle. Figures 13 4) Remove completly the fairing to manipulate the table with a pallet truck or elevator.
- Page 11 QUICKSTART The table is ready to be manipulated with a pallet truck or an elevator lengthwise or laterally and on the both sides. Lengthwise case Lateral case Figures 16 INSTALLATION OF THE TABLE UNDER THE SUSPENDED MACHINE ON CRUTCHES OR ON PALLET TRUCK/ELEVATOR 1) Bring the table under the ma- 2) Setting the table in front of the 3) Set the table, put it in contact...
- Page 12 QUICKSTART 1.3.3.3 Alternative B Moving the machine alone (without table) with a pallet truck or other device. Depending on your device, two cases are possible : 1) When using a pallet truck --> Get down the machine until it touches the base and delight the crutches to disassemble them.
-
Page 13: Procedure Of Levelling The Machine
QUICKSTART 1.3.4. Procedure for levelling the machine This procedure is also valid for the pre-assembled group machine + table. Remove access panel in stand / machine for cable access Insert PC, add cables and route for connecting machine & screen to PC Add back panel / base Position in final location Then level the system... - Page 14 1.3.4.2. Sylvac Tablet mounting 1) After unpackage the Sylvac Tablet, unscrew the nut M10 (N°1) and dissasemble the washer (N°2 & 3). 2) Remove the label and insert the Tablet inside the Ergotron Arm - Don’t dismount Washer (N°4) and the screw (N°5).
-
Page 15: Removing The Security Parts (Locking For Transport)
QUICKSTART Version C) Version for S145L (machine installed on the ground, without table). Once the machine is installed (with a hoist/elevator or crutches), set the level by adjusting the 3 feets of the machine : 1) Set the 2 front feets (use a combina- 2) same for the back tion wrench of 19 mm). -
Page 16: Electrical Connections
Check the voltage of the computer and the monitor before plugging them into the mains! Do not attempt to alter the mains supply voltage of the computer/controller. Contact your SYLVAC agent if the voltage indicated does not match your mains supply. -
Page 17: Safety Advice
QUICKSTART 2. SAFETY ADVICE Sylvac machines have been developed with state of the art technology. However, it is important to understand and comply with a few safety rules. Read the manual carefully. Only use the machine in the manner described. -
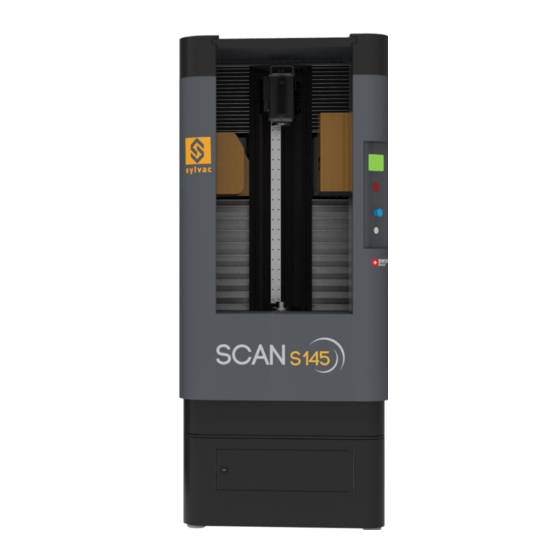
Page 18: Overview And Configuration
QUICKSTART 3. OVERVIEW AND CONFIGURATION A - Motorised tailstock: supports the upper part of the measured part can be moved manually along the calliper according to the size of the piece. B - Piece to be measured: for the user to affix the piece to be measured between the stocks. C - Headstock: supports the bottom part of the measured part. -
Page 19: Quickstart Of The Sylvac-Reflex Scan+ Software
1 - Turn on the machine using the ON/OFF button 2 - Start up the computer 3 - Launch the Sylvac-Reflex Scan+ software by clicking on the icon 4 - The below window will be displayed on your screen. Log in as a supervisor using the password “123”. - Page 20 QUICKSTART To start the calibration, go to Service tab, Plugins, Profile Diagnostics. Under Profile Diagnostics , go to the last tab: Tailstock...
- Page 21 QUICKSTART 4.2.2. Tailstock position and End Scan configuration and (Absolute Encoder) The tailstock has an electronic absolute encoder. As long as the machine is switched on, the encoder keeps the absolute po- sition. If the machine is switched off, the batteries on the main electronic board will supply it. If by any chance the position of the tailstock is lost, this step is designed to recalibrate it.
- Page 22 QUICKSTART The values are then updated. Click on the flag button to save. 4.2.3. Manual mode assistance (handle calibration) The tailstock shall have an ergonomic behavior when used manually. But it also should be able to clamp a part with a force of 20Kg.
- Page 23 QUICKSTART - Read the new values and compare with the displayed old values. They should be close if the calibration has been done before on the same machine. - Save using the flag.
- Page 24 QUICKSTART 4.2.4. Clamping assistance (Hall calibration) The S145 is able to have parts up to 60Kg in weight. The clamping force for that weight goes from 3.4Kg to 10Kg. To be able to clamp automatically a part, a hall sensor is implemented. It reads the spring stroke and gives the clamping force. The Hall sensor is also used as a contact trigger giving the information that a part is already clamped or being clamped, but also reaches the maximum of clamping.
- Page 25 QUICKSTART It is important to know that the software start the calibration from the moment you press the On/Off button and finishes the calibration of the entire stroke once you release this button. - Repeat the calibration if something went wrong by simply going back to the Prepare tab then click on next arrow. - Click on the flag to save.
-
Page 26: Maintenance And Servicing
5. MAINTENANCE AND SERVICING The maintenance and servicing of the machines must be performed by people trained and qualified by Sylvac SA or its official agents. During servicing or maintenance, switch off the machine completely using the main ON/OFF switch (E). Otherwise, activate the “Service mode”... -
Page 27: Packing Up The Machine (Moving Or Sending The Machine)
6. PACKING UP THE MACHINE (MOVING OR SENDING THE MACHINE) 6.1.Secure the moving parts Connect the machine to the computer. In the Sylvac-Reflex Scan+ software, set the mobile part (optical carriages) in posi- tion : ’’Park axes for transport’ (Figure 22). - Page 28 QUICKSTART Example with crutches 2) Separate the machine from the table with the hoisting equipment choosen and slide the pallet under the machine : - bridge crane or elevator, see chapter 1.3.1, page 3 - crutches, see chapter 1.3.2, page 4 3) Retract the 3 feets of the machine to avoid them to exceed the base (see chapter 1.3.3.1, page 6 - Steps 1 &...
- Page 29 QUICKSTART 7) While packing the plastic film, insert the 2 synthetic struts (grey struts) to avoid the crushing of the body when putting the machine on the box. Material : Removing the loops, depending on Struts settled on the roof of the Screw M20 x 90 cone-shaped head system used : machine :...
- Page 30 QUICKSTART 10) Screw the 4 iron braces and protect with lateral foams. View without machine View with machine Figures 30 Warning label for transport blocking rod. 11) Putting the box and finap strapping. Finished packing Figures 31...
-
Page 31: Packing Up The Table (Sending)
QUICKSTART 7. PACKING UP THE TABLE (SENDING) After removing the machine from the table (with hoisting system or crutches), proceed like this : 7.1 Method A - with pallet truck or elevator 1) Remove the covering of the machine (Figure 32) so you can move it to the pallet truck and unscrew the 4 back lateral screws (Figure 33) to slide the covering forward as a ’’drawer principle’’... -
Page 32: Method B - Without Any Pallet Truck Or Elevator
QUICKSTART 4) Protect and strap (Figures 38) and drop, if necessary, the hardware material (PC, screen, stand, screen, etc. - Figure 39) Figures 38 Figure 39 5) Stall and strap, then put the external box, with final strap (Figure 40). Figure 40 7.2 Method B - without any pallet truck or elevator 1) Remove the top panel so you can manipulate the table on its pallet by unscrewing the 4 screws from the panel. - Page 33 QUICKSTART 2) Move the table from the pallet to the ground by flipping up the tubular frame (has to be done by 2 persons- Figure 42) and put back the panel in its dedicated location (Figure 43). Figure 42 Figure 43 3) Protect and strap (Figures 44) and drop, if necessary, the hardware material (PC, screen, stand, screen, etc.
-
Page 34: Technical Data
QUICKSTART 8. TECHNICAL DATA 8.1. Machine S145 SPECIFICATIONS Metric Inches Overall Dimensions Machine (H x L x P), with table 1835 x 780 x 1180mm 72.3 x 30.7 x 46.5 in Mass, without table Machine with centres ≈ 600 kg ≈... -
Page 35: Machine S145L
QUICKSTART 8.2. Machine S145L SPECIFICATIONS Metric Inches Dimensions globales Machine (H x L x P), with table 2345 x 780 x 1180mm 95.9 x 30.7 x 46.5 in Mass, without table Machine with centres Packed machine Conditions de fonctionnement Storage temperature 5 to 45 °C 40 to 115 °F Relative humidity (storage) -
Page 36: Drawings Of The Machines S145 And S145L (In Mm)
QUICKSTART 8.3. Drawings of the machines S145 and S145L (in mm) -
Page 37: Pictures Of The Machines S145 And S145L
QUICKSTART 8.4. Pictures of the machines S145 and S145L 8.4.1. SCAN S145 SCAN S145 with double table... -
Page 38: Scan S145L
QUICKSTART 8.4.2. SCAN S145L... -
Page 39: Certificates Of Conformity And Calibration
Swiss Federal Office of Metrology. CERTIFICAT DE CONFORMITE Sylvac certifie que cet instrument a été fabriqué et contrôlé selon ses normes de Qualité et en référence avec des étalons dont la traçabilité est reconnue par l’office fédéral suisse de métrologie. - Page 40 Changes without prior notice Sous réserve de toute modification Änderungen vorbehalten Edition : 2020.08 / 681-106-01-110...
Need help?
Do you have a question about the SYLVAC-SCAN S145 and is the answer not in the manual?
Questions and answers