Advertisement
Introduction:
Before installation please remove the Facia Trim Plate from around the front edge of the unit. This
can be refitted once the installation is finished and any decorating is completed.
The compact depth of the AVID unit will allow installation into standard UK 2-gang EO boxes, with
a minimum of 35mm depth.
These may be galvanised metal for installation in solid construction walls, plastic drylining (with
lugs) or may be installed into surface mounting Dado-type trunking systems using the appropriate
fixings.
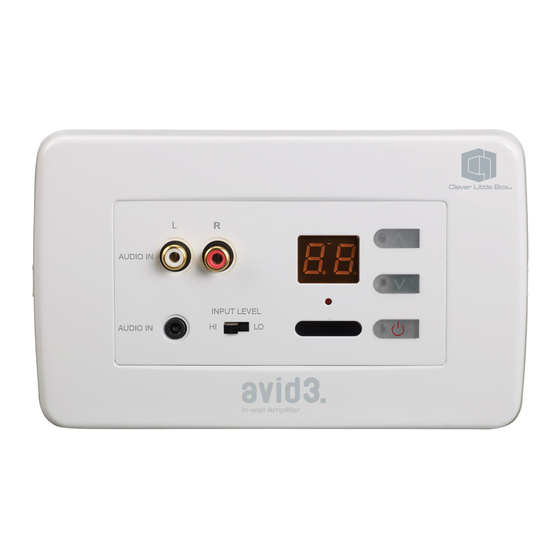
Front Panel Controls and Connectivity:
Stereo Phono
Inputs
Fascia
Trim
Plate
3.5mm
Jack
Input
Hi/Lo Line
Level
Sensitivity
Switch
Two types of input are provided via the front panel; a Stereo 3.5mm Jack and Stereo Phono Inputs;
the Stereo 3.5mm Jack Input has a signal-operated priority over the Stereo Phono Inputs.
The Hi/Lo switch adjusts the input sensitivity from 1v (Line Level) to 200mv (average Headphone
output level), allowing the interface of generic MP3, CD and media players without loss of system
volume level.
3 illuminated buttons allow basic control of the AVID, the bottom button (
function, the up/down buttons (
) control Volume Up and Volume Down.
A clear LCD Display shows the desired volume level between 0 (no output) to 20 (maximum
output).
Rear Panel Controls and Connectivity:
Audio Level
Display
Volume
Screw terminal connections for Power, Wired Input Loudspeaker Outputs and Line Level outputs
Level
are located on the rear PCB of the AVID.
Up
Volume
Power is provided via the included PSU; its cable being marked with a white line on the positive
Level
(+) core which connects to the V+ terminal, the plain black core is negative (-) which connects to
Down
the G terminal.
The Wired Input terminal is configured for a Stereo Input Signal; the three-way connector has
terminals for L (Left Signal), G (Screen) and R (Right Signal).
ON/OFF
Switch
Important Information. It is important to note that if using the audio input loacated on the rear
of the AVID that the signal applied is at full line level.
IR
Receiver
Low level signals such as headphone output levels can sometimes not provide enough output
Window
signal level to keep the internat priority switching circuit built into the AVID open, this may result in
loss or intermittent playback of the audio being broadcast.
If you are experiencing any such problems please contact you reseller or the CIE-Group Technical
Support Department on +44 (0)115 9770075
When using this application an appropriate screened cable is required to reduce the possibility of
external signal interference.
Note. The Wired Input Terminal is in parallel with the 3.5mm Jack Input on the front panel; if both
inputs are connected and a signal is present on both, then the two sources will be mixed together
(This should be clearly explained to the user).
) controls the ON/OFF
A jumper is provided to allow the AVID to be used in either mono or stereo mode, the factory default
is stereo. If set to mono the amplifier will provide a mixed output to each loudspeaker terminal.
Loudspeakers should be wired to the L+ L- and R+ R- terminals, ensuring the phase of each
loudspeaker is the same.
The line output is stereo and provides a fixed line output signal for feeding and external source
such a s a slave amplifier or induction loop system.
Loudspeaker Balance
Trim Pots
L+ L- R- R+
OUTPUT
Loudspeaker Output
Stereo
Connectors
Jumper
Note. The unit has been designed for an 8ohm load per channel, we do not
recommend the use of loudspeakers with an impedance lower than 8ohms.
Wired
Line Input
Connector
V+ G
Line Output
Connectors
Power Supply Input
Connectors
Advertisement
Table of Contents

Related Manuals for Clever Little Box Avid


Summary of Contents for Clever Little Box Avid
- Page 1 3 illuminated buttons allow basic control of the AVID, the bottom button ( ) controls the ON/OFF A jumper is provided to allow the AVID to be used in either mono or stereo mode, the factory default function, the up/down buttons ( ) control Volume Up and Volume Down.
- Page 2 Line Inputs Stereo Phonos (L & R) Stereo 3.5mm Jack (priority) Please ensure that the enclosed User Instructions are left with the AVID unit, easily available to Screw Terminal (Rear PCB. In parallel the end user. with 3.5mm Jack Input)
Need help?
Do you have a question about the Avid and is the answer not in the manual?
Questions and answers