
Related Manuals for Optimus A-257WIFI


Summary of Contents for Optimus A-257WIFI
- Page 1 WIFI SPEAKER A-257WIFI Manual de instalación y funcionamiento v2.0 Installation and operating instructions v2.0...
- Page 2 Nota: La información proporcionada por este manual no incluye detalles de diseño, producción o variaciones en el equipo. Tampoco incluye posibles situaciones de riesgo durante la instalación, funcionamiento o mantenimiento. Si usted necesita asistencia especial más allá del manual, por favor contacte con nuestro servicio técnico. A-257WIFI Versión 2.0 Página 1 de 15...
-
Page 3: Table Of Contents
AJUSTES PERSONALES ..................12 AIRPLAY FUNCTION ....................13 EHTERNET CONNECTION ..................13 ESPECIFICACIONES TÉCNICAS ................14 CERTIFICADO DE GARANTÍA ................. 15 A-257WIFI Versión 2.0 Página 2 de 15... -
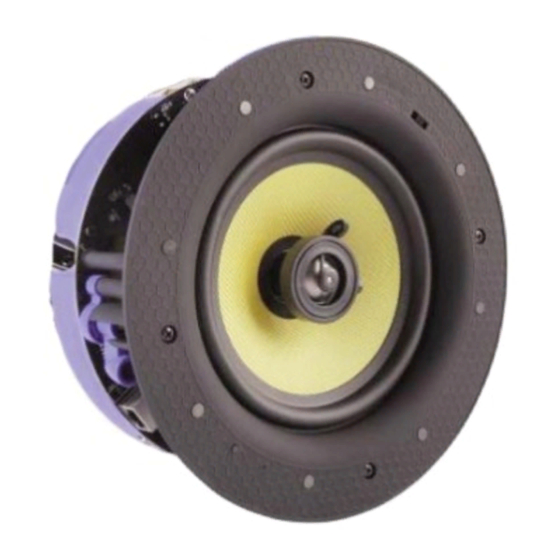
Page 4: Descripción
Impedancia: 8 ohms Sensibilidad (1 W / 1 m): 90 dB Graves: 6,5" cono de Kevlar Agudos: 1,2" Tweeter de Titanio Atenuación de agudos:+3 dB / -3 dB A-257WIFI Versión 2.0 Página 3 de 15... -
Page 5: Contenido Del Paquete
A-257WIFI WiFi Speaker 3. CONTENIDO DEL PAQUETE Altavoz WiFi Manual Plantilla de corte Fuente de alimentación 4. PARTES DEL ALTAVOZ A-257WIFI Versión 2.0 Página 4 de 15... -
Page 6: Instalación De La Aplicación
Volume limit: Interruptor limitador de volumen, 50 % o 100 %. Ethernet: Conector para red Ethernet en sistemas cableados. 5. INSTALACIÓN DE LA APLICACIÓN Por favor busque “Smartsonix” para bajar la aplicación en Google Play (Android) o Apple App Store (IOS). A-257WIFI Versión 2.0 Página 5 de 15... -
Page 7: Prueba Del Altavoz Wifi
Antes de instalar el altavoz WiFi en el techo, por favor pruébelo para verificar su correcto funcionamiento. Paso 1: Conecte el altavoz WiFi a la fuente de alimentación. Paso 2: Inicie la aplicación Smartsonix y pulse “Add Device”. A-257WIFI Versión 2.0 Página 6 de 15... - Page 8 Paso 3: Conecte su teléfono al WiFi del altavoz y vuelva a la aplicación. (Contraseña por defecto “88888888”) Paso 4: Seleccione la red WiFi definitiva a la que se va a conectar el altavoz y entre la contraseña correspondiente. Para confirmar pulse “Continue”. A-257WIFI Versión 2.0 Página 7 de 15...
- Page 9 Paso 6: Podrá renombrar el dispositivo con un nombre personalizado, dejar el nombre que viene por defecto o marcar un nombre preestablecido según la habitación donde se vaya a instalar. Pulse “>” para continuar. A-257WIFI Versión 2.0 Página 8 de 15...
- Page 10 Después de estos pasos el sistema quedará correctamente configurado. Elija un dispositivo y reproduzca una canción desde su teléfono para verificar si funciona. Si funciona correctamente puede continuar con la instalación. A-257WIFI Versión 2.0 Página 9 de 15...
-
Page 11: Instalación Del Altavoz Wifi
único agujero que tendrá que realizar. Paso 2: Coloque la fuente de alimentación en su ubicación en el techo o la pared. Asegúrese que durante la instalación la fuente de alimentación no esté enchufada. A-257WIFI Versión 2.0 Página 10 de 15... - Page 12 WiFi. Conecte los cables del altavoz pasivo a los terminales R+ y R- del altavoz WiFi y seleccione STEREO en el conmutador MONO / STEREO. Paso 5: Ponga la rejilla al altavoz y enchufe la fuente de alimentación. A-257WIFI Versión 2.0 Página 11 de 15...
-
Page 13: Indicador Led Multifunción
12. AJUSTES PERSONALES Renombrar: Si el nombre del altavoz WiFi no es correcto puede renombrarlo después de la instalación. Información del altavoz: Para proteger el altavoz WiFi puede asignarle una contraseña, por defecto es 88888888. A-257WIFI Versión 2.0 Página 12 de 15... -
Page 14: Airplay Function
En el lateral del altavoz se encuentra una conexión Ethernet. Mediante esta conexión es posible ajustar y verificar los parámetros básicos de configuración. Esta conexión funciona con una IP diferente a las de las conexiones WiFi y requiere DHCP. A-257WIFI Versión 2.0 Página 13 de 15... -
Page 15: Especificaciones Técnicas
Streaming y MP3 / WMA / AAC / ACC / Formatos de audio ACC+ / ALAC / APE / WAV 210 mm Agujero de corte Ø 227 mm Dimensiones Fuente de alimentación, plantilla de corte Accesorios incluidos A-257WIFI Versión 2.0 Página 14 de 15... -
Page 16: Certificado De Garantía
30 OPTIMUS S.A. tampoco asumirá costes en el marco de la garantía por este tipo días. No obstante, se deja aclarado que el plazo usual no supera los 30 días. - Page 17 Note: The information provided in this manual does not include details of design, production, or variations in equipment. Nor does it include possible risks during installation, operation or maintenance. If you need special assistance beyond the manual, please contact our customer service. A-257WIFI Version 2.0 Page 1 of 15...
- Page 18 DEVICE PERSONAL SETTING ................. 12 AIRPLAY FUNCTION ....................13 EHTERNET CONNECTION ..................13 TECHNICAL SPECIFICATIONS ................14 GUARANTEE CERTIFICATE ..................15 A-257WIFI Version 2.0 Page 2 of 15...
-
Page 19: Description
RMS power: 30 W Impedance: 8 ohms Sensitivity (1 W / 1 m): 90 dB Woofer: 6.5" Kevlar woven cone Tweeter: 1.2" Titanium dome Treble attenuation:+3 dB / -3 dB A-257WIFI Version 2.0 Page 3 of 15... -
Page 20: Package Contents
A-257WIFI WiFi Speaker 3. PACKAGE CONTENTS Wifi Speaker Manual Cut-Out template Power Adapter 4. PARTS OF THE SPEAKER A-257WIFI Version 2.0 Page 4 of 15... -
Page 21: Controller App Installation
Volume limit: Switch to limit the volume, 50 % or 100 %. Ethernet: Ethernet connector to be used in wired systems. 5. CONTROLLER APP INSTALLATION Please search "Smartsonix" to download controller app from Google Play (Android) or Apple App Store (IOS). A-257WIFI Version 2.0 Page 5 of 15... -
Page 22: Wifi Speaker Testing
Before your WiFi speaker is installed into ceilings, please arrange testing to make sure the device works properly. Step 1: Connect the WiFi speaker to power supply. Step 2: Start the controller APP Smartsonix and click “Add Device”. A-257WIFI Version 2.0 Page 6 of 15... - Page 23 Step 3: Connect your smartphone to the WiFi of the speaker and come back to the application. (Default password “88888888”) Step 4: Select the final WiFi network where the speaker will be connected and enter its corresponding password. Press “Continue” to confirm. A-257WIFI Version 2.0 Page 7 of 15...
- Page 24 Step 5: Wait a few seconds for the speaker to connect. Then press “Next”. Step 6: You will be able to rename the speaker, leave the default name, or select the predefined name according to the room where it will be placed. Press “>” to continue. A-257WIFI Version 2.0 Page 8 of 15...
- Page 25 After these steps, system will be ready to be used. Choose a device and play a song in your phone to test whether the device works. If ok, testing finishes and you can forward the speaker installation. A-257WIFI Version 2.0 Page 9 of 15...
-
Page 26: Wifi Speaker Installation
Step 2: Place the DC adaptor in a suitable place in your wall or ceiling, leave the plug end and jack end. During speaker installation, please make sure the adaptor is cut out from power supply. A-257WIFI Version 2.0 Page 10 of 15... - Page 27 WiFi speaker and select STEREO in MONO / STEREO switch. Step 5: Cover the grille for the installed speaker and connect the plug of DC adaptor to the power supply. A-257WIFI Version 2.0 Page 11 of 15...
-
Page 28: Multifunction Led Indicator
Rename: If you found WiFi speaker wrongly named after installation, you can rename the device to a correct one. Speaker info: To protect the WiFi speaker from embezzling by others, you can set password for your device, by default is 88888888. A-257WIFI Version 2.0 Page 12 of 15... -
Page 29: Airplay Function
Ethernet connection is available on the side of speaker. Through this connection is possible to set and check speaker basic settings. This connection works with a different IP of WiFi connections. DCHP is required. A-257WIFI Version 2.0 Page 13 of 15... -
Page 30: Technical Specifications
Streaming media and MP3 / WMA / AAC / Audio support ACC / ACC+ / ALAC / APE / WAV 210 mm Cut-out size Ø 227 mm Dimensions Power Adapter, Cut-out template Accessories included A-257WIFI Version 2.0 Page 14 of 15... -
Page 31: Guarantee Certificate
If, within this guarantee period, defects appear which are not due to borne by the client. factors outlined in section 2, OPTIMUS S.A. shall replace or repair the unit using equivalent, new or reconstructed replacement parts, as it deems fit. If 10.
Need help?
Do you have a question about the A-257WIFI and is the answer not in the manual?
Questions and answers