Table of Contents
Advertisement
Anker Innovations Limited. All rights reserved. eufy Security and eufy Security
Logo are trademarks of Anker Innovations Limited, registered in the United
States and other countries. All other trademarks are the property of their
respective owners.
51005002471 V01
QUICK
START GUIDE
Video Doorbell 1080p (Battery-Powered)
Advertisement
Table of Contents

Related Manuals for eufy Security T8222


Summary of Contents for eufy Security T8222
- Page 1 START GUIDE Video Doorbell 1080p (Battery-Powered) Anker Innovations Limited. All rights reserved. eufy Security and eufy Security Logo are trademarks of Anker Innovations Limited, registered in the United States and other countries. All other trademarks are the property of their respective owners.
- Page 2 TABLE OF CONTENTS 01 09 What’s Included Finding a Mounting Spot 03 11 Product Overview Mounting the Bracket 04 14 How the System Works Mounting the Doorbell 05 15 Powering on the Wi-Fi Doorbell Chime Detaching the Doorbell 07 16 Setting up the System Recharging the Doorbell 08 17...
-
Page 3: What's Included
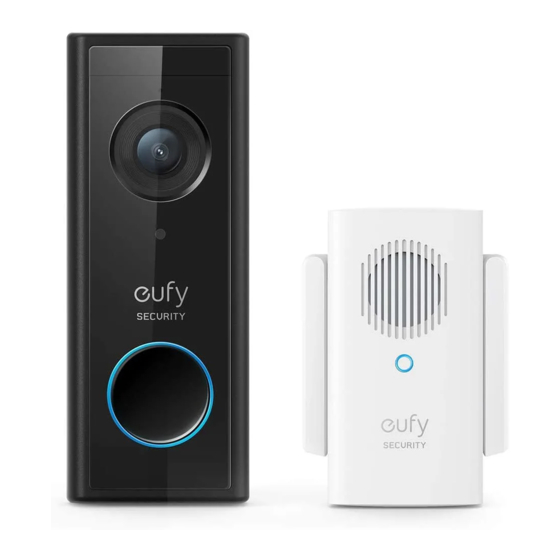
Video Doorbell 1080p Mounting Bracket Screw Hole 15° Mounting (Battery-Powered) Positioning Card Wedge (Optional) Model: T8222 FCC ID: 2AOKB-T8220 Model: Wi-Fi Doorbell Chime Power Plug IC: 23451-T8220 FCC ID: 2AOKB-T8020 IC: 23451-T8020 Note: Power plug may vary in different regions. -
Page 4: Product Overview
PRODUCT OVERVIEW HOW THE SYSTEM WORKS Video Doorbell (Battery Powered) How the System Works Front view: The video doorbell system includes 2 parts: • The video doorbell at your door • The Wi-Fi Doorbell Chime in your house 1. Motion Sensor The video doorbell detects motion at your porch and allows you to answer the door 2. - Page 5 STEP 1 POWERING ON THE WI-FI 2. Extend Wi-Fi Doorbell Chime’s antennas. DOORBELL CHIME Connect the Wi-Fi Doorbell Chime to the Internet 1. Fix the power connector to Wi-Fi Doorbell Chime. ① Place the power connector over Wi-Fi Doorbell Chime in the direction the arrows indicate.
-
Page 6: Step 2 Setting Up The System
Download the App and Set up the System The doorbell comes with an 80% battery level for safe transportation. Fully charge it Download the eufy Security app from the App Store (iOS devices) or Google Play before mounting the doorbell at your front door. - Page 7 STEP 4 FINDING A MOUNTING SPOT Place the Screw Hole Positioning Card against the wall to mark the position. Find a Mounting Spot Take the Video Doorbell to your front door and check the live view on the eufy Security app at the same time. Find a position where you can get the desired field of view.
-
Page 8: Step 5 Mounting The Bracket
STEP 5 MOUNTING THE BRACKET Mount the Video Doorbell on Surfaces Made Out of Hard Materials Mount the Doorbell on a Wooden Surface 1. If you’re mounting the doorbell on a surface made out of hard materials, like brick, concrete, stucco, drill 2 holes through the Screw Hole Positioning Card with If you’re mounting the doorbell on a wooden surface, you don’t need to pre-drill 15/64”(6mm) drill bit. - Page 9 and anchors are included.) STEP 6 MOUNTING THE DOORBELL Mount the Doorbell Align the doorbell with the top of the mount and then snap the bottom into place. Mounting Wall Mounting Wall Mounting Wedge Bracket Bracket With 15° Mounting Wedge Without 15°...
-
Page 10: Appendix 1 Detaching The Doorbell
APPENDIX 1 DETACHING THE DOORBELL APPENDIX 2 RECHARGING THE DOORBELL Detach the Doorbell Recharge the Doorbell 1. Use the doorbell detaching pin provided if you wish to detach the doorbell from the Mounting Bracket. Charge the doorbell with universal USB chargers that deliver 5V 1A output. 2. -
Page 11: Fcc Radio Frequency Exposure Statement
The suitable temperature for T8020 and accessories is 0°C-40°C. B digital device, pursuant to Part 15 of the FCC Rules. These limits are designed to The suitable temperature for T8222 and accessories is -20°C-50°C. provide reasonable protection against harmful interference in a residential installation. -
Page 12: Customer Service
CUSTOMER SERVICE This symbol means the product must not be discarded as household waste, and should be delivered to an appropriate collection facility for recycling. Proper disposal and recycling helps protect natural resources, human health and the environment. For more information on disposal and recycling of this Warranty product, contact your local municipality, disposal service, or the shop where you bought this product.
Need help?
Do you have a question about the T8222 and is the answer not in the manual?
Questions and answers
what does reset on mains unit do insert through hole under aerial wings