Table of Contents
Advertisement
Quick Links
Advertisement
Table of Contents

Related Manuals for Iridex OcuLight Symphony


Summary of Contents for Iridex OcuLight Symphony
- Page 1 ® ™ OcuLight Symphony Operator Manual IRIDEX 31144C-EN ®...
- Page 2 Copyright December 2006 of IRIDEX Corporation. All rights reserved. IRIDEX Published in the USA. CORPORATION Except with the express written permission of IRIDEX, the contents of this 1212 Terra Bella Avenue operator manual may not be copied in whole or in part, or reproduced in, Mountain View, California or transmitted to any other media.
- Page 3 Large-spot 810 nm-LS for the OcuLight SLx console · 2 Treatment wavelength · 2 Spot size · 2 Standard-spot 532 nm for the OcuLight GLx/TX console · 2 Treatment wavelength · 2 Spot size · 2 IRIDEX S · 3 ORKSTATION PECIFICATIONS Microscope · 3 Type ·...
-
Page 4: Table Of Contents
Attach the back panel to the cart · 20 Install the cable guides for the fiber-optic assembly · 20 Assembling the slit lamp table · 21 (For IRIDEX slit lamp workstation only) Installing the OcuLight Symphony Adapter · 25 IRIDEX SING THE AMP AND ABLE... - Page 5 ONCLUDING ATIENT REATMENT TROUBLESHOOTING · 47 MAINTENANCE · 51 · 51 NSPECTING AND LEANING OcuLight Symphony Adapter · 51 Slit lamp and slit lamp table · 53 (for IRIDEX slit lamp workstation only) IRIDEX EPLACING THE LLUMINATION SLIT LAMP WORKSTA ·...
- Page 6 OcuLight Symphony Operator Manual 31144C-EN...
- Page 7 The system is designed for different models of slit device to sale by or on the lamps: the IRIDEX Workstation, the Zeiss 30 SL, or the Zeiss 30 SL/M. order of a physician. The OcuLight Symphony System includes the OcuLight SLx with Tri-Mode...
- Page 8 OcuLight Symphony Adapter Specifications REFERENCE Console compatibility See the OcuLight console OcuLight SLx console manuals for console OcuLight GLx console specifications. OcuLight TX console Slit lamp compatibility IRIDEX Slit Lamp Workstation Zeiss 30 SL Zeiss 30 SL/M Standard-spot 810 nm for the OcuLight SLx console...
- Page 9 IRIDEX Slit Lamp Workstation Specifications Microscope REFERENCE See the Zeiss model Type 30 SL and model 30 SL/M slit lamp operating Galilean converging binocular instructions for specification information. Magnification 5 position rotating drum (5x, 8x, 12x, 20x, 32x) Oculars 10.0x Diopter adjustment ±6 diopter...
- Page 10 38 x 50 cm or 39 x 89 cm Chin rest vertical movement 7.1 cm Fixation lamp Micro lamp, 18V, 26 mA, Red Power requirement 115 VAC, 60 Hz 230 VAC, 50 Hz Maximum power consumption 40 W OcuLight Symphony Operator Manual 31144C-EN...
-
Page 11: Warranty And Service
Warranty and Service Warranty The OcuLight Symphony system carries a standard factory warranty. Product registration Please complete and forward to us the enclosed product registration cards. Service and technical support IRIDEX has established an efficient process to support its installations worldwide. - Page 12 OcuLight Symphony Operator Manual 31144C-EN...
-
Page 13: Operation
Laser in Use representative warning sign; immediately. • the slit lamp components, which come only with the IRIDEX slit lamp workstation, include the slit lamp and headrest assembly; REFERENCE • the OcuLight Symphony Adapter components which include the... -
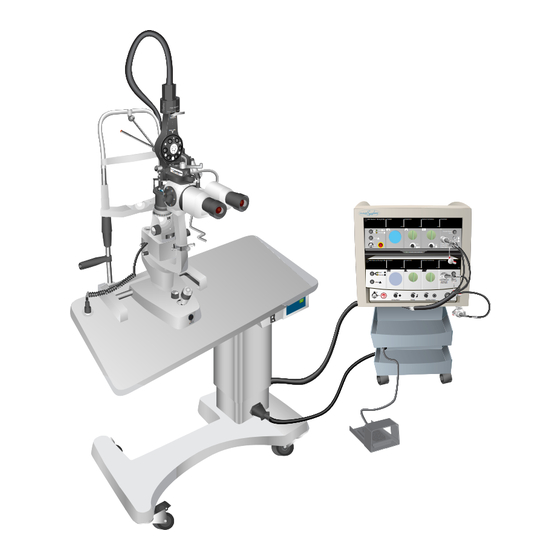
Page 14: Components Cart
Slit lamp table (for the IRIDEX slit lamp workstation only) The slit lamp table consists of a tabletop, pedestal, base, casters, cable guides, and the screws necessary for assembly. Once assembled, the electrically-controlled slit lamp table supplies power to the slit lamp. -
Page 15: Iridex Slit Lamp
IRIDEX slit lamp The slit lamp is specially designed to connect to the OcuLight Symphony Adapter. It consists of a patient chinrest and headrest with fixation light, a viewing assembly with oculars, magnification changer and objective lens, an illumination prism, an illumination housing, and a slit lamp base. -
Page 16: Oculight Symphony Adapter
OcuLight Symphony Adapter The OcuLight Symphony Adapter attaches to the slit lamp, enabling the slit lamp to be used as the therapeutic device. The adapter has an integral fiber-optic assembly which houses up to three fiber-optic cables: the 532 nm wavelength, the large-spot 810 nm wavelength, and the standard-spot 810 nm wavelength. - Page 17 If you have a Zeiss 30 SL or 30 SL/M slit lamp, the OcuLight Symphony adapter comes with an IRIDEX split-mirror illumination prism and tools for installing it.
-
Page 18: Connecting The Components
IRIS Medical OcuLight GL x POWER DURATION INTERVAL COUNTER Σ n Treat Standby Counter Reset Laser Aperture Σ n = Ø At End Of Mode Fiber Optic STOP Aiming Beam Volume Auxiliary Output SmartKey Bottom OcuLight GLx/TX Components cart Footswitch OcuLight Symphony Operator Manual 31144C-EN... -
Page 19: Connecting The Console Components
Connecting the console components Connect the main power cables Thread the main power cables through the hole on the back of the shelf and again through the hole on the bottom shelf of the components cart. Components Power cables To hole in Operation 31144C-EN... - Page 20 OcuLight SLx console power OcuLight GLx/TX console OcuLight GLx/TX console power cable (OcuLight GLx console shown) Plug the other ends of the main power cables into a properly grounded electrical outlet. (North American outlet shown) OcuLight Symphony Operator Manual 31144C-EN...
- Page 21 Connect the footswitch Thread the end of the footswitch cable through the hole in the bottom bin on the components cart and again through the hole on the bottom shelf of the components cart. NOTE The OcuLight TX console will require the use of a 2nd footswitch.
- Page 22 OcuLight GLx console NOTE The OcuLight TX console will require the use of a 2nd footswitch. The footswitch jumper used in the OcuLight SLx/GLx configuration is not compatible with the OcuLight TX console. OcuLight TX console OcuLight Symphony Operator Manual 31144C-EN...
- Page 23 Plug the five pin end of the footswitch jumper cable into the OcuLight GLx console Footswitch Out port. Plug the four pin end of the footswitch jumper cable into the OcuLight SLx console Footswitch port. If the footswitch jumper cable is not properly connected, when you turn on the console and enter the Treat mode, Connect Footswitch displays on the console status panel.
- Page 24 Remove the factory installed wire and in its place attach the two wires leading to your own switch. If the remote interlock switch is not properly connected, when you turn on the OcuLight GLx or TX console, No Remote Interlock displays on the console status panel. OcuLight Symphony Operator Manual 31144C-EN...
- Page 25 If desired, connect an external warning device As an additional safety measure you may connect an external warning device such as a warning light or small rotating beacon to the Auxiliary Output contact on the OcuLight GLx or TX console. If an external warning device is used, the system activates the device when you are in the Treat mode.
-
Page 26: Secure The Power Cables To The Cart
Install the cable guides for the fiber-optic assembly To keep the fiber-optic cables off the ground and prevent damage to the cables, attach the cable guides, where desired, in the holes provided on the underside of the cart. Cable OcuLight Symphony Operator Manual 31144C-EN... -
Page 27: Assembling The Slit Lamp Table (For Iridex Slit Lamp Workstation Only)
Assembling the slit lamp table ( For IRIDEX slit lamp workstation only) 1. Place the pedestal upside down with the switch facing away from you. 2. If present, remove and reserve the four pedestal screws. 4. If a small metal cover is attached to the underside of the base, remove and reserve the screws from each end. - Page 28 Pedestal 9. Secure the pedestal to the base with either the four reserved pedestal screws or the packaged screws that came with the slit lamp table components. OcuLight Symphony Operator Manual 31144C-EN...
- Page 29 10. Connect the transformer cable to the pedestal cable. 11. Replace the small metal cover with the two reserved screws. 12. Screw the two locking wheels into the holes on the arc side of the base. Screw the other two wheels to the opposite corners of the base. 13.
- Page 30 17. Connect the small electrical cable from the pedestal to the slit lamp power supply. 18. To keep the fiber-optic cables off the ground and prevent damage to the cables, attach the cable guides to the underside of the tabletop. Cable guides OcuLight Symphony Operator Manual 31144C-EN...
-
Page 31: Installing The Oculight Symphony Adapter
3. Lower the IRIDEX split-mirror illumination prism into the housing, aligning the pin at the base of the prism with the slot in the housing. 4. Rotate the knurled ring counter-clockwise to secure the IRIDEX split- mirror illumination prism in position. - Page 32 1. Attach mounting plate to top of the slit lamp mounting platform. than an IRIDEX OcuLight Tighten the screw to secure. SLx/GLx/TX console. Such 2. Align the mounting pins of the OcuLight Symphony Adapter with the use may void any product holes on the mounting plate. warranties and jeopardize the safety of the patient, 3.
- Page 33 Zeiss 30 SL and 30 SL/M slit lamp instructions 1. Align the mounting pins of the OcuLight Symphony Adapter with the holes on the slit lamp mounting platform. 2. Lower the OcuLight Symphony Adapter onto the slit lamp mounting platform until it is fully seated. Tighten the screw to secure.
- Page 34 Reposition the illumination housing Carefully rotate the illumination housing back into its centered position. Attach the micromanipulator handle Insert the micromanipulator handle into the OcuLight Symphony Adapter socket and tighten the thumbscrew to secure. OcuLight Symphony Adapter socket Thumbscrew Micromanipulator...
- Page 35 If desired, attach the finger-rest to the slit lamp WARNING Always inspect the Slide the finger-rest onto the binocular support post and tighten the fiber-optic assembly before thumbscrew to secure. securing it to the slit lamp headrest to ensure that it has not been damaged.
- Page 36 ∑ n Treat Standby Counter Reset Laser Aperture ∑ n = Ø At End Of Mode Fiber Optic STOP Aiming Beam Volume Auxiliary Output SmartKey Fiber-optic assembly Cable guides OcuLight Symphony Operator Manual 31144C-EN...
- Page 37 Connect the desired 810 nm fiber-optic to the OcuLight SLx console CAUTION Do not touch the end of Remove the protective caps from the OcuLight SLx console fiber-optic port the fiber-optic connector, and from the desired fiber-optic connector (810 nm or 810-LS). as finger oils can impair TERVAL COUNTER...
- Page 38 Carefully insert and finger-tighten the connector into the OcuLight GLx/ TX console fiber-optic port until secure. INTERVAL COUNTER Σ n Counter Reset Σ n = Ø Laser Aperture At End Of Fiber Optic Fiber-optic connector Auxiliary Output SmartKey OcuLight Symphony Operator Manual 31144C-EN...
- Page 39 Connect the SmartKey Insert the SmartKey into the desired OcuLight console SmartKey port. For example: if you will be using the OcuLight SLx console for treatment, insert the SmartKey into the OcuLight SLx console SmartKey port. Σ n Counter Reset Σ...
-
Page 40: Only )
Turn the control clockwise to increase intensity and counter-clockwise to patient’s eyes is likely to decrease. occur, to reduce discomfort for the patient, always keep the Slit lamp illumination control illumination intensity at the minimum required for treatment. OcuLight Symphony Operator Manual 31144C-EN... -
Page 41: Positioning And Securing The Slit Lamp Base
Positioning and securing the slit lamp base Use the slit lamp base control to move the slit lamp base laterally and vertically. Pull the control towards you to move the slit lamp closer to you. Push the control away from you to move the slit lamp towards the patient. Turn the control clockwise to raise the slit lamp and counter-clockwise to lower. -
Page 42: Adjust The Interpupillary Distance
Adjust the interpupillary distance Move the oculars apart or together to adjust the interpupillary distance for your eyes. Focus the oculars Rotate the oculars to your approximate prescription. Set the magnification Rotate the control to the desired magnification. OcuLight Symphony Operator Manual 31144C-EN... -
Page 43: If Desired, Set The Slit Lamp For Off-Axis Viewing
If desired, set the slit lamp for off-axis viewing Loosen the tension control to unlock the oculars and magnification housing. Carefully swing the oculars to the left or right to view the patient’s eye at an angle. Turn the tension control to secure the oculars and magnification housing in place. -
Page 44: Adjust The Slit Height
Select the desired rotation of the slit Use the slit rotation control to rotate the slit. Turn the control to the left to rotate the slit clockwise and to the right to rotate the slit counter-clockwise. Slit rotation OcuLight Symphony Operator Manual 31144C-EN... -
Page 45: Select The Desired Filter
Select the desired filter Rotate the bottom dial to change the slit lamp filter. The various filters are NOTE indicated on the dial by a colored marker: cobalt blue filter = blue marker, To avoid discomfort and red-free filter = green marker, heat-absorbing = red marker, protect the patient’s eyes white marker = no filter. -
Page 46: Using The Oculight Symphony Adapter
Using the OcuLight Symphony Adapter REFERENCE Selecting the fiber-optic See the Operations section Ensure that the 532 nm fiber-optic connector is properly connected to the of your OcuLight console OcuLight GLx/TX console. manuals for instructions on using the console Ensure that the desired 810 nm (standard-spot or large-spot) fiber optic controls. -
Page 47: Positioning And Focussing The Spot
Before treating patients, ensure that the spot is positioned and focussed properly for the OcuLight Symphony Adapter. 1. Insert the focus post, if using the IRIDEX slit lamp or position a paper target on the headrest, if using a Zeiss 30SL or 30 SL/M slit lamp. - Page 48 Fine focus adjustment knob 11. Rotate the nut labeled <Y> to adjust the vertical position of the laser spot into the center of the slit. 12. Set the spot size selector to the smallest spot size. OcuLight Symphony Operator Manual 31144C-EN...
-
Page 49: Using The Eye Safety Filter
13. Rotate the fine focus adjustment knob until the spot is at its smallest and sharpest focus. 14. Remove the focus post. Using the eye safety filter NOTE The eye safety filter is specifically designed to protect your eyes from laser The eye safety filter must radiation above regulatory requirements. -
Page 50: Before Treating Patients
Before Treating Patients 1. Ensure that the OcuLight consoles, the slit lamp, and the OcuLight Symphony Adapter are properly connected and set up. REFERENCE 2. Ensure that your slit lamp oculars are properly adjusted. Read the Clinical and 3. Post the laser warning sign outside the treatment room door. -
Page 51: Treating A Patient
Treating a Patient 1. Select the spot size. REFERENCE See the Using the OcuLight 2. Set the treatment parameters on the OcuLight console. Symphony Adapter section 3. Position the patient. of this manual for instructions on selecting 4. Select an appropriate contact lens for the treatment. the spot size and for 5. -
Page 52: Concluding Patient Treatment
OcuLight console manuals 4. Handle the contact lens according to the manufacturer’s instructions. and this manual for 5. If desired, clean the OcuLight Symphony Adapter fiber-optic cleaning and storing connectors and replace the protective caps. If desired, clean the instructions. -
Page 53: Troubleshooting
Troubleshooting REFERENCE Reporting problems See the Troubleshooting Should you experience problems with your OcuLight Symphony system, refer section of your OcuLight to the suggestions in this section. If you continue to experience problems, write console manuals for down the error message, product name, and serial number of the additional information. - Page 54 Press Mode to Continue • Ensure that the Fiber Switch is in the correct position for the console and wavelength you are using and press the Mode button on the OcuLight SLx/GLx/TX console to continue. OcuLight Symphony Operator Manual 31144C-EN...
- Page 55 Problem Action The Status panel reads: Unknown Fiber Type • Connect the 532 nm fiber-optic connector to the OcuLight GLx or TX console. Incompatible Device Use with 810 nm console • Connect the 810 nm or 810-LS fiber-optic connector to the OcuLight SLx console. Troubleshooting 31144C-EN...
- Page 56 OcuLight Symphony Operator Manual 31144C-EN...
-
Page 57: Maintenance
Always handle the fiber- optic cable with extreme Inspect the OcuLight Symphony Adapter care. Do not wrap the Periodically inspect the OcuLight Symphony Adapter for dirt, debris, and cable in a diameter less damage. than 15 cm (6 in). Damage to the fiber can... - Page 58 3. Wipe the lens gently with the swab to remove all dust and debris. 4. If the surface is still not clean, put a clean lens tissue around the end Delivery mirror of the swab and gently wipe it again. OcuLight Symphony Operator Manual 31144C-EN...
-
Page 59: Slit Lamp And Slit Lamp Table (For Iridex Slit Lamp Workstation Only)
Slit lamp and slit lamp table REFERENCE (for IRIDEX slit lamp workstation only) For instructions on routine Routine care care and cleaning of the Zeiss slit lamp, see the • Keep the optical components free of fingerprints. Zeiss model 30 SL and model 30 SL/M slit lamp •... -
Page 60: Replacing The Slit Lamp Illumination Bulb
Replacing the Slit Lamp Illumination Bulb (for IRIDEX slit lamp workstation only) REFERENCE To replace the illumination bulb: For instructions on 1. Unplug the slit lamp main power cable from the electrical outlet. replacing the Zeiss slit 2. Open the illumination bulb hatch by rotating the knob and pulling lamp illumination bulb, down the door. -
Page 61: Replacing The Slit Lamp Fixation Light Bulb
Replacing the Slit Lamp Fixation Light Bulb (for IRIDEX slit lamp workstation only) To replace the fixation light bulb: REFERENCE For instructions on 1. Unplug the slit lamp main power cable from the electrical outlet. replacing the Zeiss slit 2. Remove the red cap from the fixation point. -
Page 62: Changing The Slit Lamp Fuse ( For Iridex Slit Lamp Workstation Only )
Changing the Slit Lamp Fuse (for IRIDEX slit lamp workstation only) REFERENCE To check or change fuses: For instructions on 1. Unplug the slit lamp main power cable from the electrical outlet. replacing the Zeiss slit 2. Remove the other end of the slit lamp power cord from the main power lamp fuse, see the Zeiss port. -
Page 63: Clinical & Safety
Clinical & Safety Clinical Applications Indications for clinical use The OcuLight Symphony Adapter, when connected to the OcuLight SLx/GLx/TX console, provides diagnostic and therapeutic capability of retinal photocoagulation and for laser trabeculoplasty in the treatment of glaucoma. Contraindication CAUTION Take particular care when Do not treat albino patients. -
Page 64: Safety
Ensuring safe operation safety eyewear. WARNING Do not use the OcuLight Symphony Adapter if you suspect it is not functioning properly. Always verify that the OcuLight Symphony Connect the OcuLight Symphony Adapter only to the OcuLight SLx/GLx/ Adapter is properly TX console, not to any other console. -
Page 65: Preventing Fire And Explosion Hazards
Protection for the physician solutions. An eye safety filter on the OcuLight Symphony Adapter ensures that any laser radiation returned to your eyes during clinical use is below Class 1/I WARNING limit. Ensure that all persons in the treatment room are Protection for all persons in the treatment room —... -
Page 66: Regulatory Compliance Safety Features
Location of regulatory compliance and other system labels SCxxxx Serial # Serial number label Made in USA CE label Fiber Switch label 532 nm Laser aperture, laser emission labels Eye safety filter label OcuLight Symphony Operator Manual 31144C-EN... - Page 67 Distributed by IRIDEX Corporation Mfg: C.S.O. Italy Slit lamp Model SL980/5 Special 6V, 3.5A 50/60HZ specifications label Ser. Nr. XXXXXXX (On back of slit lamp base) Clinical & Safety 31144C-EN...
- Page 68 OcuLight Symphony Operator Manual 31144C-EN...
Need help?
Do you have a question about the OcuLight Symphony and is the answer not in the manual?
Questions and answers