
Related Manuals for StreetStrider 8s

Summary of Contents for StreetStrider 8s
- Page 1 8s OWNER’S MANUAL 1-800-348-0998 | www.StreetStrider.com Copyright © 2019 StreetStrider International, LLC Copyright © 2019 StreetStrider International, LLC...
-
Page 2: Table Of Contents
Poles and Skis........... Brakes............Rear Hub Shifter........Frame Strut..........Front Wheel Alignment......Advanced Lean-to-Steer Technology..3.10 Folding............. Simple Steps to Learn to Stride......Safety Equipment..........Mechanical Safety Check........Return Policy............. Limited Warranty..........Copyright © 2019 StreetStrider International, LLC... -
Page 3: About This Manual
It is impossible to predict every condition that will occur while striding. StreetStrider (the Company) has made no representation about the safe use of the StreetStrider under all conditions. There are risks associated with the use of any StreetStrider that cannot be predicted or avoided, and the Company recommends safe and cautious striding. -
Page 4: Parts Identification
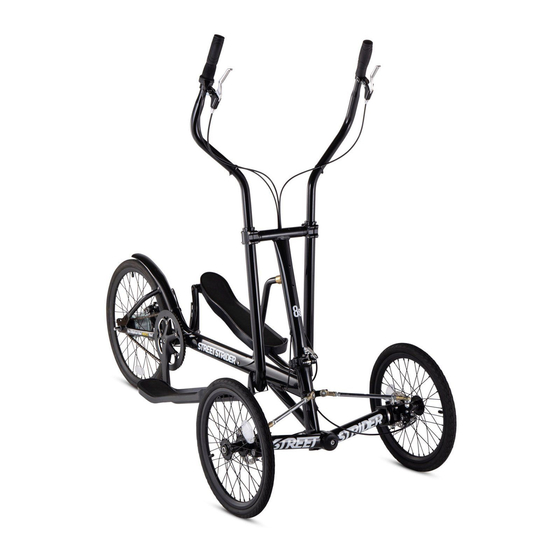
Parts Identification Figure 2.1 StreetStrider 8s Parts. Refer to Table 2-1 for part numbers and descriptions. Copyright © 2019 StreetStrider International, LLC... - Page 5 Figure 2.2 StreetStrider 8s Parts. Refer to Table 2-1 for part numbers and descriptions. Copyright © 2019 StreetStrider International, LLC...
- Page 6 Figure 2-1 StreetStrider 8s Parts List with Hardware Specifications. DESCRIPTION HARDWARE SPECIFICATIONS STATE Main frame bone AL 6061 T6 Bottle cage bosses Tighten to secure Head tube M5 x P0.8 threads, 2 front side, 1 rear side Strut coupling boss...
- Page 7 TERMINOLOGY: The right and left sides of the StreetStrider refer to sides when one is striding. IMPORTANT: Save the box and packing material as they must be used to repack the StreetStrider for any returns. Copyright © 2019 StreetStrider International, LLC...
-
Page 8: Assembling The Streetstrider 8S
To assemble your StreetStrider 8s, first follow the steps and photos in this manual and view the StreetStrider 8s assembly videos where indicated. Included in the shipping box are the StreetStrider 8s in parts, an Owner’s Manual [1] and a small bundle in the top tray inside the box containing a tool kit [2] which includes, four open end wrenches 17 x 14, 15 x 13, 14 x 12, and 13 x 10 mm [3], seven hex wrenches 8, 6, 5, 4, 3, 2.5, 2 [4], two tire levers [5], a 19 mm front hub socket [6], and a front wheel caster spanner wrench [7]. -
Page 9: Rear Wheel
Press the driver cap over the hub driver red dots on the washer and the axle end. until it snaps down. cassette pulley are in line. Copyright © 2019 StreetStrider International, LLC... -
Page 10: Poles And Skis
4 mm hex wrench to remove the 4 and threads then set the allow the clamp pin to insert into the hole. screws and caps from the both pole caps with screws on the clamps at Joint #1. table. Copyright © 2019 StreetStrider International, LLC... - Page 11 Copyright © 2019 StreetStrider International, LLC...
- Page 12 A good starting pole height will position the user’s arm to have a 90° elbow bend, with forearm parallel to the ground when standing on the platforms and holding the grips of both poles in vertical position. Copyright © 2019 StreetStrider International, LLC...
-
Page 13: Brakes
Repeat on the other brake. To make sure both front brakes stop equally, stand in front of the StreetStrider, squeeze the left brake lever and pull the StreetStrider forward while slowly easing the brake pressure. If one wheel starts rotating before the other, which begins to turn the StreetStrider, adjust the brake pads and/or the barrel adjuster at the caliper until that wheel begins to rotate with the other wheel. -
Page 14: Rear Hub Shifter
9 o’ c lock position making sure the cable lies in the groove under the cassette pulley. Copyright © 2019 StreetStrider International, LLC... -
Page 15: Frame Strut
To fold the head tube down the brass collar is disconnected from the receiver and the strut folded backwards pivoting at the saddle screw. Copyright © 2019 StreetStrider International, LLC... -
Page 16: Front Wheel Alignment
Check to make sure that each lean angle degree, adjust the position of steering linkage rod is free to rotate as the StreetStrider is leaned the lean stop disc (circle) on the steering to each side. -
Page 17: Advanced Lean-To-Steer Technology
At the end of the front beam the King Pin bolt passes through the clevis bracket and steering knuckle. On the 8s the ends of the front beam have a 52 tooth male spline and the clevis bracket fits onto the end of front beam with a 52 tooth female spline. - Page 18 2 teeth or 14°. Any adjustment to caster angle on one clevis must be duplicated at the other clevis so they remain parallel. IMPORTANT: After caster angle adjustment the front wheels MUST be realigned Copyright © 2019 StreetStrider International, LLC...
-
Page 19: Folding
6 o’ c lock position. Insert the crank arm over the end coupling at the top of the StreetStrider, rotate the left crank piece, lift the QR lever and rotate 180° then push the lever back down of the strut and fold arm to the 6 o’... -
Page 20: Simple Steps To Learn To Stride
Lean to steer. To make a turn, simply lean or shift your body weight a little bit in the direction of the turn and the StreetStrider will begin to turn. The more you lean, the more the StreetStrider turns. You can pedal while turning. Practice right and left turns, shifting gears, and braking to a stop while standing on the StreetStrider. - Page 21 Copyright © 2019 StreetStrider International, LLC...
-
Page 22: Safety Equipment
Lights If you ride your StreetStrider after dusk, it must be equipped with lights so that you can see the road and avoid road hazards, and so that others can see you. Vehicle laws treat StreetStriders like any other vehicles, meaning you must have operational white front and red rear lights if you are riding after dusk. - Page 23 • Make sure your clothing or anything you may be carrying on the StreetStrider does not obstruct a reflector or light • Stride slowly and avoid areas of heavy traffic, dark areas, and roads with speed limit over 35 mph. Avoid road hazards.
-
Page 24: Mechanical Safety Check
Like any sport, StreetStriding involves the risk of serious injury, damage and/or death. By choosing to use a StreetStrider, you assume the responsibility for the risk, not the people who sold you the StreetStrider, nor the people who made it, nor the people who distribute it, nor the people who manage or maintain the roads or trails on which you ride. -
Page 25: Return Policy
DURING RETURN SHIPPING WILL RESULT IN AN ADDITIONAL REPAIR FEE. To avoid an additional repair fee and to make sure the StreetStrider is returned properly, we encourage you to repack it exactly as it was packed when it arrived. At the bottom of the StreetStrider Support page WATCH THIS 3-PART VIDEO TO REPACK THE 3i AND 7i. -
Page 26: Limited Warranty
Terms of Limited Warranty This limited warranty is not meant to suggest or imply that the StreetStrider cannot be broken or will last forever. It does mean that the StreetStrider is covered subject to the terms of the limited warranty. - Page 27 StreetStrider occupant that may arise from the use of the StreetStrider. The user assumes the risk of any personal injury, damage to or failure of the StreetStrider and any other losses if the StreetStrider is used in any competitive event, including racing, ramp jumping, stunt riding or similar activities or training for such competitive activities or events.
- Page 28 1-800-348-0998 | www.StreetStrider.com Copyright © 2019 StreetStrider International, LLC...
Need help?
Do you have a question about the 8s and is the answer not in the manual?
Questions and answers