StreetStrider 3i Owner's Manual
And trainer stand
Hide thumbs
Also See for 3i:
- Owner's manual (18 pages) ,
- Owner's manual (13 pages) ,
- Owner's manual (36 pages)

Related Manuals for StreetStrider 3i


Summary of Contents for StreetStrider 3i
- Page 1 StreetStrider 3i and Trainer Stand OWNER’S MANUAL © January 2015 16321 Gothard Street, Suite E Huntington Beach CA 92647 1-800-348-0998 www.StreetStrider.com...
-
Page 2: Table Of Contents
IMPORTANT: You should read this manual before you go out on your first ride. Riding a StreetStrider can be a hazardous activity even under the best of circumstances. It is highly recommended that your first stride on your new StreetStrider be taken in a controlled environment, away from cars, obstacles and other cyclists, and wearing your helmet. -
Page 3: Owner's Manual Contents
WARNING Failure to read and comply with all assembly, safety, performance and maintenance requirements and warnings and unsafe or improper use of the StreetStrider could result in serious injury or death. 2. Parts Identification Table 2-1. StreetStrider Parts List with Hardware Specifications, Quantity, and Maintenance State. - Page 4 Rear drop out Holes for rear brake mounting bracket M5 x P0.8 hole for rear luggage rack screw Specification M=OD of threads, mm L=length W=wrench fit, mm P=pitch, threads/mm H=OD of head T=washer thickness, mm 3i / Owner’s Manual ...
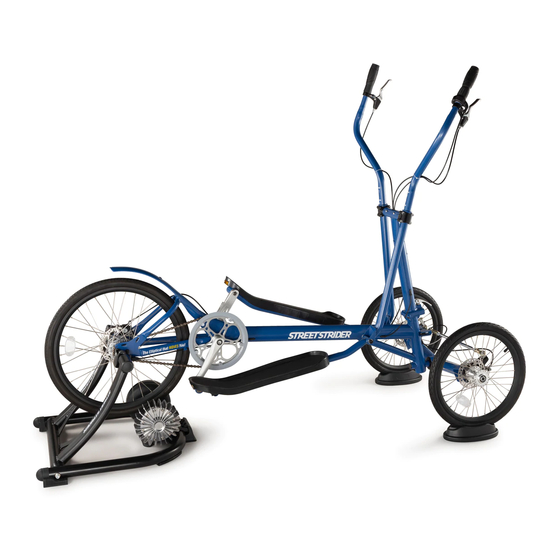
- Page 5 Figure 2-1. StreetStrider 3i Parts. Refer to Table 2-1 for part numbers and descriptions. 3i Owner’s Manual ...
- Page 6 Figure 2-2. StreetStrider 3i Parts. Refer to Table 2-1 for part numbers and descriptions. 3i / Owner’s Manual ...
-
Page 7: Assembly Of The Streetstrider 3I
This chapter refers to the assembly of the StreetStrider 3i model. To assemble your StreetStrider 3i, first view the StreetStrider assembly videos provided to you on the StreetStrider DVD, then follow the steps and photos in this chapter. Included in the shipping box are the StreetStrider in parts, an envelope containing the Owner’s Manual, Assembly Checklist, and StreetStrider DVD, and a small bundle in the top tray inside the box... -
Page 8: Attaching The Front End
8 mm pivot shaft screw. Using the 8 mm hex wrench tighten the M10 screw (40 N-m, 350 lb-in) (Fig. 3.3-1d). IMPORTANT: We recommend adding a liquid thread locker to the threads of the 10 mm screw. Figure 3.3-2. Attaching the front end (con’t) 3i / Owner’s Manual ... -
Page 9: Attaching The Rear Wheel
2.5 mm set screw with the 2.5 mm hex wrench (Fig. 3.4-2e). IMPORTANT: Do no over tighten the 2.5 mm set screw. 3i Owner’s Manual ... -
Page 10: Unfolding And Adjusting Poles
1/8” or 3 mm. If the measurements are not equal to each other, use the two 14 mm open end wrenches to loosen the jam nuts that are tightened against the base of each rod end (Fig. 3.6-1c). On each steering linkage one rod end is right hand threads and one is left hand. 3i / Owner’s Manual ... -
Page 11: Adjusting The Front Disc Brakes
Figure 3.7-2. Adjusting front brakes (con’t) 3.8. Adjusting the rear disc brake (see video) Figure 3.8-1. Adjusting the rear disc brake 3i Owner’s Manual ... -
Page 12: Adjusting The Shifter
Figure 3.10-1. Folding the StreetStrider 3i To fold the StreetStrider 3i rotate the left crank arm to the 3 o’clock position, as viewed from the left side, and open the QR clamp on the left ski just in front of the foot platform (Fig. 3.10-1a). Under the left foot platform (Fig. 3.10-1b), locate and depress the button that releases the telescopic inner tube of the left ski. -
Page 13: Simple Steps To Learn To Stride
Before you stride, wear a CPSC (Consumer Product Safety Commission) approved helmet. Children under 18 years old must wear helmets in some states. At night, make sure to wear light colored or reflective clothing and equip your StreetStrider with front and rear lights. -
Page 14: Mechanical Safety Check
Lights. If you ride your StreetStrider after dusk, it must be equipped with lights so that you can see the road and avoid road hazards, and so that others can see you. Vehicle laws treat StreetStriders like any other vehicles, meaning you must have operational white front and red rear lights if you are riding after dusk. -
Page 15: Limited Warranty
StreetStriding. Make sure your spokes are tight. To check if your wheels are true, spin each wheel - if a wheel wobbles side to side or hits the brake pads, take the StreetStrider to a qualified bicycle shop to have the wheel trued. CAUTION: Wheels must be true for the brakes to work effectively. -
Page 16: Return Policy
StreetStrider occupant that may arise from the use of the StreetStrider. The user assumes the risk of any personal injury, damage to or failure of the StreetStrider and any other losses if the StreetStrider is used in any competitive event, including racing, ramp jumping, stunt riding or similar activities or training for such competitive activities or events.
Need help?
Do you have a question about the 3i and is the answer not in the manual?
Questions and answers