Table of Contents
Advertisement
Quick Links
Advertisement
Table of Contents

Summary of Contents for ITI HOLELESS
- Page 1 TELESCOPIC – HOLELESS INSTALLATION GUIDE...
-
Page 2: Product Presentation
SOLUTIONS in motions Product presentation Holeless telescopic jack... -
Page 3: Table Of Contents
Tables of contents Product presentation Technical drawing – Head Technical drawing – Bottom Product characteristics Holeless telescopic jack installation Air bleeding Followers guides Twin jacks Maintenance program Check valve replacement Warranty policy 15-16 Installation guide... -
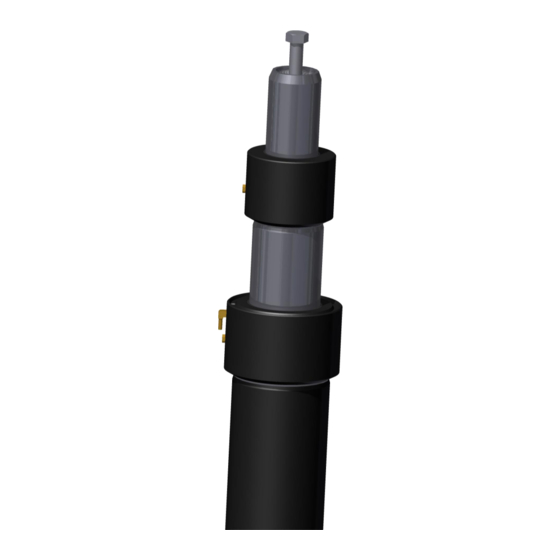
Page 4: Technical Drawing - Head
Urethane Seal Urethane section) section) Wear ring Nylon 90° coupling section) section) O’ring Bleeder Buna-N section) section) Head Cast iron section) If more than 2 sections, the components of the first section repeat for the additional sections. Holeless telescopic jack... -
Page 5: Technical Drawing - Bottom
Technical drawing – Bottom Components Materials Components Materials Piston Cast iron Wear ring Plastic (or last) section Steel Casing Steel Check valve Steel Seal Urethane Spirolock Steel Bronze piston Bronze Base Steel Installation guide... -
Page 6: Product Characteristics
Our cylinders are perfectly adapted to any type of elevator (passenger or merchandise). This cylinder is proudly made in Quebec (Canada) or South Carolina (United States). It can be delivered to the destination of your choice, anywhere in the world. Holeless telescopic jack... -
Page 7: Holeless Telescopic Jack Installation
Buffers Bolts Holeless telescopic cylinder alignment 1. Temporarily locate the jack’s support plate on the pit floor through the centerline of the mounting plate, under the car. 2. Position the jack on the pit support plate, plumb the jack with a level and fix a clamp on the wall of the jack close to the head. - Page 8 Any discrepancy should be noted and corrected before shipping the lift to the customer. Any small scratches visible on the stages should be polished with very smooth emery (400 grit). Holeless telescopic jack...
-
Page 9: Air Bleeding
bleeding To assure proper functioning of the jack, it is important to take any air out of it by applying the following procedure: 1. Remove the “Spring Buffers”. 2. Lower the car (if already installed) so the jack is completely retracted. Always be sure that the cylinder remains completely retracted. -
Page 10: Followers Guides
4. Install the car on the jack 5. Install a pair of shoes on each bracket 6. Install brackets on both sides of the follower guides 7. Run the jack up and down a few times 8. Make adjustments, if necessary Holeless telescopic jack... -
Page 11: Twin Jacks
Twin jacks Whenever two jacks are used for a single elevator, the oil inlet should divide into identical sections. Otherwise, the difference of friction (or restriction) between the sections could cause an unbalance of the loads between the cylinders. If for some reason, it is impossible to have identical paths, the use of an oil divider is to be considered. Increasing the diameter of the pipe used also helps. -
Page 12: Maintenance Program
15. Bleed the air in the jack, following the steps described in the venting the synchronized telescopic jack section shown previously 16. Re-install the hose to recuperate the oil on the straight or 90° coupling Note Pay special care to O’rings. Holeless telescopic jack... -
Page 13: Check Valve Replacement
Check valve replacement The following is the general procedure to change the check valve. These instructions show a 2 sections telescopic jack but the procedure is the same no matter the number of sections. 1. Lift the car up to have enough space to remove the entire section of the jack. 2. - Page 14 14. Re-install the bleeder taken off previously. 15. Attach the piston to the car. 16. Follow the procedure described further to resynchronize the jack. Holeless telescopic jack...
-
Page 15: Warranty Policy
Warranty policy GUARANTEE 1. ITI HYDRAULIK warrants to the original purchaser that this Product is free from any defects in materials or workmanship and agrees to repair or replace, in its sole discretion, any Product found to be defective during the period of one year from the date of delivery to the customer. - Page 16 14. ITI HYDRAULIK provides free installation manuals on its website and technical assistance on its Products. This information is intended for people with knowledge and skills in this area who will use it at their own risk. ITI HYDRAULIK assumes no liability for damage caused by anyone using these manuals.
- Page 17 PRIORITY CLIENT 3611 ROUTE 346, SAINTE-JULIENNE (QUÉBEC) J0K 2T0 TELEPHONE : 450-831-3229 | FAX : 450-831-2219 | TOLL FREE : 1-800-953-3229 | E-MAIL : INFO@ITIHYDRAULIK.COM WWW.ITIHYDRAULIK.COM Installation guide...