
Related Manuals for Sunmi K2


Summary of Contents for Sunmi K2
- Page 1 Kiosk User Manual Book Before using this product, please read this manual carefully and keep it properly.
-
Page 2: Quick Setting
Quick Setting Only several steps to enable the smart commercial device K2: Four installation styles of K2 Self-service Kiosk After turning on the complete machine power supply, the screen will be lit. Then you will enter the first boot interface and just simply operate according to the instructions. - Page 3 Quick Start Guide Open the back plug cover. Plug the power line into the power interface. Press the buttons on both side of the host Press the power switch to turn on the host. Plug the network cable into the network interface. at the same time to open the flip panel.
-
Page 4: System Switch
Paper Changing Steps for the Inside Printer Brief Introduction of Self-Service Kiosk Indicator light Face camera Touch screen Trumpet Printer System switch Host switch Code scanner Nameplate Face camera Code scanner Camera used to shoot human face. Used to read codes. System switch Touch screen In standby state, short press to boot, short press... -
Page 5: Power Interface
Installation Steps of the Four Types of Self-Service Kiosk Camera maintain cover Power supply switch Micro-USB debug port Protection cover on the mainboard USB interface Wired network interface Power interface Protection cover on the mainboard Micro-USB debug port Inside the host. Mainboard external interfaces, like USB port, On the mainboard and used for software update TF card port, etc, will be exposed after opening it. -
Page 6: Installation Components
Installation Components A Wall-mounted: B Floor-standing: C Floor-standing with table: D Eco-service expansion: Host Host back hanger Host Host back support Host Host back support Host Host back support Mainboard maintain Wall-mounted rack Mainboard maintain Back plug cover Mainboard maintain Screw Mainboard maintain Back plug cover... - Page 7 A Installation Steps of Wall-mounted 1130 Drill holes on the wall Install the wall-mounted rack Install the host back hangers Hang the host Drill Ø10 holes according to the height and Firmly fix the wall-mounted rack on the wall by four M8X50 Fix the two host back hangers with host by four M6X12 screws;...
- Page 8 B Installation Steps of Floor-standing Preassemble the stand on the baseplate Insert the host back support Hang the host Assemble the mainboard maintain cover Preassemble the stand on the baseplate by two Insert the host back support into the stand. Hang the host onto the back support.
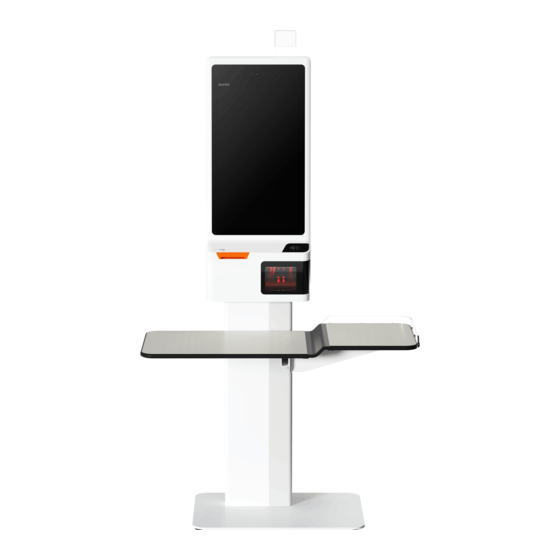
- Page 9 C Installation Steps of Floor-standing with Table D Installation Steps of Eco-service expansion (The same installation steps of the baseplate, stand and host with the Floor-standing) Preassemble the table support screws Preassemble the table Separate the stand Fix the stand on the baseplate Twist two M6X12 screws into the stand for 5-10 rounds.
- Page 10 Insert host back support Fix the plastic front shell Fix the host with back support Assemble the mainboard maintain cover Insert the host back support into the stand. Fix the plastic front shell onto the metal stand again by clips. Hang the host onto the back support Fix the mainboard maintain cover on the host.
- Page 11 Wall-mounted rack packing:315mm width × 366mm length × 37mm depth,weight:2.35kg Trumpet 2x3W (stereo) External interface 4x USB typeA, 1x RJ45 LAN,1x Micro-USB debug port Package packing List of K2 Host 1x3.5 Headphone jack,1xPower interface Extended Memory Support MicroSD(TF),up to 128GB K2 Host Power supply Input:AC100~240V,Output:DC12/24V...
- Page 12 Product certificate Our company will not be responsible for any damage or inconsistent with the product. Manufacture:Shanghai SUNMI Technology Group Co.,Ltd. problem caused by any option or consumable (not the Please refer to the material item. Our company owns the interpre- Address: Room 605, Building 7, No.
Need help?
Do you have a question about the K2 and is the answer not in the manual?
Questions and answers