Table of Contents
Advertisement
Quick Links
Product Installation and Safety Manual
www.GenTent.Com/Installation
Read this Manual in Color Online
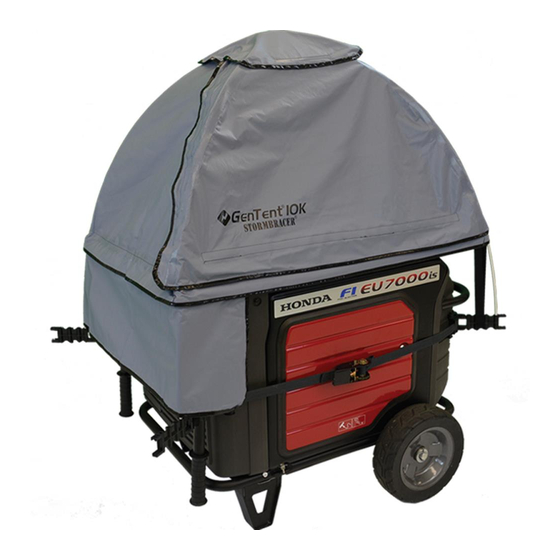
Congratulations on your purchase of the GenTent® XKi, the first ever wet
weather safety canopy specifically engineered for inverter and fully encased
generators. We are proud to provide this high quality product.
Copyright © 2017 GenTent® Safety Canopies, LLC – All Rights Reserved V1.2 – September 2017
GenTent
Free Installation Videos
www.GenTent.Com/Manual
®
XKi/XKu
THANK YOU
Page: 1 of 26
Advertisement
Table of Contents

Subscribe to Our Youtube Channel
Related Manuals for GenTent XKi


Summary of Contents for GenTent XKi
- Page 1 Free Installation Videos www.GenTent.Com/Installation Read this Manual in Color Online www.GenTent.Com/Manual THANK YOU Congratulations on your purchase of the GenTent® XKi, the first ever wet weather safety canopy specifically engineered for inverter and fully encased generators. We are proud to provide this high quality product. Copyright © 2017 GenTent® Safety Canopies, LLC – All Rights Reserved V1.2 – September 2017...
-
Page 2: Table Of Contents
Otherwise, please visit www.gentent.com/register,or mail the completed page at the back of this manual so that we can establish your purchase date and keep you informed of any periodic updates. Copyright © 2017 GenTent® Safety Canopies, LLC – All Rights Reserved V1.2 – September 2017... -
Page 3: Important Product Safety
CAUTION Always grasp fiberglass rods firmly during installation to avoid the whipping motion that can occur when a bent fiberglass rod is mistakenly released. CAUTION Avoid using your portable generator in hurricane force winds above 70mph. NOTE Should generator handle cause significant stretching of the elastic straps when extended; it is advisable to release the elastics straps on the handle side of the generator before extending generator handles. NOTE Should GenTent cover block pull starter, it is advisable to release the elastic straps on the pull starter side and temporarily move the GenTent canopy out of the way. NOTE When using GenTent during snow storms, it is recommended to periodically brush away any accumulation that blocks the top vent. Copyright © 2017 GenTent® Safety Canopies, LLC – All Rights Reserved V1.2 – September 2017... -
Page 4: Limited Three Year Warranty
GenTent products or components returned without an RMA and proof of purchase are not covered (see How to Get Service). Also, consequential and incidental damages are not recoverable under this warranty. Some states do not allow the exclusion or limitation of incidental or consequential damages, so the above limitation or exclusion may not apply to you. What GenTent Safety Canopies LLC Will Do During the term of this Warranty, GenTent Safety Canopies, LLC will repair any GenTent canopy or replace any GenTent frame or clamp component that proves to be defective in materials or workmanship. In the event repair of a GenTent canopy is not possible, GenTent Safety Canopies will replace your GenTent canopy with a new GenTent canopy of similar composition and price. How To Get Service Contact GenTent Safety Canopies LLC by emailing customercare@gentent.com, calling 781‐334‐ 8368 or writing us at the address below to discuss your Warranty concern and obtain a RMA (return materials authorization). You must provide a copy of the original receipt or packing slip that you received as part of your purchase. GenTent Safety Canopies, LLC Attn: Customer Warranty Service 44 Gile Rd Nottingham, NH 03290 How State Law Applies This warranty gives you specific legal rights, and you may also have other rights, which vary from state to state. Copyright © 2017 GenTent® Safety Canopies, LLC – All Rights Reserved V1.2 – September 2017... -
Page 5: Package Contents
GenTent 20K 1 – GenTent 10k Canopy 1 – GenTent 20k Canopy 1 – Short side Electrical Skirt –opaque 1 – Short side Electrical Skirt – stacking 1 – Long side Electrical Skirt –opaque clear vinyl 4 – 40” Fiberglass frame rods 1 – Long side Electrical Skirt – stacking clear vinyl 4 – 44” Fiberglass frame rods Copyright © 2017 GenTent® Safety Canopies, LLC – All Rights Reserved V1.2 – September 2017... -
Page 6: Installation Overview
Strap it: Install Ratchet Buckle, Angle Braces, and Extension Arms. Frame it: Install frame rod to the center connector, then into the correct hole in the Extender Arm, and repeat on all four corners. Cover it: Slide the GenTent canopy over the frame, then secure by sliding the elastic straps under the Extender Arm. Once the GenTent is installed, it can be left in place during generator storage, or easily removed and stored separately. Should you wish to store the generator with the GenTent attached, we recommend releasing the elastic straps to keep them fresh and ready. For simplified transport, the GenTent Canopy, GenTent Frame and the Extender Arms and leaving the Angle Brace strap mount in place. Alternatively, the entire strap mounted assembly can be removed while leaving the Extender Arms installed. Copyright © 2017 GenTent® Safety Canopies, LLC – All Rights Reserved V1.2 – September 2017... -
Page 7: Strap It: Install The Ratchet Strap Mount
Figure 1: Corner Mount Components This Angle Brace and Extension arms work together with the Kevlar ratchet buckle system to create a stable and strong mounting point for the GenTent on your inverter generator. Please familiarize yourself with these components: ‐ Kevlar strap – this strap is black and 1” wide. It is installed through the Angle Braces. It is attached to a ratchet buckle for tightening the assembly to your inverter case. ‐ Angle Brace – this component is held to the four corners of your case, and creates a mounting and adjustment point for the Extender Arms. ‐ Foot Grommet – your package will contain 16 total grommets, one bag of 8 with a 5/8” outside diameter (the small grommet) and one bag of 8 with a 1” outside diameter (the large grommet). These grommets are pressed onto the four pins of the Angle Brace to create mounting “feet”. The feet grip the case without marring the surface. Different sizes are used to provide for optimal fit on cases with different curvature. ‐ Extender Arm – this component snaps into place on the Angle Brace as well as into other Extender Arms. A maximum of 3 Extender Arms per corner will be used during setup and operation. Copyright © 2017 GenTent® Safety Canopies, LLC – All Rights Reserved V1.2 – September 2017... -
Page 8: Angle Brace Detail Diagram
Page: 8 of 26 The following diagrams provide a more detailed description of the key features of the Angle Brace and Extender Arm: Angle Brace Detail Diagram Figure 2: Angle Brace Detail Diagram Extender Arm Detail Diagram Figure 3: Extender Arm Detail Diagram Copyright © 2017 GenTent® Safety Canopies, LLC – All Rights Reserved V1.2 – September 2017... -
Page 9: Step 1: Determine The First Angle Brace Location
Step 2: Install the Foot Grommets The foot grommets provide the basic leveling of the mount assembly on the inverter generator. Follow this procedure to determine whether to use same sized grommets on each Angle Brace, small grommets on top/large on bottom, or large on top/small on bottom. Observe the corner curvature of your case where the Angle Braces will be installed. It will either be relatively vertical, or will have a positive slope or negative slope (please see diagram below): Figure 4: Inverter Case Corner Slope Orientation Copyright © 2017 GenTent® Safety Canopies, LLC – All Rights Reserved V1.2 – September 2017... - Page 10 Figure 6: Angle Brace Grommets - Vertical Case Slope Copyright © 2017 GenTent® Safety Canopies, LLC – All Rights Reserved V1.2 – September 2017...
-
Page 11: Step 3: Thread The Kevlar Strap
Figure 7: Angle Brace Grommets - Negative Case Slope Once installation of the grommets is complete, test fit an Angle Brace onto the location where they will be installed. For any case that is not vertical, the Angle Brace should be more horizontal than the test fit prior to installing the grommets. Step 3: Thread the Kevlar Strap The objective for this step is to thread the Kevlar Strap through each of the four Angle Braces without twisting the orientation of the strap. The ratchet buckle has a ratcheting handle that is used to tighten the strap that is fed through the center slot. The following picture shows the ratchet buckle fully open. Copyright © 2017 GenTent® Safety Canopies, LLC – All Rights Reserved V1.2 – September 2017... - Page 12 NOTE: During final adjusting, be sure to position the strap behind the four guide pins at the left and right edges of the Angle Brace Repeat this operation for each of the three remaining subsequent corners. Figure 8: Kevlar Strap Correctly Installed through Angle Brace Copyright © 2017 GenTent® Safety Canopies, LLC – All Rights Reserved V1.2 – September 2017...
-
Page 13: Step 4: Strap The Assembly To The Inverter Case
OW TO OOSEN THE ATCHET UCKLE ‐ You may find that the assembly needs to be adjusted but that the strap is too tight. The ratchet buckle can be loosened easily. ‐ The Ratchet Buckle has a brass colored, spring loaded release on the ratcheting arm. Pull the release and fully open the ratchet arm. ‐ Let go of the release and close the ratchet arm about halfway. The strap will loosen by one tooth. Repeat as necessary so that adjustments can be made. Copyright © 2017 GenTent® Safety Canopies, LLC – All Rights Reserved V1.2 – September 2017... - Page 14 Page: 14 of 26 IMPORTANT: Be sure that the back of the ratchet buckle is facing the Inverter case and that the Kevlar strap is flat and untwisted before tightening! Referencing the basic instructions above, pull the Kevlar strap through until there is little slack left in the strap. While holding the strap taut, slide the Angle Braces onto the Inverter Case. While continuing to hold the end strap taut, crank the ratchet a few times until the assembly is tight enough that is stays on the case. The Angle Braces can now be adjusted. Copyright © 2017 GenTent® Safety Canopies, LLC – All Rights Reserved V1.2 – September 2017...
- Page 15 Page: 15 of 26 Make the final adjustment by putting the Angle Braces in their predetermined location. The strap must Make sure that the Kevlar strap is sitting properly in the Angle Brace. lay flat behind the guide pins as shown below: Figure 9: Kevlar Correctly Installed Behind Center Section and Guide Pins While tightening the strap, watch the Angle Brace sections to be sure they are not pulled out of position. If any begin to move then slide it back into position before tightening further. The assembly is properly tight when the grommets show distinct Do not overtighten! flattening as shown below. Copyright © 2017 GenTent® Safety Canopies, LLC – All Rights Reserved V1.2 – September 2017...
-
Page 16: Step 5: Connect The Extender Arms
IMPORTANT: Hold the Extender so that the Rod Holes are pointing upward ‐ Figure 2 Figure 3 Refer to and ‐ Align the Extender Arm prongs into the installation slots at the top and bottom of the Angle Brace. ‐ Push the Extender Arm straight into the Angle Brace until the pivot pins snap into place. Figure 10: Connect Extender to Angle Brace Copyright © 2017 GenTent® Safety Canopies, LLC – All Rights Reserved V1.2 – September 2017... - Page 17 ‐ Adjust the Extenders across the Angle Brace Adjustment Teeth to their furthest positions away from the inverter case (position ‐2 and +2 in the diagrams below. Figure 12: Angle Brace Tooth Numbering Copyright © 2017 GenTent® Safety Canopies, LLC – All Rights Reserved V1.2 – September 2017...
- Page 18 Install Two Extenders onto each Angle Brace ‐ Position the Extender Arms at position 0 of the Angle Brace ‐ Measure the distance from one of the exhaust side rod holes to the adjacent Extender Arm just installed. Find the hole between 33” and 35” for GenTent 10k (Note: For GenTent 20k, the desired measurements are 40” to 42”). If needed, add another Extender to both dual Extender Arm and repeat this measurement. AKE INAL XTENDER RM DJUSTMENTS Now measure the distance between the rod holes on the two dual (or triple) Extender Arms. ‐ If the distance is between 24” and 26” for GenTent 10k (or between 28” and 30” for GenTent 20k), then you have identified the rod holes. ‐ If the distance is less than needed, adjust each dual (or triple) extender arm outward on the Angle Brace by one position and repeat this measurement. Copyright © 2017 GenTent® Safety Canopies, LLC – All Rights Reserved V1.2 – September 2017...
- Page 19 Page: 19 of 26 Figure 14: Locate Remaining Extender Rod Holes Copyright © 2017 GenTent® Safety Canopies, LLC – All Rights Reserved V1.2 – September 2017...
-
Page 20: Disassembling The Strap Mounting Parts
EMOVING TRAP OUNTING SSEMBLY FROM THE NVERTER ENERATOR ‐ The Ratchet Buckle has a brass colored, spring loaded release on the ratcheting arm. Pull and hold this release and open the ratchet arm to its fully open and flat. ‐ To loosen the strap and adjust Let go of the release and close the ratchet arm about halfway. The strap should loosen slightly. Repeat as necessary so that adjustments can be made. ‐ To completely remove the strap: The fixed side of the Ratchet Buckle also has a spring‐loaded release. Pull and hold this release and the Kevlar strap can be pulled all the way out. See helpful video at here https://youtu.be/1kE4xnA‐eEY Copyright © 2017 GenTent® Safety Canopies, LLC – All Rights Reserved V1.2 – September 2017... -
Page 21: Install Gentent Frame On The Xki Arms
Repeat for final two fiberglass rods ‐ Recheck the XKi mounting assembly. The Angle Braces should remain firmly in place and the Extender Arms may exhibit a slight upward lean. ‐ The Extender Arm assemblies at each corner should be in a straight line. If any are exhibiting an arc, move the Extender Arm one position in the direction of the arc on the Angle brace, or alternatively move the entire Angle Brace in the direction of the arc until the Extender Arms straighten out. Figure 15: Center Connector with Center Pin Facing Upward Copyright © 2017 GenTent® Safety Canopies, LLC – All Rights Reserved V1.2 – September 2017... -
Page 22: Secure Gentent Canopy Over Gentent Frame
Center GenTent canopy such that Vent Rod is centered under the top cap. NOTE: Be certain that the fuel door opening does not catch behind the fiberglass rods. The rods should always be tucked into the seams. This can be checked by opening the door after installation. Slide one corner elastic over the corresponding Extender Arm, under the Extender Arm, in a scallop behind a set of retention pins Repeat on opposite corner, then on the remaining two corners. Recheck and adjust canopy if necessary. Copyright © 2017 GenTent® Safety Canopies, LLC – All Rights Reserved V1.2 – September 2017... -
Page 23: Select And Install Electrical Skirt
), then wrap the 6‐inch section onto the adjacent side of the electrical panel and press firmly. Now press the main skirt body over the electrical panel to the other corner, and then wrap that edge around the adjacent side and press firmly in place. ‐ Flip the over flap down and over the electrical skirt (Figure 16). Figure 16: Canopy Over Flap Exposed and then Closed Note: The intent of the electrical skirt is to cover the electrical outlets in the front and about 6” around the adjacent sides. Do not cover other parts of your generator with the electrical skirts, especially the exhaust area! Copyright © 2017 GenTent® Safety Canopies, LLC – All Rights Reserved V1.2 – September 2017... -
Page 24: Important Gentent Usage Tips
Optional Clear Stacking Skirts Proper Door Sealing Tip ‐ GenTent now ships with the StormBracer™ door. This door wraps around the adjacent sides of the GenTent much like the skirts, forming a brace against storms. Each time you close the door, it must be pressed firmly back in place. If this is not done, holes may exist between the pieces of Velcro® which can allow water to seep in. ‐ In practice, the best way to achieve this is to close the door, then follow this procedure: Align the door properly so that the side Velcro and lower Velcro are aligned as closely as possible and are touching Then starting at the top corner of the door pinch canopy around the frame rods and slide your hand to the bottom while pinching. Repeat on the other side Check the door sides to see if you can see any gaps in the Velcro sealing. Should there be any gaps, repeat the pinching procedure. Note: Pull the door down and connect the bottom Velcro first, then use the pinch & slide technique above to secure the sides. The bottom edge should cover the under‐flap stitching! Copyright © 2017 GenTent® Safety Canopies, LLC – All Rights Reserved V1.2 – September 2017... - Page 25 Page: 25 of 26 GenTent XKi Accessories and Spare Parts GenTent accessories are available at www.gentent.com/accessories. Spare parts are available at www.gentent.com/spares. Here is a short list of what we offer: Copyright © 2017 GenTent® Safety Canopies, LLC – All Rights Reserved V1.2 – September 2017...
-
Page 26: Register Your Purchase - Activate Your Warranty
Name: ___________________________________________________________ E‐Mail Address: ____________________________________________________ Address: __________________________________________________________ City: _____________________________________ State: ____________________________________ Country: __________________________________ Postal Code: _______________________________ Phone Number: ____________________________ Purchase Information: GenTent 10k XKi GenTent XKi Hdw Kit GenTent 20k XKi GenTent Purchase Date: _____ / ______/ ________ (mm/dd/yyyy) GenTent Purchase Place: ______________________________________________________________ Generator Make: ______________________ Generator Model: ______________________ In addition to activating your product warranty, registering allows us to keep in contact with you from time to time with important product updates, generator safety tips and special offerings for registered customers. Please note we never share your contact information. Copyright © 2017 GenTent® Safety Canopies, LLC – All Rights Reserved V1.2 – September 2017...
Need help?
Do you have a question about the XKi and is the answer not in the manual?
Questions and answers