Table of Contents
Advertisement
Quick Links
Advertisement
Table of Contents

Related Manuals for Ross Carbonite Ultra


Summary of Contents for Ross Carbonite Ultra
- Page 1 Carbonite Ultra User Manual v3.0...
- Page 2 9. We will go above and beyond in times of crisis. If there's no one to authorize the required action in times of company or customer crisis - do what you ii • Thank You For Choosing Ross — Carbonite Ultra User Manual (v3.0)
- Page 3 If the provided plug does not fit into your outlet, included in this publication to call attention to these consult an electrician for replacement of the obsolete specific requirements. outlet. Carbonite Ultra User Manual (v3.0) — Document Information • iii...
- Page 4 For continued safety, replace equipment. all barriers after servicing. 22. Certain parts of this equipment still present a safety hazard with the power switch in the OFF position. iv • Document Information — Carbonite Ultra User Manual (v3.0)
- Page 5 Ross Video. The upgrades Cet appareil numérique de la classe “ A ” est conforme are posted on the Ross Video website, and are free of a la norme NMB-003 du Canada. charge for the life of the switcher.
- Page 6 Use of Hazardous Substances in Electrical and Technical Support Electronic Products (China RoHS) At Ross Video, we take pride in the quality of our Ross Video Limited has reviewed all components and products, but if a problem does occur, help is as close as processes for compliance to: the nearest telephone.
-
Page 7: Table Of Contents
To Set Up a Transition Limit........33 ME Copy................20 To Copy an ME Using the Control Panel....20 To Copy an ME Using DashBoard......20 Patterns, Washes, and Mattes......34 Patterns.................34 To Set Up a Pattern..........34 Carbonite Ultra User Manual (v3.0) — Contents • vii... - Page 8 To Delete a Memory..........49 To Connect to the Frame........107 Clear Memories..............49 To Change the IP Address........107 To Clear the Memory Registers......49 Panel Network Setup............107 To Configure the Network Setting......107 To Assign a Custom Name........108 viii • Contents — Carbonite Ultra User Manual (v3.0)
- Page 9 To Set the Power Save Mode and Timer.....138 To Set Up a Video Processor MultiViewer......121 Roll GPO/Roll Clip...............139 To Set Up a MultiViewer Clock..........122 To Set the Roll GPO/Clip Behavior......139 Shift Toggle................139 To Set the Shift Toggle.........139 Carbonite Ultra User Manual (v3.0) — Contents • ix...
- Page 10 To Run the Control Panel Test......148 To Run the LED Test..........148 To Run the Display Test........148 To Run the Tally Test..........148 To Run the GPI Input Test........149 To Run the GPI Output Test.........149 Error Messages..............149 x • Contents — Carbonite Ultra User Manual (v3.0)
-
Page 11: Features
Features effect. Thank you for buying a Ross Video Carbonite Ultra Series Multi-Definition Live Production Switcher. The Ultra series builds on the Ross Video reputation for designing switchers that fit the needs of any production environment. -
Page 12: Mediamanager
• PQ — Perceptual Quantizer. Memory System ® • S-Log3 — Sony S-Log3. Storage for 100 complete switcher snapshots per ME, ™ MiniME , and Canvas comes standard with all switchers. 12 • Features — Carbonite Ultra User Manual (v3.0) -
Page 13: Multiscreen
RossLinq interface. Up to two (2) channels with dedicated alpha can be controlled from the XPression Software Client. This feature supports still images only. Carbonite Ultra User Manual (v3.0) — Features • 13... - Page 14 Each switcher comes with a single license of XPression. Additional licenses can be ordered. 14 • Features — Carbonite Ultra User Manual (v3.0)
-
Page 15: Control Panel Overview
8. Key Select Buttons — These buttons are used to the next transition. choose which keyer is selected. The key type buttons and key bus follow the selected keyer. These are Carbonite Ultra User Manual (v3.0) — Control Panel Overview • 15... -
Page 16: Cb9 Control Panel
10. Video Source Buses — These buses are broken into the Preset, Program, and Key/Aux/Custom Control buses. The Preset bus is the bottom row of source buttons and selects the video source that will be 16 • Control Panel Overview — Carbonite Ultra User Manual (v3.0) -
Page 17: Menu System
If you select a source button that an external device is assigned to, the peripheral control menu for that specific device is shown. Carbonite Ultra User Manual (v3.0) — Menu System • 17... -
Page 18: Switcher Basics
• Internal — Internal video sources come from internally generated video, such as Media-Store channels, matte color, and black. 18 • Switcher Basics — Carbonite Ultra User Manual (v3.0) -
Page 19: To Select A Source On A Bus
• Background Bus — use the BACKGROUND Keep the following in mind: bus. Keep the following in mind when working with • Preset Bus — use the PRESET bus. re-entries: Carbonite Ultra User Manual (v3.0) — Switcher Basics • 19... -
Page 20: Flexiclean Clean Feed
3. Click a Source button to select the source you want to copy. Video preview allows you to use an additional monitor 4. Click Copy. to preview what the next shot is going to be. The preview 20 • Switcher Basics — Carbonite Ultra User Manual (v3.0) -
Page 21: Dashboard
Carbonite switcher, XPression Live Graphics System, and the BlackStorm Playout Server all through a touchscreen interface. Through ViewControl you can select sources, perform transitions, and run custom controls. Carbonite Ultra User Manual (v3.0) — DashBoard • 21... -
Page 22: Mediamanager
The buttons in the top right corner allow you to navigate around in the menu tree, and the stylized mnemonic buttons at the bottom allow you to access different menus. 22 • DashBoard — Carbonite Ultra User Manual (v3.0) -
Page 23: Control Area
Click Menu and select the menu you want to navigate to. When the Live Assist menu is selected, the sub-menus will follow actions in the bus area when PaneLINK is on. Carbonite Ultra User Manual (v3.0) — DashBoard • 23... -
Page 24: Ultritouch
DashBoard computer. 1. Tap the area and bus that you want to select a source 2. Tap the source that you want to select or tap Exit to close the popup. 24 • Ultritouch — Carbonite Ultra User Manual (v3.0) -
Page 25: Viewcontrol (Hd Only)
Bus Selection Buttons The bus selection buttons allow you to select the different buses on different ME outputs of the switcher. Carbonite Ultra User Manual (v3.0) — ViewControl (HD Only) • 25... -
Page 26: Custom Control Button Setup
Tip: You can change the name of a tab by selecting a DashBoard computer. button on the tab and then entering a new name in the Group Name field. 26 • ViewControl (HD Only) — Carbonite Ultra User Manual (v3.0) -
Page 27: To Set Up The Multiviewer For Viewcontrol
10. Use the In/Out knob to select a source for the box. Note: The large box on the left should always be assigned to PV and the large box on the right assigned to PGM. Carbonite Ultra User Manual (v3.0) — ViewControl (HD Only) • 27... -
Page 28: Transitions
™ 1. Select the ME, MiniME , or Canvas that you want that is selected. to perform a transition on. 28 • Transitions — Carbonite Ultra User Manual (v3.0) -
Page 29: To Override The Pre-Delay Setting
• Initiate a transition with the fader handle. The pre-delay countdown is aborted and the transition 1. Press DISS. proceeds as you move the fader handle. Tip: You can use the same procedure for a MiniME or Canvas. Carbonite Ultra User Manual (v3.0) — Transitions • 29... -
Page 30: Whiteflash
Press ME RATE in the Effects Memory area for the transitions. ME you want to change the rate for, use the keypad to enter the new rate, and press Enter. (Does not apply to CB1 or CB2.) 30 • Transitions — Carbonite Ultra User Manual (v3.0) -
Page 31: To Apply A Border To A Pattern
5. Select a default or custom color for the border (borders only). 3. Use the Dirctn knob to select the direction that the wipe travels. • Default — use the Load knob to select a preset color for the border. Carbonite Ultra User Manual (v3.0) — Transitions • 31... -
Page 32: Mediawipe Transitions
• Dissolve (1) — Use the Start knob to select the point where the dissolve starts and the Rate Keep the following in mind: knob to select the duration of the transition. Keep the following in mind when performing MediaWipe: 32 • Transitions — Carbonite Ultra User Manual (v3.0) -
Page 33: To Set The Mediawipe Layer
2, but under remaining keys. • Key3 — MediaWipe occurs over the background and key 3, but under key 4. • Key4 — MediaWipe occurs over the background and all keys. Carbonite Ultra User Manual (v3.0) — Transitions • 33... -
Page 34: Patterns, Washes, And Mattes
• Border — Assign a border to a WIPE transition or patten. Not all patterns can be rotated. a key. The wipe border is filled with the selected color. 34 • Patterns, Washes, and Mattes — Carbonite Ultra User Manual (v3.0) -
Page 35: To Set Up A Matte Color
5. Use the Hue knob to adjust the hue of your custom color. 6. Use the Sat knob to adjust the saturation of your custom color. 7. Use the Lum knob to adjust the luminance of your custom color. Carbonite Ultra User Manual (v3.0) — Patterns, Washes, and Mattes • 35... -
Page 36: Keying
• T/Bttm — adjusts the cropping of the bottom of the box mask Mask selects the type of mask that is applied to the key (Masks on page 42) 36 • Keying — Carbonite Ultra User Manual (v3.0) -
Page 37: Self Keys
9. Use the Mode knob to override the shaped setting for the key. 12. Use the ShowAl knob have the preview output of the current ME switch to the alpha signal that is Carbonite Ultra User Manual (v3.0) — Keying • 37... -
Page 38: Ultrachrome 2 Chroma Key
However, this design may have 38 • Keying — Carbonite Ultra User Manual (v3.0) - Page 39 You should • Gain — use this setting to lift the fill image. not have to adjust this setting. You are looking to achieve solid fill content. Carbonite Ultra User Manual (v3.0) — Keying • 39...
-
Page 40: Dve Keys
8. Press NEXT. If you have applied a border to the Tip: You can see where DVE channels are allocated from the key, additional NEXT presses may be required. Status page in DashBoard. 9. Crop the key horizontally as follows: 40 • Keying — Carbonite Ultra User Manual (v3.0) -
Page 41: To Apply A Dve To A Key (Fly Key)
Hold the SELF KEY, AUTO SELECT, or CHR KEY button again and press DVE to turn off the Fly Key. Tip: You can use the same procedure for a MiniME or Canvas. Carbonite Ultra User Manual (v3.0) — Keying • 41... -
Page 42: Show Alpha
To Box Mask a Key Note: Pattern masks are not supported in UHDTV1. Box masks can be adjusted for size, location, rotation, and multiplication. 42 • Keying — Carbonite Ultra User Manual (v3.0) -
Page 43: Split Keys
• A key swap can be recorded as part of a custom has been set up and you want to apply a different alpha control. 1. Set up your key with the video source you want to use. Carbonite Ultra User Manual (v3.0) — Keying • 43... -
Page 44: To Perform A Key Swap
Use the same procedure for any key combination. 1. Press and hold the KEY 2 SEL button. 2. Press the KEY 3 button in the next transition area. 44 • Keying — Carbonite Ultra User Manual (v3.0) -
Page 45: Memory Functions
You can deselect all inclusions for a memory so that it doesn't affect these areas. This can be used to create a memory that only recalls Media-Store or Aux bus selections. Carbonite Ultra User Manual (v3.0) — Memory Functions • 45... -
Page 46: To Store A Memory On The Global Memory Area
How to recall a memory using the source buttons on the Keep the following in mind: CB1 and CB2 control panels. Keep the following in mind when recalling memories: Note: This procedure only applies to the CB1, CB2, and CB9. 46 • Memory Functions — Carbonite Ultra User Manual (v3.0) -
Page 47: To Recall A Memory On The Effects Memory Area
• Matte colors (background, wash or borders) 5. Press the number for the memory register you want • Keyer settings like clip, gain, transparency to select. • Mask position and size Carbonite Ultra User Manual (v3.0) — Memory Functions • 47... -
Page 48: To Set The Effects Duration
PST Bus Set how the sources selected on the preset bus are recalled. 48 • Memory Functions — Carbonite Ultra User Manual (v3.0) -
Page 49: Deleting A Memory Or Bank
You cannot clear individual memory registers. To Clear the Memory Registers Delete all the memories on the switcher from the control panel. 1. Press MENU > Reset > NEXT > NEXT. Carbonite Ultra User Manual (v3.0) — Memory Functions • 49... -
Page 50: Switcher Sets
• All — store all registers to the set. • Mems — store only the memory registers to the set. 50 • Switcher Sets — Carbonite Ultra User Manual (v3.0) -
Page 51: Media-Store
AES output. Embedded • When you load an animation to an off-air Media-Store audio is not available on the AES outputs. channel, or the animation goes off-air with a Carbonite Ultra User Manual (v3.0) — Media-Store • 51... -
Page 52: Loading Stills Or Animations
• <..> — up one switcher. If a media item is created in one color space and the 52 • Media-Store — Carbonite Ultra User Manual (v3.0) -
Page 53: Media-Store Capture
ME. the alpha with the capture (Yes) or not (No). You must have an input BNC selected as the capture source to capture the alpha. Carbonite Ultra User Manual (v3.0) — Media-Store • 53... -
Page 54: Media-Store Attributes
5. Use the Func knob to select how you want to save Height shows the height of the media item in pixels the attributes. 54 • Media-Store — Carbonite Ultra User Manual (v3.0) -
Page 55: To Lock A Media Number Place And Bank
When you are communicating with the switcher, a switcher. If a media item is created in one color space and the moving status indicator is shown in the lower right corner Carbonite Ultra User Manual (v3.0) — Media-Store • 55... - Page 56 Depending on what you are loading, and if the item has been loaded before, this could take a few seconds. Figure 18: Playlist 56 • Media-Store — Carbonite Ultra User Manual (v3.0)
-
Page 57: Clip Player
The clip player does not support playing clips when the Tip: Click Reset Clip Player to reset the clip player if it is in a switcher is operating in a pSF video format. non-responsive state. Carbonite Ultra User Manual (v3.0) — Clip Player • 57... -
Page 58: To Load A Clip
The clip is loaded and queued into the clip player. source on-air. Depending on the clip you are playing, you may have to increase this value to ensure that 58 • Clip Player — Carbonite Ultra User Manual (v3.0) - Page 59 3. Click Clip Details to view general, video, and audio information on the currently loaded clip. Carbonite Ultra User Manual (v3.0) — Clip Player • 59...
-
Page 60: Custom Controls
GPI trigger, to continue the custom control. When you create a custom control, you record a series of button presses on the panel, as well as special 60 • Custom Controls — Carbonite Ultra User Manual (v3.0) -
Page 61: To Insert A Special Event Into A Custom Control
2. Press INSERT. • When a custom control is running, the button on the custom control bus is red. Carbonite Ultra User Manual (v3.0) — Custom Controls • 61... -
Page 62: To Run A Custom Control
• Delete — delete the entire custom control • Edit — select the position in the custom control • Delete Event — delete the currently selected to edit events event 62 • Custom Controls — Carbonite Ultra User Manual (v3.0) -
Page 63: Custom Control Events
(Alpha) of the key. Click the Source button and select the source that you want on the selected bus. Cancel All CC Special > Cancel all running custom Cancel All controls. Carbonite Ultra User Manual (v3.0) — Custom Controls • 63... - Page 64 Click a Mode button to Green, Blue) you want to select whether you want adjust, or RGB for all of the chroma key to operate them. in basic mode (Basic), or advanced (Advanced). 64 • Custom Controls — Carbonite Ultra User Manual (v3.0)
- Page 65 (Absolute) or reset (Reset) the parameter. Some selections will not be available when you reset the parameter. Enter a new value in the Value field. Carbonite Ultra User Manual (v3.0) — Custom Controls • 65...
- Page 66 (Absolute) or reset (Reset) the parameter. Some selections will not be available when you reset the parameter. Enter a new value in the Value field. 66 • Custom Controls — Carbonite Ultra User Manual (v3.0)
- Page 67 Click the Color button reset the parameter. and select the preset Enter the amount of color you want to apply to cropping in the Value (%) the border. field. Carbonite Ultra User Manual (v3.0) — Custom Controls • 67...
- Page 68 Value (%) (Absolute) or reset field. (Reset) the parameter. Some selections will not be available when you reset the parameter. Enter the amount of cropping in the Value (%) field. 68 • Custom Controls — Carbonite Ultra User Manual (v3.0)
- Page 69 DVE wipe transition of the Value (%) field. Reset selected ME. Click the ME button for the ME that you want to perform the event on. Click Reset to reset the DVE wipe parameters. Carbonite Ultra User Manual (v3.0) — Custom Controls • 69...
- Page 70 (Absolute) or reset (Reset) the parameter. Some selections will not be available when you reset the parameter. Enter the line value you want to use in the Value field. 70 • Custom Controls — Carbonite Ultra User Manual (v3.0)
- Page 71 Click the GPO button and select the GPI output that you want to configure. Click a Trigger to select whether the GPI output uses a level (Level) or edge (Edge) trigger. Carbonite Ultra User Manual (v3.0) — Custom Controls • 71...
- Page 72 Click the Keyer button for the key you want to make linear. 72 • Custom Controls — Carbonite Ultra User Manual (v3.0)
- Page 73 Click the Keyer button for the key you want to perform the event on. Click the Action button and select whether they key should perform a cut (Cut), or auto transition (Auto Trans). Carbonite Ultra User Manual (v3.0) — Custom Controls • 73...
- Page 74 Click a Value button to select whether external layer mode is on (On) or not (Off). Loop CC Special > Insert a loop into the custom Loop control. 74 • Custom Controls — Carbonite Ultra User Manual (v3.0)
- Page 75 (Absolute) or reset (Reset) the parameter. Some selections will not be available when you reset the parameter. Enter a new position in the Value (%) field. Carbonite Ultra User Manual (v3.0) — Custom Controls • 75...
- Page 76 Enter a new size in the Enter a new position in Value (%) field. the Value (%) field. 76 • Custom Controls — Carbonite Ultra User Manual (v3.0)
- Page 77 Mask Reset the ME that you want to reset the parameter. perform the event on. Enter a size for the border Click Reset Params. in the Value (%) field. Carbonite Ultra User Manual (v3.0) — Custom Controls • 77...
- Page 78 ME or aux that you want to perform the event Enter the number of times the pattern is multiplied in the Value field. For an ME, click the Matte button and select Matte. 78 • Custom Controls — Carbonite Ultra User Manual (v3.0)
- Page 79 Click the MediaStore Channel button for the Media-Store channel you want to perform the event Enter the number you want to assign to the capture file in the Capture File field. Carbonite Ultra User Manual (v3.0) — Custom Controls • 79...
- Page 80 Click the Parameter button and select Cut Frame. Enter the frame in the animation that you want to cut to occur for the MediaWipe in the Value field. 80 • Custom Controls — Carbonite Ultra User Manual (v3.0)
- Page 81 Channel button for the Reverse. Media-Store channel you Click the Value button want to perform the event and select whether the animation plays in reverse Click Toggle Play. (On) or not (Off). Carbonite Ultra User Manual (v3.0) — Custom Controls • 81...
- Page 82 Click the Parameter button and select GPO. Enter the GPI output that you want to trigger with the MediaWipe in the Value field. 82 • Custom Controls — Carbonite Ultra User Manual (v3.0)
- Page 83 Trans Layer selected ME. Click the ME button for the ME that you want to perform the event on. Click the Layer button to select what the MediaWipe animation covers. Carbonite Ultra User Manual (v3.0) — Custom Controls • 83...
- Page 84 Click a Value button and select whether aspect ratio markers are shown (On) or not (Off). 84 • Custom Controls — Carbonite Ultra User Manual (v3.0)
- Page 85 Click a Label Mode button and select whether the name comes from the switcher (Switcher), the router (Router), or both are shown (Both). Carbonite Ultra User Manual (v3.0) — Custom Controls • 85...
- Page 86 (Absolute) or reset (Reset) the parameter. Some selections will not be available when you reset the parameter. Enter the amount of clipping to be applied in the Value field. 86 • Custom Controls — Carbonite Ultra User Manual (v3.0)
- Page 87 Value (%) field. MultiViewer you want that you want to perform the event on. Click Foreground. Click the Color button and select the color you want to use. Carbonite Ultra User Manual (v3.0) — Custom Controls • 87...
- Page 88 Click a MultiViewer button to select which MultiViewer you want that you want to perform the event on. Click the Layout button and select the layout you want to use. 88 • Custom Controls — Carbonite Ultra User Manual (v3.0)
- Page 89 Click the Output button Converter and select the output BNC Framing that you want to assign Mode the framing to. Click a Value button to assign the type of framing to the output. Carbonite Ultra User Manual (v3.0) — Custom Controls • 89...
- Page 90 Halt Reverse — halt the transition and move backwards through the transition when pressed again • Reverse — reverse the transition immediately • Cut — cut the transition to the end 90 • Custom Controls — Carbonite Ultra User Manual (v3.0)
- Page 91 Corrector Some selections will not corrector assigned to it Reset be available when you that you want to reset. reset the parameter. Enter a new value in the Value field. Carbonite Ultra User Manual (v3.0) — Custom Controls • 91...
- Page 92 Some selections will not reset the parameter. be available when you reset the parameter. Enter a new value in the Value field. Enter a new value in the Value field. 92 • Custom Controls — Carbonite Ultra User Manual (v3.0)
- Page 93 Enter a new value in the (Absolute) or reset Value field. (Reset) the parameter. Some selections will not be available when you reset the parameter. Enter a new value in the Value field. Carbonite Ultra User Manual (v3.0) — Custom Controls • 93...
- Page 94 Select the reference source for Source Installation the switcher. > Reference Click a Reference > Video Source button to select Reference whether to use an internal (Internal) or external (External) reference source. 94 • Custom Controls — Carbonite Ultra User Manual (v3.0)
- Page 95 Channel field. Click the Value button and select whether roll clip is on (On) or not (Off). Carbonite Ultra User Manual (v3.0) — Custom Controls • 95...
- Page 96 Enter the take item id of command to. the item you want to Enter the RossTalk string perform the action on in in the Custom Cmd field. the Take ID field. 96 • Custom Controls — Carbonite Ultra User Manual (v3.0)
- Page 97 Enter the number of the Enter the layer that you clock you want to perform want to perform the action the action on in the MV on in the Layer field. Clock field. Carbonite Ultra User Manual (v3.0) — Custom Controls • 97...
- Page 98 Enter the framebuffer that Enter the framebuffer that you want to perform the you want to perform the action on in the Channel action on in the Channel field. field. 98 • Custom Controls — Carbonite Ultra User Manual (v3.0)
- Page 99 Enter the take item id of recall the custom reset the item you want to settings on. perform the action on in the Take ID field. Carbonite Ultra User Manual (v3.0) — Custom Controls • 99...
- Page 100 Click the ME button and Click the Action button select the area that you and select Set Limit. want to perform the event Click the Action button and select Trans Clear. 100 • Custom Controls — Carbonite Ultra User Manual (v3.0)
- Page 101 Click the Video Server button and select the device you want to send the command to. Click a Channel button to select the channel you want to send the command to. Carbonite Ultra User Manual (v3.0) — Custom Controls • 101...
- Page 102 Disable the wash generator for Generator — Matte > the selected ME. Disable Wash Click the ME button for Enabled the ME that you want to Reset perform the event on. 102 • Custom Controls — Carbonite Ultra User Manual (v3.0)
- Page 103 Click the Parameter button and select Direction. Click the Value button and select whether the wipe moves in a forward (Forward) or reverse (Reverse) direction. Carbonite Ultra User Manual (v3.0) — Custom Controls • 103...
- Page 104 (Reset) the parameter. Value (%) field. Some selections will not be available when you reset the parameter. Enter an amount of softness for the pattern or border in the Value (%) field. 104 • Custom Controls — Carbonite Ultra User Manual (v3.0)
-
Page 105: Naming Custom Controls
Enter a new position in a) Use the Pos knob to select the character the Value (%) field. position to edit. A name can have up to 8 character. Carbonite Ultra User Manual (v3.0) — Custom Controls • 105... -
Page 106: Deleting Custom Controls
To Copy and Paste a Custom Control Copy the contents of a custom control from one button to another. 1. Press MENU > BANK 1 > Edit. 106 • Custom Controls — Carbonite Ultra User Manual (v3.0) -
Page 107: Network Connections
Change the IP address of the frame from DashBoard. to the resources on the frame. 1. Click Navigation Menu > Configuration > 6. Click Apply Changes. Network. Carbonite Ultra User Manual (v3.0) — Network Connections • 107... -
Page 108: To Assign A Custom Name
Copying a clip to the USB while the Clip Player is playing a clip can cause the clip to stutter or stop. 4. Enter the password password 108 • Network Connections — Carbonite Ultra User Manual (v3.0) -
Page 109: Video Reference
UHDTV1 50Hz (UHD-2SI) Note: Values represent maximum resources with all options installed. 720p 59.94Hz 720p 59.94Hz 1080p 59.94Hz (A) SD/HD UHDTV1 UHDTV1 59.94Hz (UHD-2SI) MEs (Min/Max) Carbonite Ultra User Manual (v3.0) — Video Reference • 109... -
Page 110: To Set The Uhdtv1 Switcher Mode
High Dynamic Range (HDR) and Wide Color Note: Only the Ultra mode is supported at this time. Gamut (WCG) Conversion on page 133. 1. Press MENU > Ref 110 • Video Reference — Carbonite Ultra User Manual (v3.0) -
Page 111: Output Reference Synchronizers
8. Press the Confrm knob to assign the output Black bars are added to the top and bottom of a 16:9 image to display correctly in a 4:3 video format. reference synchronizer. Carbonite Ultra User Manual (v3.0) — Video Reference • 111... -
Page 112: Pillarbox
• F2 — transitions occur on even field • Both — transitions occur on current field, either even or odd 3. Press the FldSwt or FrmSwt knob to save the settings. 112 • Video Reference — Carbonite Ultra User Manual (v3.0) -
Page 113: Video Input Setup
• BK — assign internal black as a key alpha • BG — assign the matte generator as a key alpha • MX — assign the video on Media-Store X as a key alpha Carbonite Ultra User Manual (v3.0) — Video Input Setup • 113... -
Page 114: To Set Up A Source Name
Figure 27: Removing Lens from Diffuser 3. Place the Insert Film into the Lens so the readable side is facing up. The notches on the sides of the 114 • Video Input Setup — Carbonite Ultra User Manual (v3.0) -
Page 115: Bus Maps
2. Use the XptBtn knob to select the source button to • CaXBg — source on background bus of Canvas assign a video source to. • CaXPst — source on preset bus of Canvas X. Carbonite Ultra User Manual (v3.0) — Video Input Setup • 115... -
Page 116: To Reset The Bus Map
The length of the pre-delay is usually the length of time your video server requires to start playing a clip or your character generator requires to load a page. 116 • Video Input Setup — Carbonite Ultra User Manual (v3.0) -
Page 117: Video Output Setup
• CanXPst — source on preset output of • BG — matte generator Canvas X • MX — Media-Store video channel X • CanXKYV — key Y video of Canvas X Carbonite Ultra User Manual (v3.0) — Video Output Setup • 117... -
Page 118: Ancillary Data
2. Press the LyrMod knob to select the ME that you layering for an ME. This allows you to remove particular want to set the layer mode for. keys without affecting the primary program output. 118 • Video Output Setup — Carbonite Ultra User Manual (v3.0) -
Page 119: On-Air Setting
142 for information in setting a GPI as a tally. 4. Use the Input knob to select the video source that you want to tally. • XX — video inputs 1-24 • BK — black Carbonite Ultra User Manual (v3.0) — Video Output Setup • 119... -
Page 120: Multiviewer
Depending on the format the switcher is operating in, the 7. Press NEXT. MultiViewer may output a different video format than the switcher is operating in. 120 • MultiViewer — Carbonite Ultra User Manual (v3.0) -
Page 121: To Set Up A Video Processor Multiviewer
22. Configure additional I/O MultiViewer boxes as 10. Use the FSLBL knob to select whether FSFC is required. shown on the source labels (On) or not (Off) when a FSFC is applied to the source. Carbonite Ultra User Manual (v3.0) — MultiViewer • 121... -
Page 122: To Set Up A Multiviewer Clock
24. Use the RedTly knob to turn the program (red) tally 16. Use the BgSat knob to adjust the saturation of the for the Video Processor MultiViewer box on or off. background color for the clock. 122 • MultiViewer — Carbonite Ultra User Manual (v3.0) - Page 123 17. Use the BgLum knob to adjust the luminance of the background color for the clock. Carbonite Ultra User Manual (v3.0) — MultiViewer • 123...
-
Page 124: Multiscreen
In the case of a pre-tiled source, the background image has already been divided up into individual segments. A separate video source is fed into the switcher for each tile. In the example below, tile 1 is 124 • MultiScreen — Carbonite Ultra User Manual (v3.0) -
Page 125: To Set Up Multiscreen
• Y Bezel Size — enter the size of the gap you key. want between rows of tiles to compensate for Carbonite Ultra User Manual (v3.0) — MultiScreen • 125... -
Page 126: To Set Up A Pre-Tiled Source
™ MiniME outputs for the Canvas. ™ 4. Click the ME button and select the MiniME that you want to assign a substitution source to. 126 • MultiScreen — Carbonite Ultra User Manual (v3.0) -
Page 127: I/O Processors
Output format converters are only available on outputs 5-14. The total number of FSFCs can be increased to 24 (7 in UHDTV1) with the activation of the Extra SD/HD I/O Carbonite Ultra User Manual (v3.0) — I/O Processors • 127... - Page 128 Conversion is not supported when the switcher is 1080p 50Hz (A) 1080p 50Hz (A) 1080p 50Hz (A) operating in this video format. 1080i 50Hz 1080i 50Hz 720p 50Hz 720p 50Hz 128 • I/O Processors — Carbonite Ultra User Manual (v3.0)
-
Page 129: Input Fsfc
4. Use the Frming knob to select the aspect ratio signals to UHDTV1. You cannot use this resource to frame-sync a UHDTV1 video signal. conversion mode you want to use. Carbonite Ultra User Manual (v3.0) — I/O Processors • 129... -
Page 130: Output Fsfc
4:3 video format. can operate as Processing Amplifiers (Proc Amps) in the HSL (Y-Cr-Cb) color space or as RGB Color Correctors in the RGB color space. Proc Amps and RGB Color 130 • I/O Processors — Carbonite Ultra User Manual (v3.0) -
Page 131: To Assign A Color Corrector To A Source (Uhdtv1 Only)
4. Adjust the overall gain as follows: 14. Adjust the Cb (blue color difference) offset as follows: a) Use the Cntrl knob to select Gain. a) Use the Cntrl knob to select CbOff. Carbonite Ultra User Manual (v3.0) — I/O Processors • 131... -
Page 132: Rgb Color Correction
5. Adjust the gain of the selected color component(s) b) Use the Value knob to adjust the luminance as follows: gamma value. a) Use the Cntrl knob to select Gain. 11. Adjust the gamma offset as follows: 132 • I/O Processors — Carbonite Ultra User Manual (v3.0) -
Page 133: High Dynamic Range (Hdr) And Wide Color Gamut (Wcg) Conversion
Use the Cntrl knob to select Gain. signals. b) Use the Value knob to adjust the gain of the • BT.2020 — wide color gamut recommended for component(s). UHDTV1 video signals. Carbonite Ultra User Manual (v3.0) — I/O Processors • 133... - Page 134 S-Log3 BT.2020 HLG BT.709 SDR BT.709 S-Log3 BT.2020 S-Log3 BT.709 HLG BT.709 SDR BT.2020 PQ BT.709 HLG BT.2020 S-Log3 BT.709 PQ BT.2020 SDR BT.2020 S-Log3 BT.2020 HLG BT.2020 PQ BT.2020 134 • I/O Processors — Carbonite Ultra User Manual (v3.0)
- Page 135 5. Use the Gamut knob to select the color gamut of the input video signal. • 709 — BT.709 color gamut recommended for HD video signals. • 2020 — BT.2020 wide color gamut recommended for UHDTV1 video signals. Carbonite Ultra User Manual (v3.0) — I/O Processors • 135...
-
Page 136: Switcher Personality
• HltRev — the transition is halted and then 3. Press Next. reverses directions when the transition button is 4. Use the Adjust knob to select the key (KeyX) you pressed again want to set the color for. 136 • Switcher Personality — Carbonite Ultra User Manual (v3.0) -
Page 137: To Select A Panel Color Scheme
• Legacy — the next bank is selected every time the buttons on the control panel. the button is pressed, cycling through all banks (For example, to access bank 5, press BANK repeatedly until bank 5 is selected.) Carbonite Ultra User Manual (v3.0) — Switcher Personality • 137... -
Page 138: Me Select
• NotRst — area is not changed after a transition going into sleep or power-save mode. 138 • Switcher Personality — Carbonite Ultra User Manual (v3.0) -
Page 139: Roll Gpo/Roll Clip
• Canvas — use the Index knob to select which To Set the Units Used for Transition Rates Canvas the user button is assigned to 1. Press MENU > Pers. Carbonite Ultra User Manual (v3.0) — Switcher Personality • 139... - Page 140 Select Select if you want to be able to press and hold the user button and select the custom control bank on the key bus. 140 • Switcher Personality — Carbonite Ultra User Manual (v3.0)
-
Page 141: Software Options
7. Power cycle the frame by switching the power button Off and then On again. The switcher will come up with the new software options activated. Carbonite Ultra User Manual (v3.0) — Software Options • 141... -
Page 142: Gpi Control
1. Press MENU > Config > GPIO. 4. Press the Edit knob. 2. Use the GPIO knob to select the GPI pin that you <image audience="print" href="EffDiss.png" align="center" placement="bre want to configure as an output. 142 • GPI Control — Carbonite Ultra User Manual (v3.0) -
Page 143: Gpi Output Triggers
You can set a pre-delay, or pre-roll, that will specify when the GPI is triggered in relation to taking the video source on-air. This is useful for VTR pre-roll delay and Carbonite Ultra User Manual (v3.0) — GPI Control • 143... -
Page 144: Live Edit Decision Lists
3. Set the timecode offset for an External timecode as so that it can be used in the non-linear editing suite along follows: with the feeds from the video servers. The timecode data 144 • Live Edit Decision Lists — Carbonite Ultra User Manual (v3.0) -
Page 145: Liveedl Data Capture
1. Press MENU > User > LivEDL. 2. Use the Start knob to select the LiveEDL file on the switcher that you want to store the EDL data to. Carbonite Ultra User Manual (v3.0) — Live Edit Decision Lists • 145... -
Page 146: Multipanel
(ME), MiniME (MinME), Canvas (Can), and chroma key (CK) resources that selected panel can control. Note: A control panel must have permission to at least one ME, MiniME , or Canvas. 146 • MultiPanel — Carbonite Ultra User Manual (v3.0) -
Page 147: Diagnostics And Calibration
• VP FPGA Temperature (C) — the temperature of times. Do not push the fader hard when it reaches the frame video processor FPGA in degrees Celsius the limit. 4. Press MENU to save the calibration information. Carbonite Ultra User Manual (v3.0) — Diagnostics and Calibration • 147... -
Page 148: System Real-Time Clock/Date
There is a three (3) second delay between each tally being toggled on. Once the last tally This DIP switch is unused and should be left in the default up (off) position. 148 • Diagnostics and Calibration — Carbonite Ultra User Manual (v3.0) -
Page 149: To Run The Gpi Input Test
Support for assistance if The switcher may be you are unsure about used without the PMC upgrading your switcher. upgrade but may respond in an unpredictable manner. Carbonite Ultra User Manual (v3.0) — Diagnostics and Calibration • 149... -
Page 150: Switcher Soft Reset
To Factory Reset the Switcher • NoRst — the Aux bus is not reset Return the switcher to the factory default settings. 150 • Switcher Soft Reset — Carbonite Ultra User Manual (v3.0) -
Page 151: Resetting Individual Components
(each Aux is reset individually) (X is the number of the aux bus) Menu double-press the the value for that knob is reset Items knob for the value you want to reset Carbonite Ultra User Manual (v3.0) — Switcher Soft Reset • 151... -
Page 152: Specifications
Control Panel Cooling Passive 1 (Global) Matte Generators (ME+Global) Video Input Specifications Tallies SDI Video Inputs Input Specification Value SDI Video Outputs UHDTV1 Video Formats UHDTV1 50/59.94/60 (UHD- 2SI) Frame IP (default) 192.168.0.123 152 • Specifications — Carbonite Ultra User Manual (v3.0) -
Page 153: Video Output Specifications
Signal Level 800mV ±10% to +/- 0.25 line. DC Offset 0 Volts • System delay is less than 1 line. Overshoot <10% Video Outputs, SDI HD Mode 10-bit SMPTE-292M/424M serial digital Carbonite Ultra User Manual (v3.0) — Specifications • 153... -
Page 154: Power Consumption - Control Panel
2.9A 3.8A 5.4A 6.7A Input 100 - 120V~, 220 - 240V~, 47-63Hz Voltage Power Consumption — Frame Ultra Consumption 114W 7.6A 15V Input Voltage 100 - 120V~, 220 - 240V~, 47-63Hz 154 • Specifications — Carbonite Ultra User Manual (v3.0) -
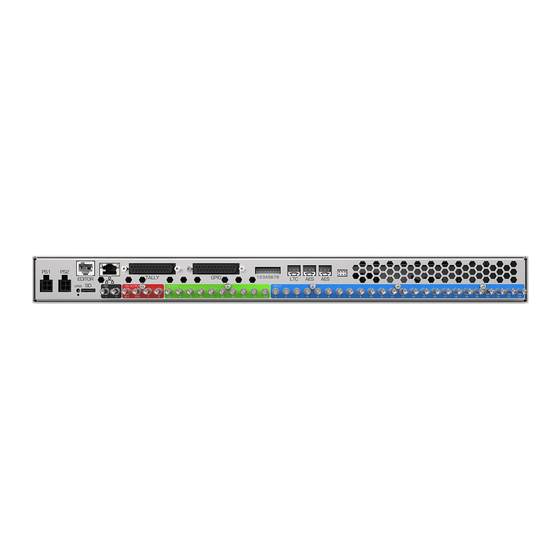
Page 155: Ports
GPI I/O 2 GPI I/O 3 GPI I/O 4 GPI I/O 5 GPI I/O 6 GPI I/O 7 GPI I/O 8 GPI I/O 9 GPI I/O 10 GPI I/O 11 GPI I/O 12 Carbonite Ultra User Manual (v3.0) — Ports • 155... -
Page 156: Aes Port
The AES ports on the back of the frame each support a single 24-bit (20-bit in SD) stereo pair. LTC Port The LTC port on the back of the frame supports a single LTC connection. 156 • Ports — Carbonite Ultra User Manual (v3.0) -
Page 157: Glossary
This allows you to add a red tint to the One half of a complete picture (or frame) interval containing all of the odd, or all of the even, lines in Carbonite Ultra User Manual (v3.0) — Glossary • 157... - Page 158 Character Generators to cut very precise holes for the A keying technique in which a shape is combined with fill. the key source to block out unwanted portions of the key source. 158 • Glossary — Carbonite Ultra User Manual (v3.0)
- Page 159 Shades of gray are translated into transparency levels, giving the key a soft edge. Unshaped Key alphas can also be considered true linear alphas. Carbonite Ultra User Manual (v3.0) — Glossary • 159...
-
Page 160: Index
Fly Key (DVE) Areas GPI Output — Edge Trigger Setup Control Panel, Top GPI Output — Level Trigger Setup Control, External Devices GPI Output — Mode Copy Keys GPI Output — Trigger 160 • Index — Carbonite Ultra User Manual (v3.0) - Page 161 Media-Store — Delete Capture Proc Amp Cr Offset Parameter Media-Store — Load Proc Amp Enable Media-Store — Looping Proc Amp Gain Parameter Media-Store — Move To Frame Proc Amp Gamma Offset Parameter Carbonite Ultra User Manual (v3.0) — Index • 161...
- Page 162 Trans Limit — On/Off Custom Controls (CC) Trans Limit — Reset Cut Transitions Trans Limit — Set Trans Limit — Value Video Mode Video Server — Cue DashBoard Video Server — Get Clips Configuration 162 • Index — Carbonite Ultra User Manual (v3.0)
- Page 163 Fly Key PaneLINK Format Conversion LiveEDL FPGA Temperature LiveEDL, Capture Frame Setup, Ethernet LiveEDL, Store Frame Synchronizer Load Custom Reset Freeze Loading Media-Store Images FSFC, Input FSFC, Output FTP Connection Mask Mattes Carbonite Ultra User Manual (v3.0) — Index • 163...
- Page 164 Memory Undo, Personality Option Personality, Shift Toggle Memory, Delete Personality, Transition Rate Units Menus Personality, Undo Memory Auto-Follow Power Connected Navigating Power-Save Mode Overview Pre-Delay Override MiniME Preview Selection Proc Amp Mnemonic Source Names 164 • Index — Carbonite Ultra User Manual (v3.0)
- Page 165 Menu Area User Area Software Options Software Version Source Button Names Undo Source Names User Buttons Sources Selecting Sources, Layering Sources, Re-Entry Video Inputs Specifications Auto Key GPI I/O Button Names Carbonite Ultra User Manual (v3.0) — Index • 165...
- Page 166 Video Output, MultiViewer Video Outputs Washes Video Processing and Flow WCG Conversion Video Server Control WhiteFlash Video Source, Bus Map Wipe Transitions Video Sources Selecting ViewControl Bus Selection Buttons XPression Control 166 • Index — Carbonite Ultra User Manual (v3.0)
Need help?
Do you have a question about the Carbonite Ultra and is the answer not in the manual?
Questions and answers