Advertisement
Quick Links
BLOCK - SUPER BLOCK
Hydraulic retractable bollard
Borne escamotable hydraulique
Dissuasore oleodinamico
Disuasores hidráulicos
SEA S.p.A.
Zona industriale 64020 S.ATTO Teramo - (ITALY)
Tel. +39 0861 588341 r.a. Fax +39 0861 588344
www.seateam.com seacom@seateam.com
67412092
Rev. 00 - 06/2018
Advertisement

Related Manuals for SEA BLOCK 600


Summary of Contents for SEA BLOCK 600
- Page 1 BLOCK - SUPER BLOCK Hydraulic retractable bollard Borne escamotable hydraulique Dissuasore oleodinamico Disuasores hidráulicos SEA S.p.A. Zona industriale 64020 S.ATTO Teramo - (ITALY) Tel. +39 0861 588341 r.a. Fax +39 0861 588344 www.seateam.com seacom@seateam.com 67412092 Rev. 00 - 06/2018...
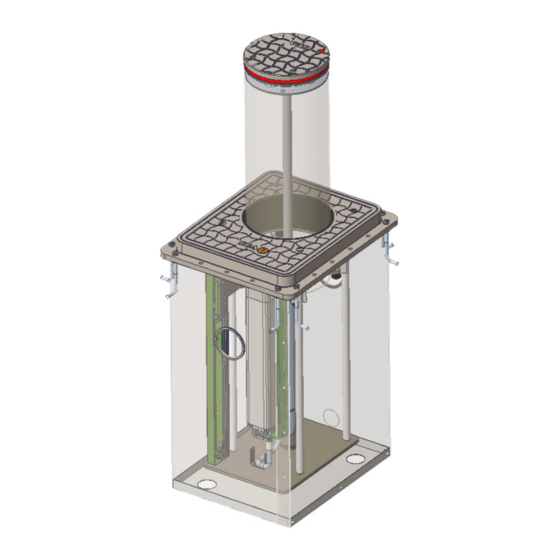
- Page 2 BLOCK and SUPER BLOCK are bollards for the management of transit areas, car parks and protection of public and private access. Made up of a hydraulic movement realized in SEA factories for maximum silence and reliability over time. The hydraulic unit is incorporated for simple installation. The release device allows manual movement in the event of a power failure.
- Page 3 “Led Strip” Led Lighting Water drain holes (white water connection) Éclairage mené lumineux à Led 24V “Strip Led” Trous décharge d’eau (connexion égout d’eau Illuminazione a Led “Strip Led” de pluie) Señales luminosos a Led “Strip Led” Fori scarico acqua (collegamento acque bianche)
- Page 4 SUPER SUPER Technical data BLOCK 600 BLOCK 600 BLOCK 900 Hydraulic unit - Centrale Hydraulique Centralina Oleodinamica - Centralina Hidráulica Hydraulic pump capacity Débit pompe hydraulique 4 liters min Portata pompa oleodinamica Capacidad de la bomba Hidráulica Operating pressure Pression d’exercice 2,5 MPA (25 bar) Pressione d’esercizio...
- Page 5 SUPER SUPER Technical data BLOCK 600 BLOCK 600 BLOCK 900 Hydraulic piston - Piston Hydraulique Pistone Oleodinamico - Piston Hidráulico Rise time Temps de montée 4 sec 6 sec 9 sec Tempo di salita Tiempo de salida Stroke Course utile...
- Page 6 1. REALIZATION OF THE EXCAVATION REALIZZAZIONE DELLO SCAVO REALISATION DE L’EXCAVATION REALIZACION DE LA EXCAVACION 1.1 Make an excavation in the ground where you want to install the bollard, according to the measurements shown in FIG. 1 Faire, selon les mesures montrées sur la Fig. 1, une excavation dans le sol où vous voulez installer la borne Realizzare in base alle misure riportate in Fig.
- Page 7 Before blocking the foundation box with concrete, make sure that the side with the 4 holes shown is positioned outside the installation. Avant de bloquer la boîte de fondation avec du béton, assurez-vous que le côté avec les 4 trous montrés est positionné...
- Page 8 1.3. Fill the entire space between the floor and the formwork with R425 concrete. Before the concrete solidifies, place the foundation plate perfectly horizontally, using a level. N.B. The foundation plate must remain on the road level. (Fig. 3) Remplissez tout l’espace entre le sol et le coffrage avec du béton R425. Avant que le béton ne se solidifie, placez la plaque de fondation parfaitement à...
- Page 9 1.4 While waiting for the concrete to solidify, place the manhole cover (optional). En attendant que le béton se solidifie, placez le couvercle de trou d’homme (en option). Nell’attesa che il calcestruzzo si solidifichi mettere il chiusino carrabile (opzionale). (Fig 4) Mientras espera que el concreto se solidifique, coloque la tapa carretera.
- Page 10 2. REmOVING OF THE FOUNDATION RImOZIONE DEL CHIUSINO DELLA CASSA BOX COVER DI FONDAZIONE REmOCIóN DE LA TAPA DE LA CAjA DE RETRAIT DU COVERCLE LA BOITE DE FUNDACIóN FONDATION 2.1. Remove the mobile manhole cover (optional) by unscrewing the four screws as shown in Fig. 5 Retirer le couvercle de trou d’homme mobile (en option) en dévissant les quatre vis comme indiqué...
- Page 11 3. INSERTION OF THE BOX INSERImENTO DELLA CASSA INSERTION DE LA BOITE INSERCIóN DE LA CAjA 3.1 After approx. 24 hours of concrete pouring, carry out a water drainage test (Fig.6) Après environ 24 heures de la coulée de béton, effectuez un test de drainage de l’eau.(Fig.6) Dopo circa 24h dal getto di calcestruzzo, effettuare una prova di drenaggio dell’acqua.
- Page 12 4. REmOVING THE BLOCK COVER RImOZIONE DEL CHIUSINO DEL BLOCK RETRAIT DU COUVERCLE DU BLOCK REmOCIóN DE LA TAPA DEL BLOCK 4.1. Remove the BLOCK cover by unscrewing the four screws as shown in Fig. 7 Fig. 7 Retirez le couvercle du BLOCK en dévissant les quatre vis comme indiqué...
- Page 13 5. PULL OUT THE BLOCK ESTRAZIONE DEL BLOCK EXTRACTION DU BLOCK EXTRACCIóN DEL BLOCK 5.1. Insert the eye bolts M12 as on Fig.8 Inserez les boulons à œil M12 comme sur Fig.8 Inserire i golfari M12 come in Fig. 8. Inserte los cáncamos M12 como se muestra en la Fig.
- Page 14 6. INSERTING THE BLOCK INTO THE BOX INSERImENTO DEL BLOCK NELLA CASSA INSERTION DU BLOCK DANS LA BOITE INSERCIóN DEL BLOCK EN LA CAjA 6.1 When inserting the BLOCK into the foundation box, be careful not to damage the power cables. Insert them into the prepared tube for the cable exit, as shown in Fig.
- Page 15 7. FIXING THE BLOCK TO THE BOX FISSAGGIO DEL BLOCK ALLA CASSA FIXATION DU BLOCK A LA BOITE FIjACIóN DEL BLOCK A LA CAjA 7.1 Screw the 8 screws, previously removed, to secure the BLOCK to the foundation box. Fig.10 Vissez les 8 vis, préalablement retirées, pour fixer le BLOCK à...
- Page 16 8. CONNECTION TABLE TABELLA COLLEGAmENTI TABLEAU DE CABLAGES TABLA DE CONEXIONES Control Unit Limit Switch Cable In Limit Switch Cable In Closing Led Cable Opening Armoire De Commande Fil Fin de Course Câble Led Câble Fin De Course Fermeture Centrale Di Comando Ouverture (Limit-Switch Close) Cavo Led...
- Page 17 9. TYPE INSTALLATION INSTALLAZIONE TIPO INSTALLATION TYPE INSTALACIóN TÍPICA 1. BLOCK-SUPER BLOCK bollard 2. Control unit 3. Key control 4. Radio receiver 5. Flasher 6. Photocells 1. Borne BLOCK-SUPER BLOCK 2. Armoire 3. Poussoir à clef 4. Récepteur radio 5. Clignoteur 6.
- Page 18 N.B. THE MANUFACTURER CAN NOT BE CONSIDERED LIABLE FOR ANY DAMAGE CAUSED BY IMPROPER, WRONG AND UNREASONABLE USE. SEA reserves the right to make changes or variations it deems appropriate to its products and / or this manual without any prior notice.
- Page 19 REPUESTOS: La demanda de la piezas de recambio debe proceder de : SEA S.p.A. - Zona Ind.le, 64020 S.ATTO - Teramo - Italia SEGURIDAD Y COMPATIBILIDAD AMBIENTAL: No desperdiciar en el ambiente los materiales de embalaje y /o los circuitos. La movimentación del producto debe ser efectuada con medios idoneos.
- Page 20 10. ORDINARY mAINTENANCE (HALF-YEARLY) mANUTENZIONE ORDINARIA (SEmESTRALE) ENTRETIEN SEmI-ANNUEL DU BLOCK mANUTENCIóN ORDINARIO SEmESTRAL The maintenance operations indicated below can be performed by opening the movable manhole cover Les opérations d’entretien indiquées ci-dessous peuvent être effectués par l’ouverture du trou d’homme mobile. Le operazioni di manutenzione indicate di seguito possono essere eseguite aprendo il chiusino mobile.
- Page 21 1.Pulizia del pozzetto con aspiratore dei materiali detriti depositati. 2.Pulizia degli scarichi di drenaggio acqua posti sulla cassaforma. 3.Pulizia e lubrificazione delle guide di scorrimento. 4.Verifica del serraggio delle viti generali. 5.Verifica del corretto funzionamento del sistema di sblocco manuale. 6.Pulizia generale del cilindro a scomparsa ed eventuali ritocchi di verniciatura.
- Page 22 11. CONNECTIONS CONNESSIONI CONNEXIOS CONEXIONES fase - nero phase - black phase - noir fase - negro phase - brown fase - marrone phase - marron fase - marrón Electric motor cable common - grey comune - grigio Câble moteur commun - gris común - gris Capacitor...
- Page 23 12. SOLENOID VALVE SUPPLY ALImENTAZIONE ELETTROVALVOLA ALImENTATION ELECTROVANNE CONNESSIONI Electrovanne Solenoid Valve Elettrovalvola Electrovalvula Emergency release button (optional) N.C. 10A Bouton de déverrouillage d’urgence (en option) N.C. 10A Pulsante sblocco Bloc d’alimentation Power supply 24V emergenza (opzionale) Alimentatore ~ 1A N.C.
- Page 24 13. mANUAL RELEASE SYSTEm SISTEmA DI SBLOCCO mANUALE SYSTEmE DE DEVERROUILLAGE mANUEL SISTEmA DE DESBLOQUEO Part for both the user and the installer Page pour l’installateur et utilizateur Parte dedicata sia all’utente che all’installatore Sección para el instalador y el usuario final The manual release system allows you to manually lower the Block in the event of an emergency or the absence of electricity.
- Page 25 Fig. 13 Fig. 13 Fig. 14 Fig. 14 Fig. 15 Fig. 15...
Need help?
Do you have a question about the BLOCK 600 and is the answer not in the manual?
Questions and answers