Table of Contents
Advertisement
Quick Links
Owners Manual
Universal Bale Feeder
From Serial Number TLCD 05584
Head Office:
P.O. Box 2018
Hilton Highway, Washdyke
Timaru, New Zealand
Telephone (03) 688 2029
Facsimile (03) 688 2821
Electrofeed
3PT Linkage
Australian Branch:
4B SIlverton Close
Laverton North 3026
Melbourne, Australia
Telephone (03) 9314-9666
Facsimile (03) 9314-6810
Pt. No. 67359
Issue 0305
Advertisement
Table of Contents

Related Manuals for Duncan Electrofeed 3Pt Linkage


Summary of Contents for Duncan Electrofeed 3Pt Linkage
- Page 1 Owners Manual Electrofeed Universal Bale Feeder 3PT Linkage From Serial Number TLCD 05584 Head Office: Australian Branch: P.O. Box 2018 4B SIlverton Close Hilton Highway, Washdyke Laverton North 3026 Timaru, New Zealand Melbourne, Australia Telephone (03) 688 2029 Telephone (03) 9314-9666 Facsimile (03) 688 2821 Facsimile (03) 9314-6810 Pt.
-
Page 3: Table Of Contents
Electrofeed Contents Page Introduction Acquisition & Warranty ... . The Owner’s Manual ....Description of Machine Working Principle ....Features . -
Page 4: Introduction
Introduction Acquisition & Warranty On delivery of your new Duncan Ag Electrofeed, Universal Bale Feeder (3Pt Linkage), please check that the machine is not damaged. In cases of shipping damage, please ask your dealer to arrange for the appropriate claim to be lodged immediately. -
Page 5: Description Of Machine
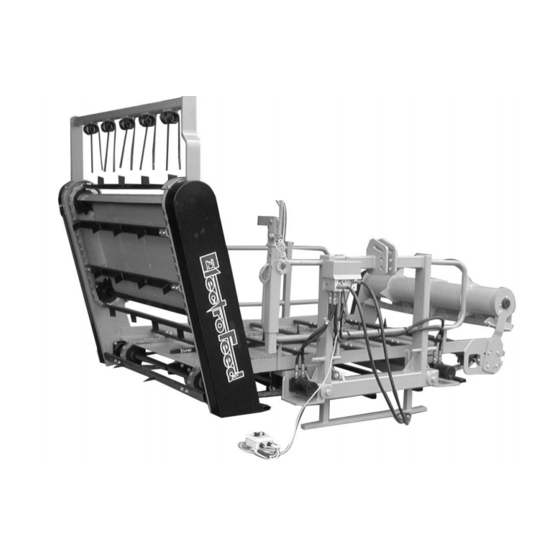
Description of Machine The Duncan Ag Electrofeed, Universal Bale Feeder (3Pt Linkage), will feed both round and square bales of various sizes and composition. The elevator feeds out square bales of various sizes, teasing the biscuits through the adjustable spring tine frame at the top; the knife roller feeds round bales without blocking due to the unique anti-wrap deflector. - Page 6 ATTENTION On the machine important safety information is indicated by these symbols. These highlight general safety aspects in regard to the machine rather than specific hazards. Do not ride or allow passengers on the machine. Under no circumstances are passengers to be permitted on the machine while it is in operation or being transported.
-
Page 7: Safety - General
Duncan Ag has made every effort to highlight all risks to personnel or property. Owners and operators have a A prohibition should responsibility to exercise care and safe work practices at be observed under all all times in the vicinity of the machine. -
Page 8: Appropriate Dress
SAFETY - General (Continued) Appropriate Dress Wear close fitting clothing and avoid rings or other forms of jewellery which could become caught in the machinery. People with long hair must have it securely fixed and confined close to the head. Refer to local safety standards for protective clothing and recommended safety equipment. -
Page 9: Handle Agricultural Chemicals Safely
SAFETY - General (Continued) Handle Agricultural Chemicals Safely All farm chemicals should be stored, used, handled and disposed of safely and in accordance with the supplier’s/manufacturer’s recommendations. Read the product label before using, noting any warnings or special cautions, including any protective clothing or equipment that may be required, ie. -
Page 10: Practise Safe Maintenance
SAFETY - General (Continued) Practise Safe Maintenance Keep the machine in safe working condition. Routine maintenance and regular servicing will help reduce risks and prolong the life of the machine. General Maintenance Accidents occur most frequently during servicing and repair. The following general rules must be followed when maintaining or working with machinery: •... -
Page 11: Safety- Machine Specific
SAFETY - Machine Specific This section of the manual gives specific guidelines for the safe operation of the Vineyard Seeder. These guidelines were current at the time of publication, but may be superseded by later circumstances. They do not necessarily cover every possible hazard and must be read in conjunction with the SAFETY - General section (Page 4 - 8). - Page 12 SAFETY - Machine Specific (Continued) Hazard Points on the Bale Feeder (Continued) Drive Chain Guard, Floor Chains & Elevator To prevent hands, etc getting caught in drive chains, these guards are attached with set screws. These guards must be fitted while the machine is in use. Warning: Access to pinch points is still possible from underneath or behind the guards.
-
Page 13: Safety Decals & Safety Guards
SAFETY - Machine Specific (Continued) Safety Decals & Safety Guards Item Decal/Guard Cross Reference Qty. ‘No Ride’ Refer Page 9 Pt N 43906 ‘Pinch Point/Moving Parts’ Refer Page 9 Pt N 43901 ‘Pinch Point/Moving Parts’ Refer Page 9 Pt N 43907 ‘Sharp Points’... -
Page 14: Operation
Operation Attaching & Detaching Attaching Machine to Tractor Reverse up to the fork frame, align the lower hitches with the pins and secure in place with a lynch pin in each hitch pin hole. fig 1 Refer Fig 1. Attach the the top link using either the hole or the slot provided. -
Page 15: Loading Round Bales
Operation (Continued) Loading Round Bales Release the tine frame arm. This will swing upright under spring tension, allowing clear access for loading the bale. Lower the forks until tips are flat on the ground and reverse gently under the bale to be picked up. Refer Fig 5. -
Page 16: Loading & Feeding Out Square Bales
Operation (Continued) Loading & Feeding Out Square Bales Release the tine frame arm. This will swing upright under spring tension, allowing clear access for loading the bale. Refer Fig 9. Lower the forks until the tips are flat on the ground and fig 8 reverse gently under the bale to be picked up. -
Page 17: Warnings Specific To This Machine
Operation (Continued) Cautions Specific to this Machine Dangerous: Keep well clear of knife roller, elevator and floor moving parts when feeding out. Never try to clear any blockage, build-up, tangled string or netting while the machine is operating. Never climb into the bed of the machine without isolating the hydraulics. -
Page 18: Maintenance
Maintenance Your new Duncan Ag Electrofeed machine will give long and efficient service if given normal care and maintained properly. Lubrication Chart fig 11 Precautions with Grease Greases should not be mixed as the structure may be weakened by the mixing of different types of thickener which may cause softening and loss of grease from bearings by running out. -
Page 19: Mechanical Adjustments
Mechanical Adjustments Floor Chain Tension Settings Check floorchains tension initially after 1 month and thereafter 6 monthly, depending on use. To check the tension on the floorchains measure from under the floor to the chains as in Fig 12. The gap should be 170mm at the centre of the floor. -
Page 20: Sprockets, Drive Dogs & Bearings
Mechanical Adjustments (Continued) Sprockets, Drive Dogs & Bearings All sprockets and drive dogs have 2 grub screws. (Fig 17/1 18/1 & 19/1) One is located over the key (Fig 17/2 & 18/2), the other at 90 to it. These should be checked for tightness after an initial period of 2 weeks and thereafter every 2 months. -
Page 21: Operator Notes
Electrofeed Operator Notes Pt. No. 67359 Issue 0305... - Page 22 Electrofeed Operator Notes...
- Page 23 Parts List Electrofeed Universal Bale Feeder 3PT Linkage Head Office: Australian Branch: P.O. Box 2018 4B SIlverton Close Hilton Highway, Washdyke Laverton North 3026 Timaru, New Zealand Melbourne, Australia Telephone (03) 688 2029 Telephone (03) 9314-9666 Facsimile (03) 688 2821 Facsimile (03) 9314-6810 Pt.
- Page 24 29 30 29 30 10 14...
- Page 25 Electrofeed Complete Assembly Item Part No. Description Qty. See Page 24/25 Chassis Assembly See Page 26/27 Forks Assembly See Page 36/37 Elevator Assembly See Page 28/29 Chains & Battens (Floor) See Page 35 Chains & Battens (Elevator) See Page 31 Drive Assemblies See Page 32/33 Knife Roller &...
- Page 26 This End as Shown Other End Both Ends...
- Page 27 Electrofeed Chassis Assembly Item Part No. Description Qty. 32065 Mainframe Assembly 31572 Nylon Wear Block 45397 M8 x 55 Z/P Bolt 45137 M8 Nyloc Nut 45157 M8 H/D Flat Washer 32060 Wearstrip 32 x 35 x 2055 Floor 45415 M8 x 45 Z/P Bolt 45437S M12 x 50 Z/P Set Screw (Elevator End) 45442S...
- Page 28 19 20 Catch Detail Refer Page 27 Motor Detail...
- Page 29 Electrofeed Forks Assembly Item Part No. Description Qty. 32520 Forks Frame Assembly (UBF) 32527 Fork Point Assembly (for extended sleeve) 30546 Hydraulic Motor 16 cub.in. 4 Bolt 43420 Ross Motor Seal Kit Spares 30433 Key 1/4” x 1” Woodruff no.808 46984 3/8”...
- Page 30 16 17...
- Page 31 Electrofeed Floor Chains & Battens Item Part No. Description Qty. 31631 4’ 6” Floorshaft (35mm Dia) 32037 4’ 6” R.H. Floorshaft (35mm Dia) 31630 11 Tooth x 2” Pitch Floorchain Sprocket 30298 Key 8.0mm Square x 68mm Long 45186 M10 x 12 Socket Head Grub Screw 30295 Bearing Housing FY 507 43418...
- Page 32 L.H. Drive Assembly 24 25 R.H. Drive Assembly 13 12 19 18 23 24 14 16...
- Page 33 Electrofeed Drive Assemblies Item Part No. Description Qty. 31625 Driven Dog Assembly 31627 Drive Shaft 43418 ‘Y’ Bearing YAR 207 (35mm) 30295 Bearing Housing FY 507 Key 8mm Square x 35 mm Long 31570 15T 3/4” P Sprocket 35mm Bore 31575 31576 23T 5/8”...
- Page 35 Electrofeed Knife Roller & Deflector Item Part No. Description Qty. 31670 4’ 6” Knife Roller Assembly 31662 4’6” Deflector Assembly 31664 Knife Roller Support Assembly (Rear) 43416 ‘Y’ Bearing YAR-206 (30 mm) 43417 30 mm Bearing Housing Pressed Steel PF62 (2 Flanges) 45418S M10 x 25 Class 4.6 Z/P Set Screw 45138...
- Page 36 Electrofeed Tine Frame Catch Assembly Item Part No. Description Qty. 32005 Top Catch Bar Assembly 32006 Torsion Spring R.H. 32034 Handle Assembly 32035 Top Restraint Catch 17439 45460S Set Screw M16 x 50 Z/P 45464 Bolt M16 x 70 Z/P 45140 Nut Nyloc M16 Z/P 45160...
- Page 37 Electrofeed Elevator Chains & Battens Item Part No. Description Qty. 31900 Elevator Chain C2082H x 36 Links (Includes Joiner) 43612 Chain Joiner Link C2082H Spares 32075 Elevator Batten R.H. Offset Assembly 32078 Elevator Batten L.H. Offset Assembly 45414 M8 x 40 Z/P Bolt 45137 M8 Nyloc Nut 45157...
- Page 38 25 24 20 21 27 33 31 32 42 43 35 38...
- Page 39 Electrofeed Elevator Assembly Item Part No. Description Qty. 32104 Front Elevator Frame Assembly 32105 Rear Elevator Frame Assembly 32086 Elevator Bed Frame Assembly 32155 Elevator Wear Strip 32 x 35 x 650 32120 Tine Frame Assembly 32107 Pivot Mount Assembly (Front) 32109 Pivot Mount Assembly (Rear) 32137...
- Page 40 Electrofeed Hydraulic Control Valves Eaton Hydraulic Controls Parts & Connections...
- Page 41 Electrofeed Hydraulic Control Valves (Continued) Parker Hydraulic Controls Parts & Connections Pt. No. 67359 Issue 0305...
Need help?
Do you have a question about the Electrofeed 3Pt Linkage and is the answer not in the manual?
Questions and answers