Table of Contents
Advertisement
Quick Links
Advertisement
Table of Contents

Related Manuals for Makita XRM10


Summary of Contents for Makita XRM10
- Page 1 INSTRUCTION MANUAL Job Site Charger Radio XRM10 IMPORTANT: Read Before Using.
-
Page 2: Specifications
Bluetooth SIG, Inc. and any use of such marks by Makita is under license. Other trademarks and trade names are those of their respective owners. The following table indicates the operating time on a single charge in Radio mode. -
Page 3: Safety Warnings
Read this instruction manual carefully before tions. Charging improperly or at temperatures use. If you use a Makita charger, also read the charger instruction manual. Clean only with dry cloth. Do not use water for 14. -
Page 4: Fcc Statement
10. The contained lithium-ion batteries are subject the party responsible for compliance could void the to the Dangerous Goods Legislation require- user’s authority to operate the equipment. ments. For commercial transports e.g. by third parties, Makita U.S.A. Inc. 4 ENGLISH... - Page 5 Before charging, read all instructions and cautionary markings on this appli- ance, AC power adaptor, and battery cartridge. CAUTION – To reduce risk of injury, charge only Makita type rechargeable bat- teries. Other types of batteries may burst causing personal injury and damage.
- Page 6 Do not operate this appliance with damaged cord or plug. If the cord or plug is damaged, ask Makita authorized service center to replace it in order to avoid a hazard. Do not operate or disassemble this appliance if it has received a sharp blow, Do not charge battery cartridge when room temperature is BELOW 10°C (50°F)
-
Page 7: Parts Description
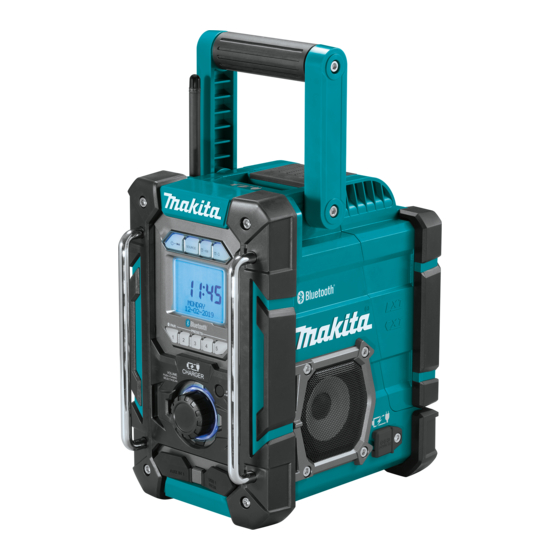
INTRODUCTION Parts description Body Fig.1 Handle Soft bended rod antenna Speaker Menu/Info button Volume/Tuning control/ Auxiliary input socket USB power supply port DC IN socket Select knob (AUX IN 1) Hook for AC adaptor Bottle cap opener Battery cover Slot for LXT battery cartridge Slot for CXT battery Auxiliary input socket... -
Page 8: Installing Back Up Batteries
Buttons and LCD display Fig.2 Power/Sleep timer Source button Radio alarm button Buzzer alarm button button Buzzer alarm Radio alarm Icon for delay charge Band Icon for sleep timer PM indicator for clock Stereo symbol No power indicator Error icon for charging Indicator for battery Indicator for AC power Clock... -
Page 9: Functional Description
Remove back up battery compartment cover and To remove the battery cartridge, slide it from the tool install 2 fresh UM-3 (AA sizes) batteries. Make sure the while sliding the button on the front of the cartridge. batteries are with correct polarity as shown inside the After installing/removing the battery cartridge, be sure compartment. -
Page 10: Auxiliary Input Socket
Using the soft bended rod antenna When listening to FM radio stations, straight up the soft Fig.8 1. Cover 2. DC IN socket 3. Adaptor plug NOTE: When the adaptor is used, the radio is pow- ered from the mains and the battery cartridge is Fig.7 charged. -
Page 11: Charging The Battery Cartridge
for comfortable listening. NOTE: No matter if the radio is AC powered or battery powered, you can charge a USB device when the Charging with USB power supply radio is switched on and in FM radio mode, Bluetooth port mode, or AUX mode which is appeared when an external audio source is connected. -
Page 12: Operation
NOTE: It will take several seconds until the indicator for battery status/capacity appears after the AC power adaptor is plugged into the mains. NOTE: If the AC power adaptor is disconnected from the radio during battery charging, the radio turns off for a few seconds and then automatically turns on with the battery power supply. -
Page 13: Setting The Clock
Scan tuning AM/FM NOTE: Preset stations which have already been stored may be overwritten by following the above procedure. Press the Power button to switch on your radio. Recalling a preset station in AM/FM Press the Source button to select AM or FM radio mode. - Page 14 Rotate the Tuning control knob to select the Rotate Tuning control knob to select <LAST desired date format (<DD/MM/YYYY> or <MM/DD/ LISTENED> or <PRESET NO.> and press Tuning YYYY>). Press the Tuning control knob control knob your choice. Rotate Tuning control knob to select the desired volume and press Tuning control knob to con- Setting the clock time and date...
- Page 15 ® Snooze Pairing your Bluetooth device When the alarm sounds, press any button other than ® Press the Source button to select Bluetooth the Power button to stop the alarm for 5 minutes. function. "READY BLUETOOTH" will be shown on the "SNOOZE"...
-
Page 16: Maintenance
Never use gasoline, benzine, thinner, NOTICE: alcohol or the like. Discoloration, deformation or cracks may result. To maintain product SAFETY and RELIABILITY, be performed by Makita Authorized or Factory Service Centers, always using Makita replacement parts. OPTIONAL ACCESSORIES These accessories or attachments... - Page 18 Makita Corporation 3-11-8, Sumiyoshi-cho, XRM10-NA2-1911 Anjo, Aichi 446-8502 Japan XRM10-1 20200323 www.makita.com...
Need help?
Do you have a question about the XRM10 and is the answer not in the manual?
Questions and answers