Advertisement
Rear Handlebar and laser light
I N S T A L L A T I O N I N S T R U C T I O N S F O R G A L L A N T
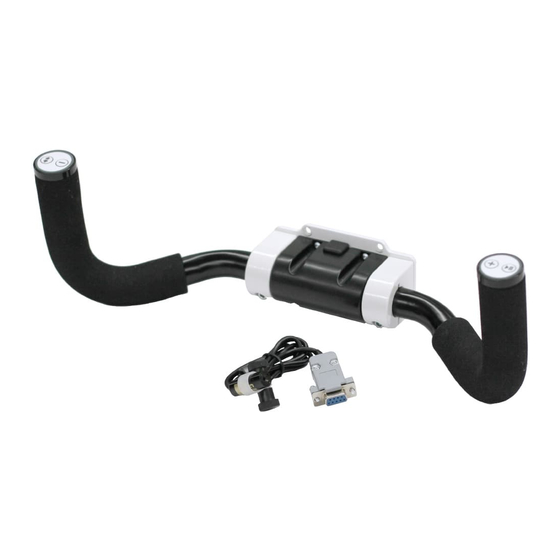
KIT CONTENTS
(1) Rear Handlebar (QM29421)
(1) Laser Light Assembly (QM10290)
I
c n
u l
e d
l s
s a
r e
p
, n i
a l
e s
i l r
mounting bracket
(1) 3mm Hex Wrench (QM40406)
(3) M5X12 Screw-SKB ZN (QM12017)
INSTALLING THE REAR HANDLEBAR
1. Loosen the two screws from the rear handlebar
connection cover and remove the plastic cover.
Do not remove the screws.
IMPORTANT:
There is a connector plugged into the
back of the circuit board. If the board is loosened
too much or pulled out, ensure the connector is fully
plugged into the back of the circuit board before
proceeding.
2. Retighten the two screws into the circuit board.
3. Locate the three M5X12 SKB ZN hex screws for the rear
handlebar and the 3mm hex wrench.
4. Align the three holes in the handlebar with the holes on the
back of the machine.
5. Slide the screws into the holes until they stop. Use the
3mm hex wrench to firmly tighten the bolts and securely
fasten the handlebar to the back of the machine.
6. The contacts on the back of the handlebar will contact the
circuit board, so no cable is needed to connect the rear
handlebar to the machine.
NOTE:
power cord and test by turning on the machine using
on the front handlebar.
TM
h g
, t
n a
d
y n
o l
n
BabyLock.com
1-800-313-4110
L O N G A R M M A C H I N E
™
screws for
plastic cover
plastic cover
removed
BLGT15-RH
Advertisement
Table of Contents

Subscribe to Our Youtube Channel
Related Manuals for Baby Lock GALLANT BLGT15-RH


Summary of Contents for Baby Lock GALLANT BLGT15-RH
- Page 1 BLGT15-RH Rear Handlebar and laser light I N S T A L L A T I O N I N S T R U C T I O N S F O R G A L L A N T L O N G A R M M A C H I N E ™...
- Page 2 Machine and Rear Handlebar connections shown. CONNECTING THE LASER . n i nut all the way onto the laser pin. Place the washer on the end and screw the laser pin into the threaded hole found near the rear wheel (see diagram). The washer will go against the machine to protect the paint finish.
Need help?
Do you have a question about the GALLANT BLGT15-RH and is the answer not in the manual?
Questions and answers