
Subscribe to Our Youtube Channel
Related Manuals for Dormakaba FSW EASY Safe


Summary of Contents for Dormakaba FSW EASY Safe
- Page 1 FSW EASY Safe and FSW EASY Safe-C/-C-Plus Folding sliding wall Mounting instructions WN 059292 45532 – 2017-07...
-
Page 2: Table Of Contents
Contents About this manual Information about the manual Symbols in the manual Overview and product description Overview 2.2 Tools 2.3 Scope of delivery Safety Intended use 3.2 Remaining residual risks during installation 3.2.1 Basic hazards at the installation site 3.2.2 Mechanical hazards 3.2.3 Chemical substance hazards... -
Page 3: About This Manual
This manual allows for the safe and efficient • If necessary, the installation instructions for the installation of the FSW EASY Safe and FSW EASY TS92/93 door closer Safe-C/-C-Plus folding sliding wall (hereinafter called • System drawing of the delivered folding sliding wall “folding sliding wall”) as well. - Page 4 The following markings are used in this manual to highlight instructions, results, lists, references and other elements: Marking Explanation 1., 2., 3., ... Step-by-step instructions Results of instructions → Lists without a specified order • WN 059292 45532 2017-07 FSW EASY Safe and FSW EASY Safe-C/-C-Plus...
-
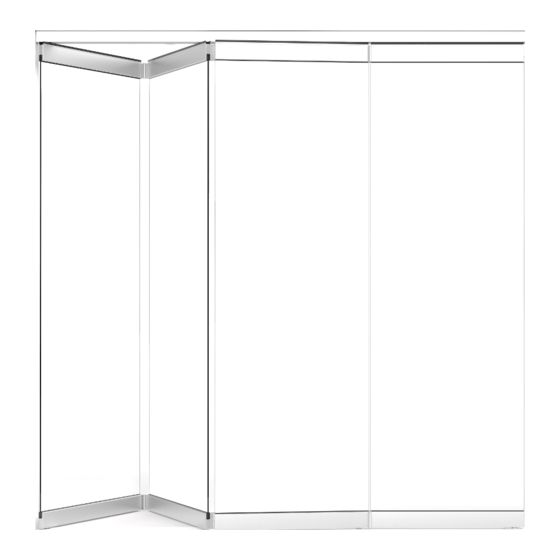
Page 5: Overview And Product Description
• Folding panel (Fig. 1/2) • Track rail (Fig. 1/H) • Final folding base panel (Fig. 1/3) • Final folding panel (Fig. 1/4) Fig. 1 Folding sliding wall overview (sample model) FSW EASY Safe and FSW EASY Safe-C/-C-Plus WN 059292 45532 2017-07... -
Page 6: Tools
• Hole saw ∅ 40 mm use. The hole saw must be suitable for masonry. The FSW EASY Safe consists of a base panel and • Hole saw ∅ 25 mm folding panels. A separate swing panel can optionally The hole saw must be suitable for masonry. -
Page 7: Safety
• Only use replacement parts that are approved by The ladder or scaffolding must be in perfect the manufacturer. condition. If necessary, have a second person secure the ladder or scaffolding. FSW EASY Safe and FSW EASY Safe-C/-C-Plus WN 059292 45532 2017-07... -
Page 8: Mechanical Hazards
• Always be mindful of sharp notches and at hand. edges on components before beginning work. Transport parts with sharp notches and edges with protective gloves and protective clothing only. WN 059292 45532 2017-07 FSW EASY Safe and FSW EASY Safe-C/-C-Plus... -
Page 9: The Operator's Responsibility
This includes keeping the folding installation work on the FSW EASY Safe and FSW sliding wall, along with the entrance and exit, free EASY Safe-C/-C-Plus as well as independently detect from contaminants. -
Page 10: Personal Protective Equipment
Protective gloves serve to protect the hands from friction, abrasions, punctures, deep wounds and contact with hot surfaces. Safety shoes Safety shoes protect the feet from bruises, falling parts and slipping on slippery floors. WN 059292 45532 2017-07 FSW EASY Safe and FSW EASY Safe-C/-C-Plus... -
Page 11: Environmental Protection
(Customer service, p. 3). Adhesives Adhesives contain poisonous substances. They may not be leaked to the environment. They must be disposed of via a waste management facility. FSW EASY Safe and FSW EASY Safe-C/-C-Plus WN 059292 45532 2017-07... -
Page 12: Delivery And Transport
TIPS AND RECOMMENDATIONS File a complaint about any defect as soon as it is detected. Claims for damages can only be asserted within the valid damage claims period. WN 059292 45532 2017-07 FSW EASY Safe and FSW EASY Safe-C/-C-Plus... -
Page 13: Removing Packaging
• Dispose of packaging material in an environmentally responsible manner. Follow applicable local disposal guidelines. If necessary, commission a specialized company to dispose of the waste. FSW EASY Safe and FSW EASY Safe-C/-C-Plus WN 059292 45532 2017-07... -
Page 14: Installation
• There is a system drawing. Check the mounting points for the track rail on the substructure/ceiling at the following intervals: • Approx. every 100 mm in the panel’s stacking track area. WN 059292 45532 2017-07 FSW EASY Safe and FSW EASY Safe-C/-C-Plus... -
Page 15: Installing Long Track Rails (Front Of The System)
6. Insert the next track rail piece’s (Fig. 4/3) joint into the already installed track rail piece. For this, insert the clamping pieces into the upper channels. Screw the second track rail piece to the substructure/ceiling. FSW EASY Safe and FSW EASY Safe-C/-C-Plus WN 059292 45532 2017-07... -
Page 16: Installing The Floor Pivot
6. Wear protective glasses. Drill the middle of the floor pivot at least 15 mm deep using a 40-mm hole saw (Fig. 5). Fig. 6 Setting down the glass pane WN 059292 45532 2017-07 FSW EASY Safe and FSW EASY Safe-C/-C-Plus... - Page 17 The door rails stick to the glass pane. → Fig. 10 Tighten the door rail Repeat the process for the remaining panels. Fig. 8 Sliding on the door rail FSW EASY Safe and FSW EASY Safe-C/-C-Plus WN 059292 45532 2017-07...
-
Page 18: Adhering The Door Rail With Lsg Pane (Optional)
2. Remove excess adhesive on the adhesive chamber (Fig. 12/2) and with the feed piece. outlet and on the fill hole. 3. Repeat the process for the second adhesive chamber. WN 059292 45532 2017-07 FSW EASY Safe and FSW EASY Safe-C/-C-Plus... -
Page 19: Installing The Upper Pivot Bearing
• Open-end wrench, 17 mm Disassembling the pivot bearing Fig. 16 Loosening the threaded pins Remove the washer (Fig. 14/1) from the upper (Fig. 14/2) pivot bearing. Fig. 14 Removing the washer FSW EASY Safe and FSW EASY Safe-C/-C-Plus WN 059292 45532 2017-07... - Page 20 10. Insert the support block into the upper door rail/ the upper carrier profile (Fig. 21). Fig. 18 Inserting the upper pivot bearing Fig. 21 Inserting the support block WN 059292 45532 2017-07 FSW EASY Safe and FSW EASY Safe-C/-C-Plus...
-
Page 21: Installing The Swing Panel
• Glass suction cup • Plastic hammer • Open-end wrench, 8 mm • Phillips and flat-head screw driver Ensure: • There is a system drawing. Fig. 24 Inserting the swing panel FSW EASY Safe and FSW EASY Safe-C/-C-Plus WN 059292 45532 2017-07... -
Page 22: 5.10 Installing The Folding Panel
• There is a system drawing. TIPS AND RECOMMENDATIONS Position the track roller according to the system drawing: • FSW EASY Safe: Track roller is positioned 65 mm from the end of panels 2 and 4. • FSW EASY Safe-C/-C-Plus: Track roller is Fig. 25 Fastening the swing panel positioned in the middle of the panel. - Page 23 Position the suspension blocks according to the system drawing: 10. Alternately install the hinges on the installed • FSW EASY Safe: until the end of the panel panels with 3 screws on the front of the door rails/carrier profiles (Fig. 29/1).
-
Page 24: Finishing The Installation
4. Tighten the revision piece (Fig. 30/4) with a screw. 5. Force the tapered dowel pins halfway into the revision piece. Use a hammer and a flat-head screw driver to do so. Fig. 32 Installing the rubber seal WN 059292 45532 2017-07 FSW EASY Safe and FSW EASY Safe-C/-C-Plus... - Page 25 5. Pull out the sleeve (Fig. 34/1) and push upwards up to the stop. Afterwards, loosen the sleeve again. → The sleeve is on the cover plate. Fig. 34 Removing the sleeve FSW EASY Safe and FSW EASY Safe-C/-C-Plus WN 059292 45532 2017-07...
-
Page 26: Installing The Eccentric Bushing
10. Screw the eccentric bushings on the floor with screws and dowels (Fig. 36). → The eccentric bushings are installed. WN 059292 45532 2017-07 FSW EASY Safe and FSW EASY Safe-C/-C-Plus... -
Page 27: Installing The Remaining Cover Profiles
Fastening the cover plate Fig. 43 Snapping on cover profile 3. Repeat the process for the remaining cover profiles on both sides of the panel on the upper and lower door rail. FSW EASY Safe and FSW EASY Safe-C/-C-Plus WN 059292 45532 2017-07... -
Page 28: Installing The Brush Profiles
Fig. 45 Wedging the brush profile 3. Repeat the process for the remaining panels. Fig. 47 Screwing together the end cover 3. Repeat the process for the last panel. WN 059292 45532 2017-07 FSW EASY Safe and FSW EASY Safe-C/-C-Plus... - Page 29 Inserting the combination fixing block 5. Placing the cover on the combination fixing block (Fig. 49). Fig. 49 Installing the cover 6. Tighten the cover (Fig. 50). Fig. 50 Tightening the cover FSW EASY Safe and FSW EASY Safe-C/-C-Plus WN 059292 45532 2017-07...
-
Page 30: Installing The Ts92/93 Door Closers (Optional)
3. Check the handover protocol and have it signed by the operator. 4. Train the operator on how to use the system. WN 059292 45532 2017-07 FSW EASY Safe and FSW EASY Safe-C/-C-Plus... -
Page 31: Disassembly And Disposal
Follow the applicable documents. Improper disposal ENVIRONMENTAL PROTECTION Improper disposal may harm the environment! Improper disposal may create hazards for the environment. • Follow the operating instructions’ specifications for disposing of components. FSW EASY Safe and FSW EASY Safe-C/-C-Plus WN 059292 45532 2017-07... - Page 32 DORMA-Glas GmbH Max-Planck-Straße 33 – 45 32107 Bad Salzuflen Germany T: +49 2333 793-0 F: +49 2333 793-4950 www.dormakaba.com...
Need help?
Do you have a question about the FSW EASY Safe and is the answer not in the manual?
Questions and answers