Chapters
Table of Contents

Related Manuals for Zanussi ZRB935NX2


Summary of Contents for Zanussi ZRB935NX2
- Page 1 User manual Notice d'utilisation Használati útmutató Manual de instrucciones Fridge Freezer Réfrigérateur/congélateur Hűtő - fagyasztó Frigorífico-congelador ZRB935NX2...
-
Page 2: Table Of Contents
During transportation and installation of the • If this appliance featuring magnetic door appliance, be certain that none of the compo- seals is to replace an older appliance having www.zanussi.com... - Page 3 Daily Use to flow back in the compressor. • Do not put hot pot on the plastic parts in the • Adequate air circulation should be around the appliance. appliance, lacking this leads to overheating. www.zanussi.com...
-
Page 4: Product Description
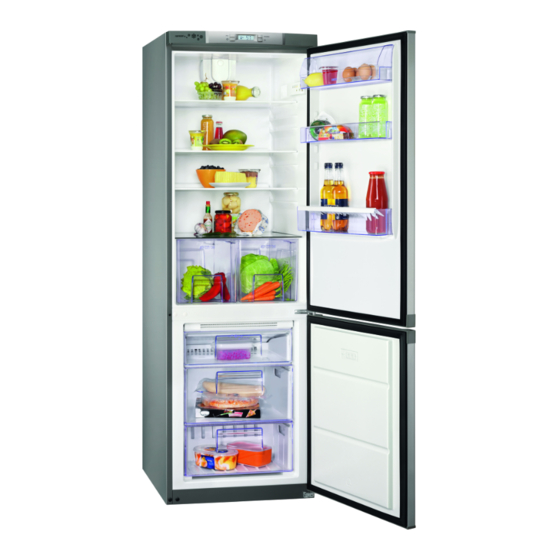
• Any electrical work required to do the servic- materials used on this appliance marked by the ing of the appliance should be carried out by symbol are recyclable. a qualified electrician or competent person. Product description Vegetable drawers Dynamic Air Cooling Glass shelves Control panel www.zanussi.com... -
Page 5: Control Panel
As soon as the appliance is turned on, it is in reached. alarm condition, the temperature flashes and For a correct storage of the food select the Eco you will hear a buzzer. mode function that guarantee the following tem- peratures are set: www.zanussi.com... - Page 6 ( e. Press the key (E) to confirm the selection. You g. the summer holidays) without the formation of will hear the buzzer and the icon remains ligh- a bad odours. ted. www.zanussi.com...
- Page 7 It is possible to deactivate the function at any During the alarm phase, the buzzer can be time by pressing key (D) until indicator will switched off by pressing key (E). flash and then press key (E). www.zanussi.com...
-
Page 8: First Use
After 24 hours, when the freezing process is opening or when the completed, deactivate the Fast Freezing func- ambient temperature tion (see "Fast Freezing function"). is high. Allows you to switch on the device manually by activating the Shopping function when needed. www.zanussi.com... -
Page 9: Helpful Hints And Tips
Butter and cheese: these should be placed in so a saving in electricity consumption. special airtight containers or wrapped in alumi- Hints for fresh food refrigeration nium foil or polythene bags to exclude as much To obtain the best performance: air as possible. www.zanussi.com... -
Page 10: Care And Cleaning
Important! Do not pull, move or damage any little washing-up liquid added. pipes and/or cables inside the cabinet. After cleaning, reconnect the equipment to the Never use detergents, abrasive powders, highly mains supply. perfumed cleaning products or wax polishes to www.zanussi.com... -
Page 11: Troubleshooting
The product temperature is too Let the product temperature de- high. crease to room temperature before storage. The room temperature is too high. Decrease the room temperature. The Action Freeze function is Refer to "Action Freeze function". switched on. www.zanussi.com... - Page 12 1. Disconnect the appliance. gested to use Osram PARATHOM SPE- 2. Push the movable part to unhook the lamp CIAL T26 0.8 Watts. cover (1). 5. Install the lamp cover. 3. Remove the lamp cover (2). 6. Connect the appliance. www.zanussi.com...
-
Page 13: Technical Data
+10°C to + 32°C Warning! It must be possible to +16°C to + 32°C disconnect the appliance from the mains +16°C to + 38°C power supply; the plug must therefore be easily accessible after installation. +16°C to + 43°C www.zanussi.com... - Page 14 Important! To carry out the following operations, we suggest that this be made with another person that will keep a firm hold on the doors of the appliance during the operations. www.zanussi.com...
-
Page 15: Environmental Concerns
Return the product to your local recycling facility Help protect the environment and human health or contact your municipal office. and to recycle waste of electrical and electronic www.zanussi.com... -
Page 16: Instructions De Sécurité
Ils pourraient s'asphyxier. d'agents chimiques ou tout autre système ar- tificiel pour accélérer le processus de dégi- • Si l'appareil doit être mis au rebut, sortez la fi- vrage. che de la prise électrique, coupez le cordon www.zanussi.com... - Page 17 Utilisez une spatule en plas- de l'ampoule (si présent) de l'éclairage tique. intérieur. • Contrôlez régulièrement l'orifice d'évacuation • Cet appareil est lourd. Faite attention lors de de l'eau de dégivrage dans le compartiment son déplacement. www.zanussi.com...
- Page 18 • Placez de préférence votre appareil loin d'une clables. source de chaleur (chauffage, cuisson ou ray- ons solaires trop intenses). • Assurez-vous que la prise murale reste ac- cessible après l'installation de l'appareil. www.zanussi.com...
-
Page 19: Description De L'appareil
Description de l'appareil Bacs à légumes Compartiment à produits laitiers Clayettes en verre Balconnet de porte « Dynamic Air Cooling » Compartiment à bouteilles Bandeau de commande Paniers de congélation Voyant Plaque signalétique Bandeau de commande www.zanussi.com... -
Page 20: Fonctionnement
: condes qui suivent, l'affichage s'éteint puis re- +5 °C dans le compartiment réfrigérateur prend son aspect initial. -18°C dans le compartiment congélateur Les fonctions affichées sont les suivan- tes : www.zanussi.com... - Page 21 Pour activer la fonction Sécurité enfants, ap- Appuyez sur la touche (D) (plusieurs fois si né- puyez sur la touche (D) (plusieurs fois, si néces- cessaire) jusqu'à ce que le symbole correspon- saire), jusqu'à ce que le symbole correspondant dant apparaisse. apparaisse www.zanussi.com...
- Page 22 52 heures. Dès que les conditions normales de fonctionne- Il est possible de désactiver la fonction à tout ment sont rétablies, vous constaterez ce qui moment en appuyant sur la touche (D), jusqu'à suit : • le signal sonore s'éteint www.zanussi.com...
-
Page 23: Première Utilisation
Congélation d'aliments frais Le compartiment congélateur est idéal pour congeler des denrées fraîches et conserver à long terme des aliments surgelés ou congelés. Pour congeler les denrées fraîches, activez la fonction Congélation Rapide au moins 24 heu- www.zanussi.com... -
Page 24: Conseils Utiles
Ce phénomène est normal. Conseils pour l'économie d'énergie • Le compresseur peut produire un ronronne- • N'ouvrez pas la porte trop souvent ou plus ment aigu ou un bruit de pulsation. Ce phé- longtemps que nécessaire. nomène est normal. www.zanussi.com... - Page 25 • assurez-vous que les denrées surgelées Bouteilles : elles doivent être munies d'un bou- achetées dans le commerce ont été correcte- chon et être placées dans le balconnet porte- ment entreposées par le revendeur ; bouteilles de la porte. www.zanussi.com...
-
Page 26: Entretien Et Nettoyage
à l'intérieur du comparti- duits chimiques qui peuvent attaquer/endom- ment, sous l'impulsion d'un ventilateur à com- mager les pièces en plastique utilisées dans cet mande automatique. appareil. Il est par conséquent recommandé d'utiliser seulement de l'eau chaude additionnée www.zanussi.com... -
Page 27: En Cas D'anomalie De Fonctionnement
Cela peut être dû à un mauvais ré- Sélectionnez une température plus glage de la température. élevée. La température à l'intérieur La porte n'est pas bien fermée. Consultez le paragraphe "Fermeture de l'appareil est trop éle- de la porte". vée. www.zanussi.com... - Page 28 2. Si nécessaire, ajustez la porte. Reportez- vous au chapitre « Installation ». 6. Branchez la prise d'alimentation. 3. Si nécessaire, remplacez les joints de porte 7. Ouvrez la porte. Vérifiez que l'ampoule s'al- défectueux. Contactez votre service après- lume. vente. www.zanussi.com...
-
Page 29: Caractéristiques Techniques
Pour installer les entretoises, procédez comme et l'élément suspendu doit être de 100 mm mi- suit : nimum. Si possible, évitez de placer l'appareil 1. Desserrez la vis. sous des éléments suspendus. La mise à niveau www.zanussi.com... - Page 30 Lorsque vous installez une autre personne pour maintenir fermement l'appareil, veillez à ce les portes lors de toute manipulation de qu'il soit d'aplomb. l'appareil. Utilisez les deux pieds réglables se trouvant à l'avant de l'appareil. www.zanussi.com...
-
Page 31: En Matière De Sauvegarde De L'environnement
à cet effet. ménagères. Emmenez un tel produit dans votre Contribuez à la protection de l'environnement et centre local de recyclage ou contactez vos à votre sécurité, recyclez vos produits services municipaux. www.zanussi.com... - Page 32 érdekében, hogy ne – étkeztetés és hasonló, nem kereskedelmi játsszanak a készülékkel. jellegű alkalmazások. • Minden csomagolóanyagot tartson a gyer- • Ne használjon mechanikus szerkezetet mekektől távol. Fulladásveszélyesek. vagy mesterséges eszközöket a leolvasztá- si folyamat elősegítésére. www.zanussi.com...
- Page 33 • Ne tisztítsa a készüléket fémtárgyakkal. mütés vagy tűz veszélye. • Ne használjon éles tárgyakat a dérnek a 6. Nem szabad működtetni a készüléket, készülékről történő eltávolításához. Hasz- ha a belső világítás lámpabúrája nincs náljon műanyag kaparókést. a helyén (ha van a készüléken). www.zanussi.com...
- Page 34 és szimbólummal megjelölt anyagok a forró alkatrészek (kompresszor, konden- újrahasznosíthatóak. zátor) megérintését vagy megfogását az esetleges égési sérülések megelőzése ér- dekében. • A készüléket nem szabad radiátorok vagy tűzhelyek közelében elhelyezni. www.zanussi.com...
- Page 35 Termékleírás Zöldséges fiókok Tejtermék polc Üvegpolcok Ajtóban lévő polc Dynamic Air hűtés Palacktartó polc Kezelőpanel Fagyasztó kosarak LED lámpa Adattábla Kezelőpanel www.zanussi.com...
- Page 36 Eco üzemmód funkciót, ami garan- gomb megnyomásával erősíthető meg. Ha tálja a következő hőmérsékletek beállítását: néhány másodperc elteltével nem történik +5°C a hűtőszekrényben megerősítés, a kijelző kilép a menüből, és vis- -18°C a fagyasztóban szatér normál állapotba. A következő funkciók kerülnek kijelzésre: www.zanussi.com...
- Page 37 Nyomja meg (szükség szerint többször) a (D) A választást meg kell erősítenie az (E) gomb gombot, amíg a megfelelő ikon meg nem jele- néhány másodpercen belüli megnyomásával. Hangjelzés hallható, az ikon pedig tovább vi- www.zanussi.com...
- Page 38 (E) gomb megnyomásá- néhány másodpercre. val. Ezután a kijelző visszatér a normál működés- Italhűtő funkció re, a kiválasztott rekesz hőmérsékletét mutat- Az Italhűtő funkció biztonsági figyelmeztetés- ként szolgál, amikor italos palackokat helyez www.zanussi.com...
- Page 39 élelmiszerek hosszú távú tárolására is. szés szerinti helyre Friss élelmiszer lefagyasztásához aktiválja a lehessen tenni. Gyorsfagyasztás funkciót legalább 24 órával azelőtt, hogy a lefagyasztani kívánt élelmi- szert behelyezi a fagyasztórekeszbe. Helyezze a lefagyasztandó friss élelmiszert az alsó rekeszbe. www.zanussi.com...
- Page 40 • Esetleg egy halk csobogó vagy bugyboré- zott anyag; ekkor zümmögő és pulzáló zaj koló hangot is lehet hallani, amikor a hűtő- hallatszik a kompresszor felől. Ez normális közeget a rendszer a hátsó tekercseken jelenség. vagy vezetéken. Ez normális jelenség. www.zanussi.com...
- Page 41 Ötletek fagyasztott élelmiszerek Vaj és sajt: speciális légmentes tartóedények- tárolásához be kell helyezni, vagy alufóliába vagy nejlon- Annak érdekében, hogy a legjobb teljesít- zacskókba csomagolni őket, és a lehető leg- ményt érje el a készüléknél: több levegőt kiszorítani körülöttük. www.zanussi.com...
- Page 42 és erőteljes illatot hagynak maguk után. Tisztítsa meg a kondenzátort (fekete rács), majd a készülék hátulján lévő kompresszort egy kefével. Ezzel a művelettel javíthatja a készülék teljesítményét, és csökkentheti az áramfogyasztást. Fontos Ügyeljen arra, hogy ne sérüljön meg a hűtőrendszer. www.zanussi.com...
- Page 43 Túl sok dér és jég képző- Az élelmiszerek nincsenek megfe- Csomagolja be jobban az élelmi- dött. lelően becsomagolva. szereket. Az ajtó nincs jól becsukva. Olvassa el "Az ajtó bezárása" c. szakaszt. www.zanussi.com...
- Page 44 2. Szükség esetén állítsa be az ajtót. Olvas- 6. Csatlakoztassa a készüléket. sa el az „Üzembe helyezés” c. szakaszt. 7. Nyissa ki az ajtót. Győződjön meg arról, 3. Szükség esetén cserélje ki a hibás ajtótö- hogy a világítás bekapcsol-e. mítéseket. Forduljon a márkaszervizhez. www.zanussi.com...
- Page 45 +16°C és + 43°C között Olyan helyen helyezze üzembe a készüléket, amelynek környezeti hőmérséklete megfelel Elhelyezés annak a klímabesorolásnak, amely a készülék A készüléket minden hőforrástól, például ra- adattábláján fel van tüntetve: diátortól, kazántól, közvetlen napsütéstől stb. távol kell üzembe helyezni. Gondoskodjon ar- www.zanussi.com...
- Page 46 2. Helyezze a távtartót a csavarfej alá. A gyártó minden felelősséget elhárít magától, 3. Fordítsa a távtartót a megfelelő helyzet- ha a fenti biztonsági óvintézkedéseket nem tartják be. 4. Csavarozza be a csavart. Ez a készülék megfelel az EGK irányelvek- nek. www.zanussi.com...
- Page 47 A márkaszerviz szakembe- • A mágneses tömítés a készülékházhoz ta- re költségtérítés ellenében elvégzi az ajtók pad-e. nyitásirányának megfordítását. • Az ajtó megfelelően nyílik és csukódik-e. Ha a környezeti hőmérséklet alacsony (pl. té- len), előfordulhat, hogy az ajtótömítés nem ta- www.zanussi.com...
- Page 48 Juttassa el a csomagolást. készüléket a helyi újrahasznosító telepre, Járuljon hozzá környezetünk és egészségünk vagy lépjen kapcsolatba a hulladékkezelésért védelméhez, és hasznosítsa újra az felelős hivatallal. www.zanussi.com...
-
Page 49: Instrucciones De Seguridad
(tan cerca del aparato como pueda) y retire la bricante haya autorizado su utilización para puerta para impedir que los niños al jugar estos fines. www.zanussi.com... - Page 50 • No retire ni toque elementos del comparti- cesario, limpie el desagüe. Si el desagüe se mento congelador con las manos húmedas o bloquea, el agua se acumulará en la base del mojadas, ya que podría sufrir abrasión de la aparato. piel o quemaduras por congelación. www.zanussi.com...
- Page 51 • El aparato no debe colocarse cerca de radia- materiales de este aparato marcados con el dores ni de hornillas de cocina. símbolo son reciclables. • Asegúrese de que es posible acceder al en- chufe después de instalar el electrodomésti- www.zanussi.com...
-
Page 52: Descripción Del Producto
Descripción del producto Cajones de verduras Estante para productos lácteos Estantes de cristal Estante de la puerta Refrigeración de aire dinámico Estante para botellas Panel de control Cajones de congelador Indicador LED Placa de características Panel de mandos www.zanussi.com... -
Page 53: Funcionamiento
+5 °C en el frigorífico -18 °C en el congelador www.zanussi.com... - Page 54 Confirme la selección con la tecla (E). Se emiti- Esta función se activa pulsando la tecla (D) (va- rá una señal acústica y el icono permanecerá rias veces si fuera necesario) hasta que aparez- activado. ca el icono correspondiente www.zanussi.com...
- Page 55 Función Bebidas frías compartimento seleccionado. Utilice esta función como advertencia de segu- Durante la fase de alarma, se puede desactivar ridad cuando coloque botellas en el comparti- la señal acústica con la tecla (E). www.zanussi.com...
-
Page 56: Primer Uso
Para congelar alimentos frescos, active la fun- ción de congelación rápida al menos 24 horas antes de introducir los alimentos en el comparti- mento congelador. Coloque los alimentos que vaya a congelar en el compartimento inferior. www.zanussi.com... - Page 57 Eleve paulatinamente el estante en la direc- ción de las flechas hasta retirarlo del so- porte y colóquelo en la posición que de- see. www.zanussi.com...
-
Page 58: Consejos Útiles
Por razones de seguridad, guárdela de ese mo- do durante uno o dos días, como máximo. • el hielo, si se consume inmediatamente des- Alimentos cocinados, platos fríos, etc.: cúbralos pués de retirarlo del compartimento congela- y colóquelos en cualquier estante. www.zanussi.com... -
Page 59: Mantenimiento Y Limpieza
Muchas marcas de limpiadores de superficies El compartimento congelador de este modelo de cocina contienen químicos que pueden ata- es de tipo "no frost" y no produce escarcha. Es- car o dañar los plásticos del aparato. Por tal ra- www.zanussi.com... -
Page 60: Solución De Problemas
Hay demasiada escarcha y Los productos no están bien en- Envuelva mejor los productos. hielo. vueltos. La puerta no está bien cerrada. Consulte la sección "Cierre de la puerta". www.zanussi.com... - Page 61 2. Si es necesario, ajuste la puerta. Consulte 6. Conecte el aparato. "Instalación". 7. Abra la puerta. Compruebe que la bombilla 3. Si es necesario, cambie las juntas defec- se ilumina. tuosas. Póngase en contacto con el servi- cio técnico. www.zanussi.com...
-
Page 62: Datos Técnicos
Encontrará los dos separadores en la bolsa que aparato y el mueble de pared. No obstante, lo contiene la documentación. ideal sería que el aparato no se colocara debajo Siga estos pasos para colocar los separadores: de ningún mueble instalado en la pared. La ba- www.zanussi.com... - Page 63 Al colocar el aparato durante todo el proceso. compruebe que que- da nivelado. Esto se puede conseguir utili- zando las dos patas ajustables de la parte inferior delantera. www.zanussi.com...
-
Page 64: Aspectos Medioambientales
Lleve el producto Ayude a proteger el medio ambiente y la salud a su centro de reciclaje local o póngase en pública, así como a reciclar residuos de contacto con su oficina municipal. www.zanussi.com... - Page 65 www.zanussi.com...
- Page 66 www.zanussi.com...
- Page 67 www.zanussi.com...
- Page 68 www.zanussi.com/shop...
Need help?
Do you have a question about the ZRB935NX2 and is the answer not in the manual?
Questions and answers