Table of Contents
Advertisement
Quick Links
The 062 can only be used with tekmar controls that are tekmar Net™ capable (tN1 or
tN1 / tN2) terminals. The items that the 062 displays depends on the type of tekmar control
that the RTU is connected to. To determine the exact items that are displayed by the RTU,
refer to the Data Brochure for the control that the 062 is to be used with. In cases where a
restricted temperature range is required, the RTU's range can be limited by changing the
access level of the RTU.
Installation
STEP ONE
Place a small screwdriver or similar object into the small slot located in the top of the RTU
enclosure. Push the screwdriver down against the plastic tab and pull the top of the front
cover so that it pivots around the bottom edge of the RTU. The back cover provides the
base to which the front of the RTU mounts. Store the front of the RTU in a safe place until
wiring must be completed.
- Data Brochure
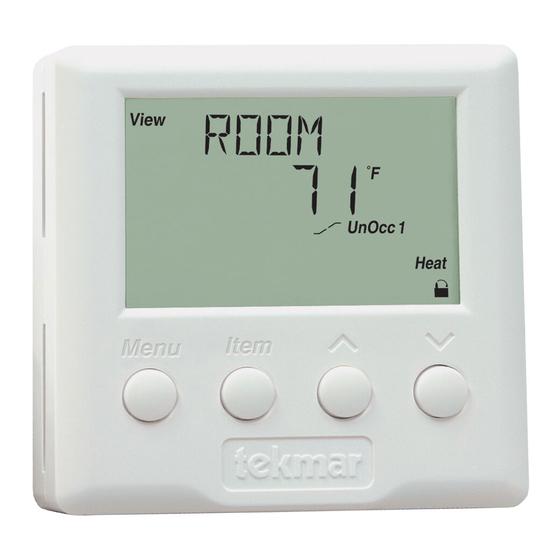
The tekmar Room Temperature Unit (RTU) 062 consists of an
air temperature sensor, a liquid crystal display (LCD) and four
buttons. These buttons and the LCD are used to set and view the
desired room temperature. The RTU's LCD displays the current
room temperature, the outdoor air temperature and a number
of other items.
REMOVING THE FRONT COVER
1 of 4
D 062
© 2007
D 062 - 05/07
05/07
Advertisement
Table of Contents

Related Manuals for Tekmar RTU 062


Summary of Contents for Tekmar RTU 062
- Page 1 The 062 can only be used with tekmar controls that are tekmar Net™ capable (tN1 or tN1 / tN2) terminals. The items that the 062 displays depends on the type of tekmar control that the RTU is connected to. To determine the exact items that are displayed by the RTU, refer to the Data Brochure for the control that the 062 is to be used with.
- Page 2 RTU is polarity sensitive. The Com terminal of the RTU must be connected to the Com terminal of the control and the tekmar Net™ (tN1) terminal of the RTU must be connected to the appropriate tekmar Net™ (tN1) terminal of the control. If the wires are reversed, the display on the RTU will remain blank and the control will display a short circuit error for the tekmar Net™...
- Page 3 STEP FOUR INSTALLING THE FRONT COVER Align the hinges on the bottom of the front cover with the bottom of the RTU mounting base. Pivot the front cover around the bottom hinges and push the top against the mounting base until it snaps firmly in place.
- Page 4 Prod- uct was not installed in compliance with tekmar’s instructions and / or the local codes and ordinances; or if due to defective installation of the Product; or if the Product was not used in compliance with tekmar’s instructions.
Need help?
Do you have a question about the RTU 062 and is the answer not in the manual?
Questions and answers