
Related Manuals for Duramaxx Big Black Mike


Summary of Contents for Duramaxx Big Black Mike
- Page 1 Big Black Mike Fahrradanhänger Bicycle Trailer Remorque de vélo Remolque de bicicletas Rimorchio da bici 10021741 10021742...
- Page 3 Sehr geehrter Kunde, wir gratulieren Ihnen zum Erwerb Ihres Gerätes. Lesen Sie die folgenden Hinweise sorgfältig durch und befolgen Sie diese, um möglichen Schäden vorzubeugen. Für Schäden, die durch Missachtung der Hinweise und unsachgemäßen Gebrauch entstehen, übernehmen wir keine Haftung. Scannen Sie den folgenden QR-Code, um Zugriff auf die aktuellste Bedienungsanleitung und weitere Informationen rund um das Produkt zu erhalten.
- Page 4 SICHERHEITSHINWEISE Kleine Objekte/Verpackungsteile (Plastikbeutel, Karton, etc.) Bewahren Sie die kleine Objekte (z.B. Schrauben und anderes Montagematerial, Speicherkarten) und Verpackungsteile außerhalb der Reichweite von Kindern auf, damit sie nicht von diesen verschluckt werden kann. Lassen Sie kleine Kinder nicht mit Folie spielen. Es besteht Erstickungsgefahr! Bestimmungsgemäßer Gebrauch Dieses Gerät dient dem Transport von Gegenständen mit einem Fahrrad.
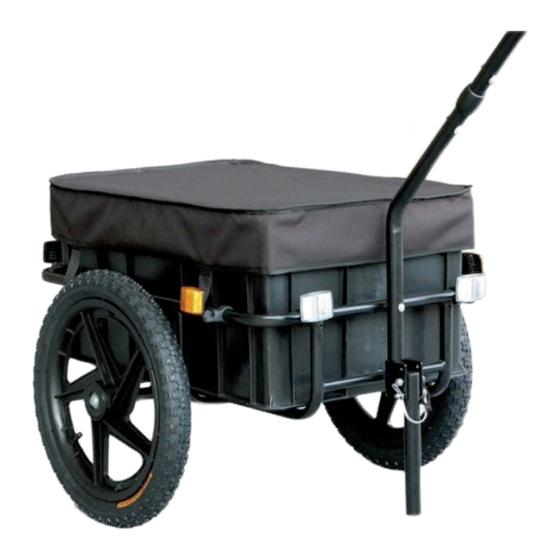
- Page 5 LIEFERUMFANG Transportbox Rahmen 16” Rad Zugstange Zugstange roter Reflektor (f. Rüclkeite) weißer Reflektor (f. gelber Reflektor (für Seite) Reflektorenhalterung Zugstangenverbinder Fuss Zugstangenhalter Sicherheitsbolzen Kupplung Sattelverbinder Kupplung Unterlegscheibe M6*50mm-Schraube M6*35mm-Schraube M6*47mm-Schraube Abdeckung...
- Page 6 MONTAGE Schritt 1: Vorbereitung Entfernen Sie die beiden Schutzkappen vom Rahmen. Schritt 2: Reflektoren montieren Bringen Sie die Reflektorenhalterungen (9) am Rahmen (2) an. Es liegen Halterungen für vorwärtsweisende, rückwärtsweisende und seitwärts weisende Reflektoren bei. Bringen Sie die roten Reflektoren (6) hinten, die weißen (7) vorne und die gelben (8) seitlich an.
- Page 7 Schritt 3: Zugstange montieren • Verbinden Sie die Zugstangen (4,5) unter Nutzung des Verbindungsstückes (10) und der the M6 x35 (19) Schraube. • Verbinden Sie die soweit montierte Zugstange vermittels des Zugstangenhalters (12) und unter Nutzung der M6x50mm (18) Schrauben mit dem Rahmen. •...
- Page 8 Schritt 5: Räder anbringen Bringen Sie die Räder (3) fest an beiden Seiten der Achse an. Schritt 6: Plane und Box anbringen Setzen Sie die Transportbox (1) mit der Abdeckung (21) in den Rahmen ein. Schritt 7: Wagen und Fahrrad verbinden Ziehen Sie den Sicherheitsmechanismus der Kupplung (14), um die Kupplung (16) anzubrignen.
- Page 9 Dear Customer, Congratulations on purchasing this device. Please read the following instructions carefully and follow them to prevent possible damages. We assume no liability for damage caused by disregard of the instructions and improper use. Scan the QR code to get access to the latest user manual and more product information.
- Page 10 SAFETY INSTRUCTIONS Small objects/packaging parts (plastic bags, cardboard, etc.) Keep small objects (e.g. screws and other assembly materials, memory cards) and packaging parts out of the reach of children so that they cannot be swallowed by them. Do not let small children play with foil. There is a danger of suffocation! Intended use This unit is used to transport objects with a bicycle.
- Page 11 SCOPE OF DELIVERY Transport box Frame 16" wheel Drawbar Drawbar Red reflector (for returns) White reflector (f. Yellow reflector (for side) Reflector holder Tie rod connectors Foot Tie rod holder Safety bolt Coupling Saddle connectors Coupling Washer M6*50mm screw M6*35mm screw M6*47mm screw Cover...
- Page 12 ASSEMBLY Step 1: Preparation Remove the two protective caps from the frame. Step 2: Mount reflectors Attach the reflector brackets (9) to the frame (2). Brackets for forward, backward and sideways pointing reflectors are included. Attach the red reflectors (6) at the rear, the white reflectors (7) at the front and the yellow reflectors (8) at the sides.
- Page 13 Step 3: Mount the drawbar • Connect the tie rods (4,5) using the connector (10) and the M6 x35(19) screw. • Connect the tie rod to the frame using the tie rod holder (12) and the M6x50mm(18) screws. • Connect the foot (11) to the tie rod holder (12) by inserting the M6x47mm (20) screw through the centre hole of the tie rod holder to the upper hole of the foot and fix it.
- Page 14 Step 5: Fitting the wheels Mount the wheels (3) fest on both sides of the axle. Step 6: Attach tarpaulin and box Insert the transport box (1) with the cover (21) into the frame. Step 7: Connect car and bicycle Pull the safety mechanism of the coupling (14) to attach the coupling (16).
- Page 15 Estimado cliente, Le felicitamos por la adquisición de este producto. Lea atentamente las siguientes instrucciones y sígalas para evitar posibles daños. No asumimos ninguna responsabilidad por los daños causados por el incumplimiento de las instrucciones y el uso inadecuado. Escanee el siguiente código QR para obtener acceso a la última guía del usuario y más información sobre el producto.
- Page 16 INSTRUCCIONES DE SEGURIDAD Piezas pequeñas/partes del embalaje (bolsas de plástico, cartón, etc.) Mantenga las piezas pequeñas (p.ej. tornillos y otro material de montaje) y las partes del embalaje fuera del alcance de los niños para evitar que se atraganten. No permita que los niños pequeños jueguen con los plásticos, pueden provocar riesgo de asfixia.
- Page 17 PARTES SUMINISTRADAS Caja de transporte Estructura Rueda 16" Barra de remolque Barra de remolque Reflector rojo (para la parte trasera) reflector blanco (para la parte delantera) reflector amarillo (para los laterales) Soporte de los reflectores Conector de la barra de remolque Pata de apoyo Soporte de la barra de remolque Perno de seguridad...
- Page 18 MONTAJE Paso 1: Preparación Retire las dos cubiertas protectoras de la estructura. Paso 2: Montar los reflectores Coloque el soporte para el reflector (9) en la estructura (2). Se incluyen dos soportes para la parte delantera, dos para la trasera y uno para cada lado.
- Page 19 Paso 3: Montar barra de remolque • Una las barras de remolque (4, 5) mediante el conector (10) y el tornillo M6 x 35 (19). • Una las barras de remolque con el soporte ya montado (12) a la estructura mediante tornillos M6x50 mm (16).
- Page 20 Paso 5: Montar las ruedas Instale las ruedas (3) en ambos lados de los ejes. Paso 6: Montar la cubierta y la caja Coloque la caja de transporte (1) con la cubierta (21) sobre la estructura. Paso 7: Unir el remolque y la bicicleta Tire del mecanismo de seguridad del acople (14) para instalar el acople (16).
- Page 21 Chère cliente, cher client, Toutes nos félicitations pour l’acquisition de ce nouvel appareil. Veuillez lire attentivement et respecter les instructions de ce mode d’emploi afin d’éviter d’éventuels dommages. Le fabricant ne saurait être tenu pour responsable des dommages dus au non-respect des consignes de sécurité...
- Page 22 CONSIGNES DE SÉCURITÉ Petits éléments / éléments d’emballage (sacs en plastique, cartons, etc.) Conservez les petits éléments (par exemple vis, matériel de montage) et éléments d’emballage hors de portée des enfants pour éviter les risques d’étouffement. Ne pas laisser les enfants jouer avec les emballages plastiques, il y a risque d‘étouffement ! Utilisation prévue Cet appareil est destiné...
- Page 23 CONTENU DE L‘EMBALLAGE Coffre de transport Cadre Roue de 16” Barre de traction Timon Réflecteur rouge (pour l'arrière) Réflecteur blanc (pour l'avant) Réflecteur jaune (pour le côté) Support de réflecteur Connecteur de barre de traction Béquille Support de timon Goupille de sécurité Attelage Connecteur de selle Attelage...
- Page 24 MONTAGE Étape 1: Préparation Retirez les deux capuchons de protection du cadre. Étape 2: Montage des réflecteurs Fixez les supports de réflecteur (9) au cadre (2) Des supports pour réflecteurs avant, arrière et latéraux sont inclus. Fixez les réflecteurs rouges (6) à l‘arrière, le blanc (7) à l‘avant et le jaune (8) sur le côté.
- Page 25 Étape 3: Montage du timon • Connectez les timons (4,5) à l‘aide du connecteur (10) et de la vis M6 x35 (19). • Connectez le timon monté jusqu‘à présent au cadre à l‘aide du support de timon (12) et des vis M6x50mm (18). •...
- Page 26 Étape 5: Fixation des roues Fixez solidement les roues (3) des deux côtés de l‘essieu. Étape 6: Fixez la bâche et la caisse Placez la caisse de transport (1) avec le couvercle (21) dans le cadre. Étape 7: Voiture et vélo connectés Tirez sur le mécanisme de sécurité...
- Page 27 Gentile cliente, La ringraziamo per aver acquistato il dispositivo. La preghiamo di leggere attentamente le seguenti istruzioni per l’uso e di seguirle per evitare possibili danni tecnici. Non ci assumiamo alcuna responsabilità per danni scaturiti da una mancata osservazione delle avvertenze di sicurezza e da un uso improprio del dispositivo.
- Page 28 AVVERTENZE DI SICUREZZA Piccoli oggetti/Componenti d’imballaggio (sacchetti di plastica, cartone, ecc.) Conservare i piccoli oggetti (ad es. viti e altro materiale di montaggio, schede di memoria) e i componenti d’imballaggio fuori dalla portata dei bambini, in modo che non vengano ingeriti. Non lasciare che i bambini giochino con la pellicola.
- Page 29 VOLUME DI CONSEGNA Cesta di trasporto Telaio Ruota da 16” Barra di trazione Barra di trazione Catarifrangente rosso (per il lato posteriore) Catarifrangente bianco (per il lato anteriore) Catarifrangente giallo (per il lato) Supporto catarifrangente Connettore asta di trazione Piede Supporto asta di trazione Bullone di sicurezza Collegamento...
- Page 30 MONTAGGIO 1° passaggio: Preparazione Togliere i due tappi protettivi dal telaio. 2° passaggio: Montaggio dei catarifrangenti Montare i supporti per i catarifrangenti (9) sul telaio (2). Sono inclusi supporti per le parti anteriore, posteriore e laterale. Montare i catarifrangenti rossi (6) sul retro, quelli bianchi (7) davanti e quelli gialli (8) sui lati.
- Page 31 3° passaggio: Montare la barra di trazione • Collegare le barre di trazione (4/5) utilizzando il connettore (10)e la vite M6x35 (19). • Collegare la barra di trazione montata al telaio utilizzando il supporto della barra di trazione (12) e le viti M6x50 mm (18). •...
- Page 32 5° passaggio: Montare le ruote Montare le ruote (3) su entrambi i lati dell’asse. 6° passaggio: Montare i teli e il cesto di trasporto Inserire il cesto di trasporto (1) con la copertura (21) nel telaio. 7° passaggio: Collegare rimorchio e bici Tirare il meccanismo di sicurezza del collegamento (14) per montare il collegamento (16).
- Page 33 Vážený zákazníku, Gratulujeme Vám k zakoupení produktu Prosím, důkladně si přečtete manuál a dbejte na následující pokyny, aby se zabránilo škodám na zařízení. Jakékoliv selhání způsobené ignorováním uvedených instrukcí a upozornění uvedených v návodu k použití se nevztahuje na naši záruku a jakoukoliv odpovědnost.
- Page 34 BEZPEČNOSTNÍ INSTRUKCE (Igelitové sáčky, lepenkové krabice atd.) Drobné předměty (např. šrouby a jiný montážní materiál) a části obalu uchovávejte mimo dosahu dětí, aby je nemohly spolknout. Nenechte malé děti hrát si s fólií. Hrozí nebezpečí udušení! Účel použití Toto zařízení se používá pro přepravu předmětů na kole. Je určeno výhradně pro tento účel a smí...
- Page 35 SEZNAM DÍLŮ Přepravní box Rám 16" kolo Tažné zařízení Tažné zařízení Zadní reflektor červený Přední reflektor bílý Boční reflektor žlutý Konzola reflektoru Konektor tažného zařízení Podpěrná noha Konzola tažného zařízení Bezpečnostní čep Spojka s kulovou hlavou Upevnění sedlové podpěry Kulová spojka Plastová...
- Page 36 MONTÁŽ Krok 1: Příprava Odstraňte dva černé transportní chrániče z rámu. Krok 2: Nasazení reflektorů Namontujte konzoly reflektoru (9) na rám (2), jak je to znázorněno. Vpředu by měly být dvě konzoly, vzadu by měly být dvě konzoly a na každé straně. Namontujte dvě...
- Page 37 Krok 3: Namontování tažného zařízení • Zasuňte konektor (10) tažného zařízení na konec tažného zařízení (4) a připojte tažné zařízení (4) a (5) pomocí šroubu M6x35 (19). • Pomocí šroubů M6x50mm (18) namontujte namontované tažné zařízení s držákem (12) na přední rám. •...
- Page 38 Krok 5: Instalace kol Vložte nápravu (3) kola k trubici dole uprostřed rámu. Dbejte na to, aby byly kola zcela zajištěny. Krok 6: Přepravní box Přepravní box (1) s krytem nasaďte na rám. Během používání přívěsu nezapomeňte na připevnění skříňky a krytu na rám pomocí suchého zipu. Krok 7: Připojení...
Need help?
Do you have a question about the Big Black Mike and is the answer not in the manual?
Questions and answers