Table of Contents
Advertisement
Quick Links
®
®
WePlaySmart
by Hatch
Instruction for Hatch Classroom Integration Consultants
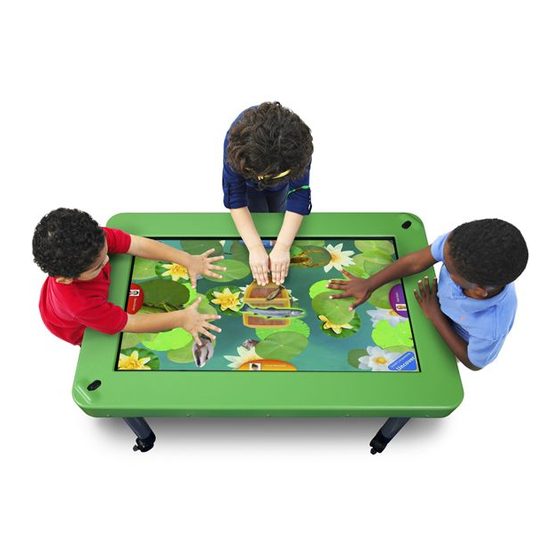
WePlaySmart by Hatch includes the multi-touch table, 275+ preinstalled activities,
surge protector, keyboard with touchpad, cord cover, power supply, QRG and cleaning kit.
(Cord cover, QRG, cleaning kit, and main power supply not pictured)
Advertisement
Table of Contents

Related Manuals for hatch WePlaySmart

Summary of Contents for hatch WePlaySmart
- Page 1 Hatch Instruction for Hatch Classroom Integration Consultants WePlaySmart by Hatch includes the multi-touch table, 275+ preinstalled activities, surge protector, keyboard with touchpad, cord cover, power supply, QRG and cleaning kit. (Cord cover, QRG, cleaning kit, and main power supply not pictured)
-
Page 2: Table Of Contents
Installing WePlaySmart by Hatch ........................7 Mobility (Casters) Package Installation for WePlaySmart by Hatch ............10 How to Add a Class to WePlaySmart by Hatch ................... 12 How to Add Children to WePlaySmart by Hatch ..................12 How to Delete Children from WePlaySmart by Hatch ................13 Calibrating WePlaySmart by Hatch ...................... -
Page 3: Installation Checklist For Weplaysmart By Hatch
At least one classroom and two children have been set up for the teacher during training. After training, you should remove your child information. You may leave the Teacher’s child, if desired. Sign-up customers on the Hatch Learning Management System using Customer ID (Customer number from MAS system) located on order. -
Page 4: Unpacking Weplaysmart By Hatch
Hatch customers have two people present to unpack WePlaySmart by Hatch. 2. Open the box and carefully lay the WePlaySmart by Hatch box down onto the floor so it is resting on its side. - Page 5 3. Slide the product out of the box onto the floor space. 4. While the product is on a flat surface or the floor, begin removing the three small Styrofoam pieces that hold the Table’s legs in place during shipment and put the Styrofoam and legs to the side. Last Revised Date: 6/26/13 P a g e V 1.1...
- Page 6 Styrofoam pieces and legs are no longer attached to the table. Please store the packaging components (if possible). 6. Tilt the table against a wall or sturdy surface. Remove the plastic covering. Then, you are ready to install the WePlaySmart by Hatch product in your classroom. Last Revised Date: 6/26/13 P a g e...
-
Page 7: Installing Weplaysmart By Hatch
1. Once the table is securely propped against a sturdy surface or wall, attach each of the four legs to the underside of the table by screwing them in one at a time. Ensure the leg with the Hatch sticker is placed nearest the power button and cord (the power leg). - Page 8 2. Once all four legs are attached, make sure to connect the power cord to the top outlet on the table’s power leg. 3. Next, get a firm grip on the table’s edges and pull the table away from the floor to an upright position.
- Page 9 5. Press the table’s power button; you are just about ready to play WePlaySmart by Hatch! WePlaySmart by Hatch will automatically launch when the unit is powered on. Last Revised Date: 6/26/13 P a g e V 1.1...
-
Page 10: Mobility (Casters) Package Installation For Weplaysmart By Hatch
Or if you are adding casters to a WePlaySmart by Hatch that has been preinstalled, it is best to lay or tilt the table on its side against a sturdy surface or wall. - Page 11 3. Next, get a firm grip on the table’s edges and pull the table away from the floor to an upright position. It is important you have a secure grasp on the edges of the table or request assistance. Position the table steadily onto the floor and move into place. 4.
-
Page 12: How To Add A Class To Weplaysmart By Hatch
4. From this page, select the newly-named class from the dropdown menu in the top-left of the screen. 5. If there is more than one classroom in this WPS by Hatch System, you will find the classroom names in alphabetical order. If there is only one classroom, you will skip this step. -
Page 13: How To Delete Children From Weplaysmart By Hatch
1. Simultaneously touch Control + Shift + T on the keyboard (shifting control to the teacher) to access the WePlaySmart Main Menu. Select the Teacher Area and find the respective Classroom (check to ensure the classroom is Set as Active Classroom). -
Page 14: Calibrating Weplaysmart By Hatch
NOTE: WePlaySmart by Hatch is calibrated before shipment. The unit’s multi-touch interface may require calibration over time. 1. Turn WePlaySmart by Hatch on by pressing the power button. WePlaySmart by Hatch will automatically launch. 2. Press CTRL+ SHIFT + T (Controls shift to the Teacher) to open the Main Menu. - Page 15 3. Select “Exit WePlaySmart” then select “OK”. 4. Select the “Start” icon from the Windows task bar, go to All Programs and choose “MultiTouchScreen”. Next, select the program “TouchWin”. Then, select “TouchWin Configuration”. 5. Once the application displays, select “Calibration”.
-
Page 16: Replacing The Hard Drive For Weplaysmart By Hatch
Replacing the Hard Drive for WePlaySmart by Hatch 1. First, power off WePlaySmart by Hatch by selecting “Start” and “Shut Down”. 2. Tilt and lay the table on its side for easy access to the hard drive. Do not pivot the table on the legs;... - Page 17 3. Using your fingers, remove the foam and pull the hard drive out from its receptacle. 4. Disconnect the hard drive from the USB cable. Last Revised Date: 6/26/13 17 | P a g e V 1.1...
- Page 18 5. Connect your replacement hard drive to the USB cord and place the hard drive back into green tray, using your fingers to push through the opening of the green tray. Replace the foam you removed earlier. 6. Hard drive replacement is complete. NOTE: WPS backs up to the W drive.
-
Page 19: Wireless Connection For Weplaysmart By Hatch
NOTE: If possible, please connect customer units to a wireless connection. It is important to receive FREE updates from Hatch throughout the life of the product. 1. To connect the WePlaySmart by Hatch unit to a wireless network, begin with the table powered on. WePlaySmart by Hatch will automatically launch. -
Page 20: Repacking Weplaysmart By Hatch
Note: We recommend Hatch customers to have two people to repack WePlaySmart by Hatch. 1. First, ensure the Hatch Table has been shut down by selecting “Start” and “Shut Down”. 2. Power down the table by unplugging the cord from the outlet (lower portion of power leg). - Page 21 5. Unscrew the top two legs from the underside of the table (the remaining two legs on the bottom help support the table on its side). 6. Next, slide the protective plastic covering that your product shipped with (or you requested from Hatch Customer Care at 800-624-7968 extension 4) over the table. Last Revised Date: 6/26/13 21 | P a g e V 1.1...
- Page 22 7. Hold the table steady with one hand, while untwisting the remaining bottom legs from the table. 8. Lay the table flat (screen side up) and place one of the two large pieces of Styrofoam on one side of the table with the circle openings closest to the floor.
- Page 23 9. Next, on the long side of the table, place two of the three small Styrofoam pieces on with the hole closest to the floor and slide the legs into the holes. Place the third small Styrofoam piece in between the two legs to keep in place and protect during shipment.
- Page 24 How NOT to space the Styrofoam 12. Slide the table into the large shipping box (you may need to request this from Hatch Customer Care at 800-624-7968 extension 4) by placing the box on top of the table and sliding it down over the...
- Page 25 table. Do not slide the box all the way to the down to the floor, stop when the box flaps are touching the floor. Last Revised Date: 6/26/13 25 | P a g e V 1.1...
- Page 26 13. Next, tilt and lay the box over onto the floor. Finish sliding the table into the box. 14. Stand the box upright. Last Revised Date: 6/26/13 26 | P a g e V 1.1...
- Page 27 15. Use packing tape to close the box. We recommend at least six pieces of packing tap across the edge of the box and applying at least two pieces to the ends. 16. Repacking of WePlaySmart by Hatch is complete. Last Revised Date: 6/26/13...
Need help?
Do you have a question about the WePlaySmart and is the answer not in the manual?
Questions and answers