Advertisement
Advertisement

Related Manuals for FLIR FLIRSCOUT III


Summary of Contents for FLIR FLIRSCOUT III
- Page 1 ® SCOUT FLIR Thermal Monocular U S E R M A N U A L...
- Page 2 Proper Disposal of Electrical © 2018 FLIR Systems, Inc. All rights reserved worldwide. No parts of this manual, in whole or and Electronic Equipment in part, may be copied, photocopied, translated, (EEE) or transmitted by any electronic medium or in...
- Page 3 Notices to the User: This Class B digital apparatus complies with Canadian ICES-003. Modification of this device without the express authorization of FLIR Systems, Inc. may void Avis d’Industrie Canada: the user’s authority under FCC rules to operate this device.
-
Page 4: Table Of Contents
CONTENT Page 1. Introduction 2. Getting Started 3. Operating the System 4. Symbology 5. Maintenance 6. Warranty 7. Specifications SCOUT III FLIR U S E R M A N U A L... -
Page 5: Introduction
SECTION 1. INTRODUCTION 1.1 SCOPE 1.4 REGISTER YOUR SCOUT III This manual covers the FLIR SCOUT III Series and all applicable components. It is recommended In order to validate the warranty on your product, that you read and understand this manual to FLIR Systems must register the product on optimize the monocular’s operation. - Page 6 ) night vision devices. This allows you to see clearly without any visible light. People, animals, and objects all generate or reflect heat and are clearly seen by the FLIR SCOUT III in even the most adverse conditions. FLIR SCOUT III ENABLES THE OUTDOOR ENTHUSIAST TO: •...
-
Page 7: Getting Started
SECTION 2. GETTING STARTED 2.1 UNPACKING AND INSPECTING The FLIR SCOUT III Series monocular is available with the features, options, and accessories described in this manual. Refer to the packing list enclosed with your product to determine the actual contents of your product package. - Page 8 • When charging the charging indicator will be lit orange. • When fully charged, the charging indicator will light solid green. The initial charge time is approximately 5 hours. SCOUT III FLIR U S E R M A N U A L...
-
Page 9: Operating The System
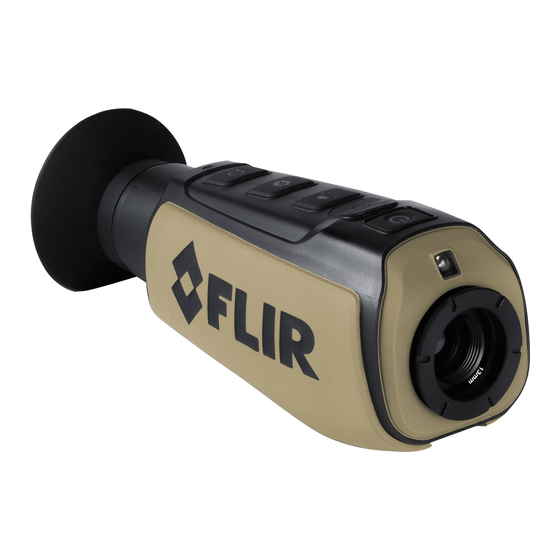
SECTION 3. OPERATING THE SYSTEM 3.1 SYSTEM CONTROLS AND BUTTONS Eyepiece Power Zoom (320 & 640 models) Display Brightness Task Light On/Off Charging Indicator Palette Selection Adjustable Diopter Mini-USB/Charging/Analog Task Light video out (320 & 640 models only) 3.1.1 DIOPTER ADJUSTMENT 3.1.3 DISPLAY BRIGHTNESS BUTTON While looking through the eyepiece, adjust the... - Page 10 The hottest 20% of things in the image are colored and everything else is greyscale. INSTALERT LEVEL 1 ™ The hottest 5% of things in the image are colored and everything else is greyscale. SCOUT III FLIR U S E R M A N U A L...
- Page 11 Off state, it takes about five seconds so that a single frame may be to become operational. During the bootup inspected closely process, the FLIR splash screen is shown. Pressing the Power button will toggle the monocular between On and Off. 3.2 USING USB/ANALOG •...
- Page 12 Auto Shutdown turns the camera off if the following conditions are met: • LS Series • The product is On To download the GUI go to: www.flir.com/ hunting-outdoor, and then click the resource tab • No buttons have been pressed for five and select product literature.
-
Page 13: Symbology
SECTION 4. SYMBOLOGY The SCOUT III user interface has a clear and simple on-screen symbology that allows the user to easily navigate through the settings, and optimize the image quality based on certain variables. From the zoom function to palette choice the symbology on-screen matches the button symbology so the user becomes instantly familiar with how to manipulate and operate all of SCOUT III’s functions. -
Page 14: Maintenance
SECTION 5. MAINTENANCE 5.1 SOFTWARE UPDATE 5.3 CLEANING THE SCOUT III Software updates for your FLIR SCOUT III can be Wipe the housing with a damp cloth, as needed. found at www.flir.com/hunting-outdoor/ under Use a high quality lens wipe to remove dirt or the “Resources”... -
Page 15: Specifications
Focal Length 13 mm Fixed Focus 19mm Fixed Focus 35mm Fixed Focus Start up < 1.5 seconds Image Processing FLIR Proprietary Digital Detail Enhancement™ USER INTERFACE Zoom Button Freeze Frame 2X Zoom 2X, 4X Zoom Video Detection Palettes User Selectable: Black Hot, White Hot, InstAlert™ and Graded Fire... - Page 16 Equipment described herein is subject to US export regulations and may require a license prior to export. Diversion contrary to US law is prohibited. Imagery for illustration purposes only. Specifications are subject to change without notice. ©2018 FLIR Systems, Inc. All rights reserved. 10/19/2018 18-2054-OTS...
Need help?
Do you have a question about the FLIRSCOUT III and is the answer not in the manual?
Questions and answers