Advertisement
Quick Links
Quick Installation Guide
2/4/8 Port Single/Dual-Head Modular Secure KVM Switches
Objectives
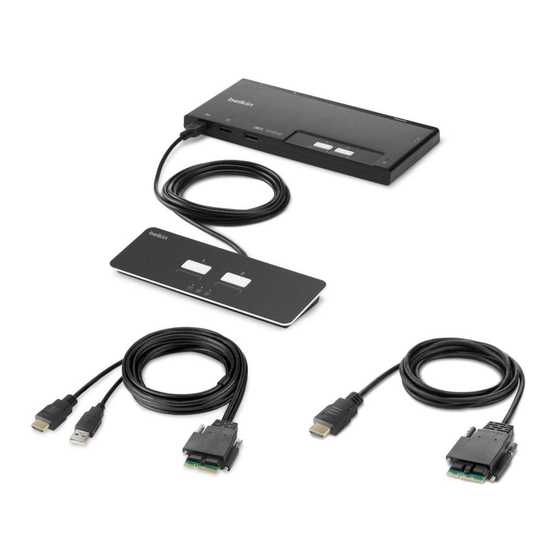
• This guide includes instructions for installing Belkin Modular Secure KVM Switches. A modular secure KVM will need to be connected by a group of cables designed
to support various video combinations. Consult the user manual or your Belkin representative for the correct cables required. Without the correct cables, the
modular secure KVM can not be made operational.
• A KVM allows sharing keyboard, video, mouse and audio peripherals between multiple computers.
• This Manual and additional product documentation is available for online download on Belkin website. For further assistance please refer to: http://www.belkin.com/
us/Resource-Center/Cybersecurity/Secure-KVM-Switching/.
General
• Verify that all peripherals and computers are turned OFF prior to
connecting them to the product.
• Verify that you have the correct modular cables for your install.
• The KVM's back panel is divided into sections of Console Ports and
Computer Ports.
– Using proper mounts and mounting techniques, secure the unit to its
mount (optional equipment)
– Connect the peripherals to be shared by the KVM to the Console Port
via a modular cable, and the keyboard and mouse ports on the front
panel.
F1DN204MOD-PP-4 Model is shown
Connect peripherals to the KVM
Console Ports:
• Keyboard & Mouse: Connect a USB keyboard
and mouse to the corresponding USB ports
on the front panel. The Keyboard and mouse
connected lights (top panel) will illuminate
green. If the keyboard or mouse are not
authorized, the lights will lilluminate red.
• Video: Connect the modular console cable
to the KVM console video port and to the
monitor(s). The EDID LEDs (top panel) will
operate as follows:
– Off: no EDID
– Flicker: EDID read in progress
– On: EDID received
Note: EDID is only read in the first few seconds
of device boot. The secure switch does not
support hot plug or swap of displays. In any
swap of display(s) it is required to restart the
KVM.
• Audio peripherals: : Connect headphones /
speakers to the monitor audio-out port, since
audio is handled by the video channel, audio
out is only available on the monitor(s).
Connect computers to the KVM
Computer ports:
• Computer keyboard & mouse connection:
Connect each computer to the KVM keyboard
& mouse computer port using modular host
cable Connect the USB A end to the computer.
• Computer video connection: Connect each
F1DN102MOD Series: Belkin 2-Port Single Head Modular Video Secure Desktop KVM Switch, No CAC PP4.0
F1DN202MOD Series: Belkin 2-Port Dual Head Modular Video Secure Desktop KVM Switch, No CAC PP4.0
F1DN104MOD Series: Belkin 4-Port Single Head Modular Video Secure Desktop KVM Switch, No CAC PP4.0
F1DN204MOD Series: Belkin 4-Port Dual Head Modular Video Secure Desktop KVM Switch, No CAC PP4.0
F1DN108MOD Series: Belkin 8-Port Single Head Modular Video Secure Desktop KVM Switch, No CAC PP4.0
F1DN208MOD Series: Belkin 8-Port Dual Head Modular Video Secure Desktop KVM Switch, No CAC PP4.0
Primary Display
Secondary Display
computer to the KVM computer video port
using the corresponding modular host cable.
If two video connections exist, make sure each
PC video 1 is in the "A" video connector.
• Computer audio connection: Is supplied in all
cases except VGA via the video connection.
Mounting Options and Remote
Control:
The modular secure KVM is very small in
footprint. As such it is highly suggested that
the unit be mounted in a convenient location at
the desktop using one of the optional mounts
provided by Belkin. Each mounting option has
– Connect the provided remote control to the front panel via the
supplied cable.
– Connect each computer that needs access to shared peripherals to a
specific Computer Ports section via a modular cable.
– Make sure that every computer is connected to a separate Computer
Port section.
– The push buttons on the product's top panel indicate which computer
has currently access to shared peripherals.
– To switch peripherals between computers, press the appropriate push
button on the product's top panel, or use the channel buttons on the
remote control.
Console Ports
Source PC
X 4
been designed to facilitate a position on or
near the desktop. See the Belkin web site or
contact your Belkin representative for a full
understanding of the multiple options, which
include an on desk/under desk mount, a VESA
back of the monitor mount, as well as a single
and dual monitor stand with an integrated
mount.
• Installation:
– Choose the mount
– Install the modular KVM unit with it's
modular cables to the mount
– Install the remote control on the desktop
near the mouse with enough cable loop to
provide easy access and movement for the
Source Ports
8820-02949 Rev.B00
Advertisement

Related Manuals for Belkin F1DN102MOD Series


Summary of Contents for Belkin F1DN102MOD Series
- Page 1 Objectives • This guide includes instructions for installing Belkin Modular Secure KVM Switches. A modular secure KVM will need to be connected by a group of cables designed to support various video combinations. Consult the user manual or your Belkin representative for the correct cables required. Without the correct cables, the modular secure KVM can not be made operational.
- Page 2 F1DN102MOD Series: Belkin 2-Port Single Head Modular Video Secure Desktop KVM Switch, No CAC PP4.0 F1DN202MOD Series: Belkin 2-Port Dual Head Modular Video Secure Desktop KVM Switch, No CAC PP4.0 F1DN104MOD Series: Belkin 4-Port Single Head Modular Video Secure Desktop KVM Switch, No CAC PP4.0 F1DN204MOD Series: Belkin 4-Port Dual Head Modular Video Secure Desktop KVM Switch, No CAC PP4.0...