
Related Manuals for Semtech IOT8EUSBREF-1

Summary of Contents for Semtech IOT8EUSBREF-1
- Page 1 Smart Building Reference Kit User Guide IOT8EUSBREF-1 (EU 868) IOT9USSBREF-1 (NA 915) June 2019...
- Page 2 Login: SemtechDemo1 Password: LoraWan592 The data in each dashboard is stored for a maximum of 30 days. In this document we explain how to set up and use the kit. Smart Building User Guide | Proprietary Information | Semtech Corporation...
-
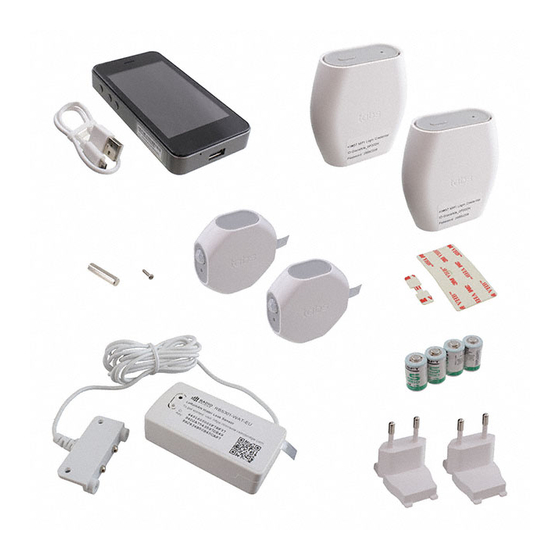
Page 3: What Is In The Kit
If additional options are needed, you can add up to two nano SIM cards in the hotspot. Use a needle to pull out the available the SIM slots and insert the SIM cards. Note: The hotspot included in this kit does not support SIM cards that require PIN codes. Smart Building User Guide | Proprietary Information | Semtech Corporation... -
Page 4: Setting-Up The Kit
2. Once charged, press and hold the hotspot’s power button (#11) for five seconds and wait for the device to boot. Figure 2: Hotspot Buttons and Ports 3. The hotspot will automatically log-in and connect to the GlocalMe service. Figure 3: Automatic Logon Smart Building User Guide | Proprietary Information | Semtech Corporation... - Page 5 Figure 5: Plug-in the mini-hub 6. You will know the mini-hub is connected to the hotspot when the light on top turns green as shown in Figure 6 Figure 6: Connected to Hotspot Smart Building User Guide | Proprietary Information | Semtech Corporation...
- Page 6 LED to the magnet face with the notch, as illustrated in Figure 8. The Door/Window sensor will provide an indication of whether the door or window is open or closed. Figure 8: Sensor / Magnet Alignment Smart Building User Guide | Proprietary Information | Semtech Corporation...
- Page 7 5. To detect the temperature and humidity in the room, place the Temp/Humidity sensor anywhere in the room. To mitigate momentary changes in temperature due to opening a door or window, best practice is to place this sensor away from doors and windows. Smart Building User Guide | Proprietary Information | Semtech Corporation...
- Page 8 You will be presented with a screen which includes a place where the Pronto code can be entered as shown in Figure 11. Figure 11: Entering Pronto codes for the IR Blaster Smart Building User Guide | Proprietary Information | Semtech Corporation...
- Page 9 2. Using a computer, perform a network scan and select the open Wi-Fi network that starts with MiniHub-xxxxx where xxxxx are the last 6 digits of the mini hub MAC address, as illustrated in Figure Figure 12: Mini-hub network Smart Building User Guide | Proprietary Information | Semtech Corporation...
-
Page 10: Led Indicators
To reboot the mini-hub, while in CONFIG mode, press the Setup button for 5 seconds. To return the mini-hub to factory settings, (and delete the Wi-Fi and LoRaWAN Network Server credentials), press the Reset button for 5 seconds. Smart Building User Guide | Proprietary Information | Semtech Corporation... - Page 11 Support For any additional questions about operation or help with troubleshooting please contact SBKSupport@semtech.com For more information about LoRa®, LoRaWAN® or the hardware contained within the kit please contact SBKSales@Semtech.com Smart Building User Guide | Proprietary Information | Semtech Corporation...
- Page 12 Mouser Electronics Authorized Distributor Click to View Pricing, Inventory, Delivery & Lifecycle Information: Semtech IOT8EUSBREF-1 IOT9USSBREF-1...
Need help?
Do you have a question about the IOT8EUSBREF-1 and is the answer not in the manual?
Questions and answers