Table of Contents
Advertisement
Available languages
Available languages
Quick Links
Advertisement
Table of Contents

Related Manuals for Videotec VIPNX


Summary of Contents for Videotec VIPNX
- Page 1 VIPNX - VIPNXL Wiper for housing English - Instruction manual Italiano - Manuale di istruzioni Français - Manuel d’instructions Deutsch - Bedienungsanleitung Русский - Руководство по эксплуатации...
-
Page 3: About This Manual
ENGLISH VIPNX - VIPNXL Wiper for housing 1 About this manual 3 Safety rules Read all the documentation supplied carefully before CAUTION! Device installation and installing and using this unit. Keep the manual in a maintaining must be performed by convenient place for future reference. -
Page 4: Preparing The Product For Use
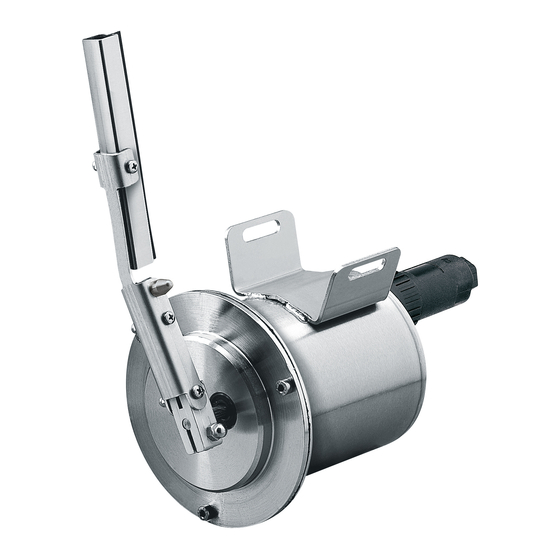
4 Identification 5.3 Safely disposing of packaging material 4.1 Product description and type The packaging material can all be recycled. The designation installer technician will be responsible for separating the material for disposal, and in any case for Wiper kit which can be directly installed on the compliance with the legislation in force where the housing body. - Page 5 6.2 Installing the wiper kit on If necessary, use the fixing clip to adjust the position of the wiper body so it does not interfere with the NXL, NXM and NXM36 housing housing support. Assembly is flexible based on the orientation of the housing.
- Page 6 6.4 Wiring Unscrew one of the 2 fastening screws (01) of the sunshield on the front part of the housing. Insert the Pay attention the power supply voltage used is that pipe (02) in the clip (03) and fasten everything with indicated on the plate on the back of the equipment.
-
Page 7: Instructions For Normal Operation
Dimensions (ØxL): 100x169mm (3.9x6.7in) (not comprehensive of blade) Unit weight: 1.7kg (3.7lb) Fig. 12 VIPNXL. Headquarters Italy Videotec S.p.A. Via Friuli, 6 - I-36015 Schio (VI) - Italy Tel. +39 0445 697411 - Fax +39 0445 697414 Email: info@videotec.com www.videotec.com... -
Page 8: Informazioni Sul Presente Manuale
ITALIANO VIPNX - VIPNXL Tergicristallo per custodia 1 Informazioni sul presente 3 Norme di sicurezza manuale ATTENZIONE! L'installazione e la manutenzione del dispositivo deve Prima di installare e utilizzare questa unità, leggere essere eseguita solo da personale tecnico attentamente tutta la documentazione fornita. Tenere specializzato. -
Page 9: Descrizione E Designazione Del Prodotto
4 Identificazione 5.3 Smaltimento in sicurezza dei materiali di imballaggio 4.1 Descrizione e designazione I materiali d'imballo sono costituiti interamente da del prodotto materiale riciclabile. Sarà cura del tecnico installatore smaltirli secondo le modalità di raccolta differenziata Kit tergicristallo installabile direttamente sul corpo o comunque secondo le norme vigenti nel Paese di custodia. - Page 10 6.2 Installazione del kit Agendo sulla fascetta di fissaggio regolare eventualmente la posizione del corpo del tergicristallo su custodia NXL, tergicristallo in modo che questo non interferisca con NXM e NXM36 il supporto della custodia. Il montaggio risulta così flessibile a seconda dell’orientamento della custodia. Inserire la fascetta metallica di fissaggio, aperta, Fare attenzione alla regolazione della attraverso le 2 asole del corpo del tergicristallo come...
- Page 11 6.4 Cablaggio Svitare una delle 2 viti di fissaggio (01) del tettuccio sulla parte anteriore della custodia. Inserire il tubo Prestare attenzione che la tensione di alimentazione (02) nella fascetta (03) e fissare il tutto con vite (01) e usata sia quella indicata sulla targhetta posta sul retro rondella (04).
-
Page 12: Istruzioni Di Funzionamento Ordinario
Spazzola e corpo in acciaio Inox AISI 316L Dimensioni (ØxL): 100x169mm (non comprensivo di spazzola) Peso unitario: 1.7kg Fig. 12 VIPNXL. Headquarters Italy Videotec S.p.A. Via Friuli, 6 - I-36015 Schio (VI) - Italy Tel. +39 0445 697411 - Fax +39 0445 697414 Email: info@videotec.com www.videotec.com MNVKVIPNX_1744_IT... -
Page 13: Conventions Typographiques
FRANÇAIS VIPNX - VIPNXL Essuie glace pour caisson 1 À propos de ce mode 3 Normes de securité d’emploi ATTENTION! L’installation et l’entretien du dispositif doivent être effectués Avant d'installer et d'utiliser cette unité, lire exclusivement par un personnel technique attentivement toute la documentation fournie. -
Page 14: Préparation Du Produit En Vue De L'utilisation
4 Identification 5.3 Élimination sans danger des matériaux d’emballage 4.1 Description et désignation du Le matériel d’emballage est entièrement composé produit de matériaux recyclables. Le technicien chargé de l’installation est tenu de l’éliminer conformément aux Kit essuie-glace installable directement sur le corps dispositions en matière de collecte sélective et selon du caisson. - Page 15 6.2 Installation du kit essuie- En agissant sur le collier de fixation, réglez éventuellement la position du corps de l'essuie-glace glaces sur caisson NXL, NXM et pour ne pas qu'il interfère avec le support du caisson. NXM36 Ainsi, le montage est flexible selon l'orientation du caisson.
- Page 16 6.4 Câblage Desserrer une des 2 vis de fixation (01) du toit pare- soleil sur la partie antérieure du caisson. Insérer le Veillez à ce que la tension d'alimentation utilisée soit tuyau (02) dans le collier (03) et fixer le tout avec la vis celle qui est indiquée sur l'étiquette présente au dos (01) et la rondelle (04).
-
Page 17: Instructions De Fonctionnement Courant
Balai et corps en acier Inox AISI 316L Dimensions (ØxL): 100x169mm (sans balai) Poids net: 1.7kg Fig. 12 VIPNXL. Headquarters Italy Videotec S.p.A. Via Friuli, 6 - I-36015 Schio (VI) - Italy Tel. +39 0445 697411 - Fax +39 0445 697414 Email: info@videotec.com www.videotec.com... -
Page 18: Anmerkungen Zum Copyright Und Informationen Zu Den Handelsmarken
DEUTSCH VIPNX - VIPNXL Scheibenwischer für Gehäuse 1 Allgemeines 3 Sicherheitsnormen Vor Installation und Anwendung der Einheit ist die ACHTUNG! Die Installation und Wartung gesamte gelieferte Dokumentation aufmerksam zu der Vorrichtung ist technischen Fachleuten lesen. Zum späteren Nachschlagen das Handbuch in vorbehalten. -
Page 19: Vorbereitung Des Produktes Auf Den Gebrauch
4 Identifizierung 5.3 Sichere Entsorgung der Verpackungsmaterialien 4.1 Beschreibung und Die Verpackungsmaterialien sind vollständig Bezeichnung des Produktes wiederverwertbar. Es ist Sache des Installationstechnikers, sie getrennt, auf jeden Fall aber nach den geltenden Scheibenwischerkit direkt auf den Gehäusekorpus Vorschriften des Anwendungslandes zu entsorgen. installierbar. - Page 20 6.2 Montage des Durch Einwirken auf die Befestigungsschelle gegebenenfalls die Position des Scheibenwischer-Kits an das NXL, Scheibenwischerkorpus so einstellen, dass dieser NXM und NXM36 Gehäuse nicht die Gehäusehalterung überlagert. Die Montage ist somit je nach Ausrichtung des Gehäuses flexibel. Die geöffnete Metallschelle durch die beiden Auf die Einstellung des Wischerblatts Langlöcher im Korpus der Scheibenwaschanlage bei dem Gehäuse NXM36 achten.
- Page 21 6.4 Verkabelung Eine der beiden Befestigungsschrauben (01) des Sonnenschutzdachs am vorderen Gehäusebereich Darauf achten, dass die verwendete lösen. Die Leitung (02) in die Schelle (03) Spannungsversorgung dem Wert entspricht, der auf einführen und alles mit der Schraube (01) und der dem hinten am Gerät angebrachten Typenschild Unterlegscheibe (04) befestigen.
-
Page 22: Anleitung Für Den Normalen Betrieb
Gerät gekauft wurde. Das kann im Moment der Einkauf von neuen gleichartigen Produkten passieren oder auch ohne Verpflichtung Abb. 11 VIPNX. einen neuen Kauf zu tätigen, falls die Größe der Ausrüstung kleiner als 25cm beträgt. Mehr Informationen über die korrekte Entsorgung dieser Geräte erhalten Sie bei der entsprechenden... -
Page 23: Типографские Условные Обозначения
РУССКИЙ VIPNX - VIPNXL Стеклоочиститель для кожуха 1 О настоящем 3 Правила техники руководстве безопасности Внимательно ознакомьтесь со всей ПРЕДУПРЕЖДЕНИЕ! Установка документацией, входящей в комплект поставки, и обслуживание устройства перед тем как приступить к установке и должны осуществляться только эксплуатации данного оборудования. Всегда... - Page 24 4 Обозначение 5.3 Безопасная утилизация упаковочных материалов 4.1 Описание и обозначение Упаковочные материалы могут подвергаться типа устройства переработке. Технический специалист установщика отвечает за сортировку материалов для переработки, Комплект стеклоочистителя, устанавливаемый а также за соблюдение требований законодательства, непосредственно на корпус кожуха. Щетка и действующего...
- Page 25 6.2 Установка комплекта При необходимости, используйте крепежный хомут для того, чтобы отрегулировать положение стеклоочистителя на кожух корпуса стеклоочистителя и он не соприкасался NXL, NXM и NXM36 с кронштейном кожуха. Получаемое соединение подстраивается под ориентацию кожуха. Вставить металлический крепежный Обратите внимание на положение щетки хомут, открытый, через...
- Page 26 6.4 Подключение проводов Открутите один из 2 крепежных винтов (01) козырька в передней части кожуха. Вставьте трубку (02) в хомут (03) Убедитесь, что напряжение используемого и закрепите при помощи винта (01) и шайбы (04). источника питания соответствует напряжению, указанному на табличке с задней стороны устройства.
-
Page 27: Информация Об Утилизации И Переработке
из нержавеющей стали AISI 316L Размеры (ØxД): 100x169mm (без учета длины щетки) Вес устройства: 1,7kg Рис. 12 VIPNXL. Headquarters Italy Videotec S.p.A. Via Friuli, 6 - I-36015 Schio (VI) - Italy Tel. +39 0445 697411 - Fax +39 0445 697414 Email: info@videotec.com www.videotec.com MNVKVIPNX_1744_RU... - Page 28 Email: info@videotec.com Tel. +33 1 60491816 - Fax +33 1 69284736 Email: info.fr@videotec.com Asia Pacific Videotec (HK) Ltd Americas Videotec Security, Inc. Flat 8, 19/F. On Dak Industrial Building, No. 2-6 Wah Sing Street Gateway Industrial Park, 35 Gateway Drive, Suite 100 Kwai Chung, New Territories - Hong Kong Plattsburgh, NY 12901 - U.S.A.
Need help?
Do you have a question about the VIPNX and is the answer not in the manual?
Questions and answers