Table of Contents
Advertisement
Available languages
Available languages
Quick Links
ENGLISH
Plate for assembly with the pole collar or with the corner adaptor
EN
English - Instruction manual
IT
Italiano - Manuale di istruzioni
FR
Français - Manuel d'instructions
DE
Deutsch - Bedienungsanleitung
RU
Русский - Руководство по эксплуатации
PT
Português - Manual de instruções
한국어 - 지침 설명서
KO
MBXMP
Advertisement
Table of Contents

Related Manuals for Videotec MBXMP


Summary of Contents for Videotec MBXMP
- Page 1 ENGLISH MBXMP Plate for assembly with the pole collar or with the corner adaptor English - Instruction manual Italiano - Manuale di istruzioni Русский - Руководство по эксплуатации Français - Manuel d’instructions Português - Manual de instruções 한국어 - 지침 설명서...
-
Page 3: About This Manual
ENGLISH MBXMP Plate for assembly with the pole collar or with the corner adaptor 1 About this manual 3 Safety rules Read all the documentation supplied carefully before Installation should be carried out using installing and using this unit. Keep the manual in a adequate tools. -
Page 4: Preparing The Product For Use
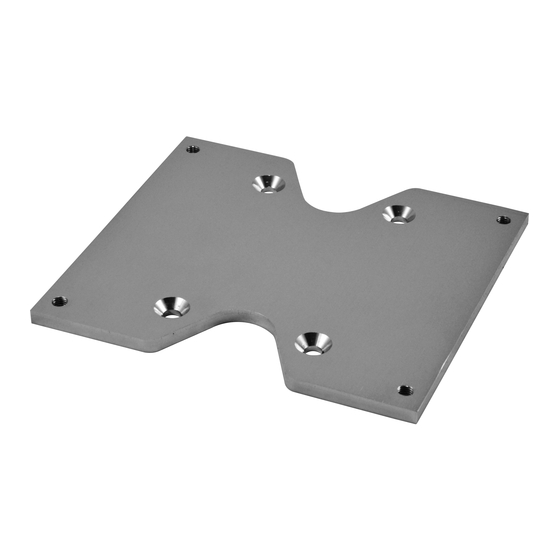
5 Preparing the product for Make sure the appliance is securely anchored before supplying power. For technical services, consult only and Any change that is not expressly approved exclusively authorized technicians. by the manufacturer will invalidate the guarantee. Since the user is responsible for choosing the surface to which the unit is to be 5.1 Unpacking anchored, we do not supply the fixing... - Page 5 Fix the support plate (01) to the pole sling, using the Make sure the thread are free of dirt and debris. 4 flat countersunk screws (02) with hexagonal socket Apply a generous amount of threadlocker (Loctite M10x20mm in stainless steel (A4 class 70) supplied. 270) on the 4 threaded holes on the plate.
-
Page 6: Technical Data
8 Technical drawings The indicated measurements are expressed in millimetres. SECTION A A Fig. 6 MBXMP. Headquarters Italy Videotec S.p.A. Via Friuli, 6 - I-36015 Schio (VI) - Italy Tel. +39 0445 697411 - Fax +39 0445 697414 Email: info@videotec.com www.videotec.com... -
Page 7: Informazioni Sul Presente Manuale
ITALIANO MBXMP Piastra per il montaggio con il collare a palo o con l'adattatore angolare 1 Informazioni sul presente 3 Norme di sicurezza manuale Eseguire l’installazione utilizzando utensili adeguati. Il luogo in cui il dispositivo viene Prima di installare e utilizzare questa unità, leggere istallato può... -
Page 8: Preparazione Del Prodotto Per L'utilizzo
5 Preparazione del prodotto Prima di fornire alimentazione assicurarsi per l'utilizzo che l’apparecchio sia saldamente ancorato. Per l’assistenza tecnica rivolgersi Qualsiasi intervento non espressamente esclusivamente a personale tecnico approvato dal costruttore fa decadere la autorizzato. garanzia. Poiché la responsabilità della scelta della 5.1 Disimballaggio superficie di ancoraggio dell’unità... - Page 9 Fissare la piastra di supporto (01) all’imbracatura da Assicurarsi che le filettature siano prive di sporcizia e palo, utilizzando 4 viti a testa svasata piana (02) con residui. esagono incassato M10x20mm in acciaio inox (A4 Applicare una buona quantita di frenafiletti (Loctite classe 70) fornite in dotazione.
-
Page 10: Dati Tecnici
8 Disegni tecnici Le misure indicate sono espresse in millimetri. SECTION A A Fig. 6 MBXMP. Headquarters Italy Videotec S.p.A. Via Friuli, 6 - I-36015 Schio (VI) - Italy Tel. +39 0445 697411 - Fax +39 0445 697414 Email: info@videotec.com www.videotec.com... -
Page 11: Conventions Typographiques
FRANÇAIS MBXMP Plaque pour le montage avec le collier sur poteau ou avec l'adaptateur d'angle 1 À propos de ce mode 3 Normes de securité d’emploi Effectuer l'installation à l'aide d'outils appropriés. Le lieu d'installation du Avant d'installer et d'utiliser cette unité, lire dispositif peut toutefois exiger l'utilisation attentivement toute la documentation fournie. -
Page 12: Préparation Du Produit En Vue De L'utilisation
5 Préparation du produit en Avant d'alimenter l'appareil, s'assurer qu'il vue de l’utilisation est solidement fixé. Pour l'assistance techniques, s'adresser Toute modification non approuvée exclusivement à du personnel technique expressément par le fabricant entraînera agréé. l’annulation de la garantie. Etant donné que l'utilisateur est 5.1 Déballage responsable du choix de la surface de fixation, le fabricant ne fournit pas dans... - Page 13 Assembler la plaque de support (01) à la fixation pour S'assurer qu'il n'y ait pas de saleté ou de résidus dans poteau, à l'aide de 4 vis à tête fraisée plane (02) à six les taraudages. pans creux M10x20mm en acier inox (A4 classe 70) Appliquer une bonne quantité...
-
Page 14: Données Techniques
8 Dessins techniques Les tailles indiquées sont en millimètres. SECTION A A Fig. 6 MBXMP. Headquarters Italy Videotec S.p.A. Via Friuli, 6 - I-36015 Schio (VI) - Italy Tel. +39 0445 697411 - Fax +39 0445 697414 Email: info@videotec.com www.videotec.com... -
Page 15: Anmerkungen Zum Copyright Und Informationen Zu Den Handelsmarken
DEUTSCH MBXMP Platte für die Montage mit Rohrschelle oder mit Winkeladapter 1 Allgemeines 3 Sicherheitsnormen Vor Installation und Anwendung der Einheit ist die Die Installation mit geeignetem Werkzeug gesamte gelieferte Dokumentation aufmerksam zu durchführen. Es kann durchaus sein, dass lesen. Zum späteren Nachschlagen das Handbuch in an der Stelle, an dem das Gerät installiert... -
Page 16: Vorbereitung Des Produktes Auf Den Gebrauch
5 Vorbereitung des Vor dem Einschalten der Stromversorgung Produktes auf den Gebrauch prüfen, dass das Gerät fest verankert ist. Für Kundendiensteingriffe wenden Sie sich Jede vom Hersteller nicht ausdrücklich ausschließlich an autorisiertes technisches genehmigte Veränderung führt zum Verfall Personal. der Gewährleistungsrechte. Da der Benutzer für die Auswahl der 5.1 Entfernen der Verpackung Verankerungsoberfläche der Einheit... - Page 17 Die Halterungsplatte (01) am Wandhalterungsbügel Sicherstellen, dass die Gewinde ohne Schmutz und befestigen. Hierzu die 4 flachen, mitgelieferten Rückstände sind. Senkschrauben (02) mit Innensechskant M10x20mm Reichlich Gewindesicherungsmittel (Loctite 270) auf aus Edelstahl (A4 Klasse 70) verwenden. die 4 Gewindeöffnungen der Platte aufbringen. Schrauben festziehen.
-
Page 18: Technische Daten
8 Technische Zeichnungen Die Maße sind in Millimetern angegeben. SECTION A A Abb. 6 MBXMP. Headquarters Italy Videotec S.p.A. Via Friuli, 6 - I-36015 Schio (VI) - Italy Tel. +39 0445 697411 - Fax +39 0445 697414 Email: info@videotec.com www.videotec.com... -
Page 19: Типографские Условные Обозначения
РУССКИЙ MBXMP Пластина для монтажа на мачтовом кронштейне или угловом адаптере 1 О настоящем 3 Правила техники руководстве безопасности Внимательно ознакомьтесь со всей При установке должен использоваться документацией, входящей в комплект поставки, соответствующий инструмент. Ввиду перед тем как приступить к установке и... - Page 20 5 Подготовка устройства к Пред тем как включить питание, использованию убедитесь в том, что устройство надежно зафиксировано. Любое изменение, которое выполняется Техническое обслуживание должно без разрешения, явным образом проводиться только уполномоченным предоставленного производителем, техническим персоналом. аннулирует гарантию. 5.1 Распаковка Поскольку пользователь самостоятельно выбирает...
- Page 21 Прикрепите опорную пластину (01) к мачтовому Убедитесь, что на резьбе нет грязи. хомуту, используя 4 прилагаемых болта с плоской Введите достаточное количество фиксатора потайной головкой (02) с шестигранным шлицем резьбы (Loctite 270) в 4 резьбовых отверстия на из нержавеющей стали M10x20mm (А4 класс 70). пластине.
- Page 22 Размеры: 220x240x10mm 8 Технические чертежи Размеры указаны в миллиметрах. SECTION A A Рис. 6 MBXMP. Headquarters Italy Videotec S.p.A. Via Friuli, 6 - I-36015 Schio (VI) - Italy Tel. +39 0445 697411 - Fax +39 0445 697414 Email: info@videotec.com www.videotec.com MNVKMBXMP_1926_RU...
-
Page 23: Direitos Autorais E Informações Sobre Marcas Registradas
PORTUGUÊS MBXMP Placa para montagem com o anel para poste ou com adaptador angular 1 Informações neste manual 3 Normas de segurança Antes de instalar e utilziar esta unidade, deve ser lida Faça a instalação usando os utensílios com atenção toda a documentação fornecida. Manter adequados. -
Page 24: Preparação Do Produto Para O Uso
5 Preparação do produto Antes do fornecimento de energia garantir para o uso que o aparelho seja firmemente ancorado. Para a assistência técnica, entrar em A realização de alterações não aprovadas contato com um profissional qualificado. expressamente pelo fabricante invalidará a garantia. - Page 25 Fixe a placa de suporte (01) na fixação em poste Garantir que os fios sejam livres de sujeira e resíduos. usando 4 parafusos allen com cabeça chata cônica Aplique uma boa quantidade de veda-roscas (Loctite (02), M10x20mm, em aço inox (classe A4 70), que 270) nos 4 furos roscados presentes na placa.
-
Page 26: Dados Técnicos
8 Desenhos técnicos As medidas indicadas estão expressas em milímetros. SECTION A A Fig. 6 MBXMP. Headquarters Italy Videotec S.p.A. Via Friuli, 6 - I-36015 Schio (VI) - Italy Tel. +39 0445 697411 - Fax +39 0445 697414 Email: info@videotec.com www.videotec.com... -
Page 27: 설명서에 있는 정보들
MBXMP 한국어 폴 칼라 또는 코너 어댑터가 있는 조립용 판 1 설명서에 있는 정보들 3 안전규칙 장치를 설치 및 사용하기 전에 제공된 모든 문서를 설치는 적절한 도구를 이용해 실시하도록 주의 깊게 읽어 보십시오. 나중에 참조할 수 있도록 합니다. 장치가 설치되는 장소에서 특정한... -
Page 28: 포장 재료의 안전한 폐기
5 사전에 대한 제품 준비 전원공급을 공급하기 전에 장치가 안전하게 고정되었는지 확인합니다. 제조업자에 의해서 승인되지 않은 모든 변경은 보증을 무효화합니다. 기술 서비스에 대해서는, 공인 기술자에게만 의뢰하십시오. 5.1 포장 풀기 장치를 고정할 표면을 선택하는 것은 사용자의 제품을 납품할 때 포장이 완전하고 떨어지거나 책임이므로... - Page 29 제공된 스테인리스 스틸(A4 class 70)의 육각 소켓 나사줄에 오물과 부스러기가 없는지 확인합니다. (M10x20mm)이 있는 4개의 평 접시 나사(02)를 판에 있는 4개의 나사 구멍에 충분한 양의 나사고정제 사용해 지지판(01)을 폴 슬링에 고정하십시오. (Loctite 270)를 바릅니다. 스크류들을 잠급니다. 고정동안 주의를 기울입니다. 조임 토크: 35Nm.
- Page 30 그림. 5 8 기술 도면 측정 단위는 밀리미터로 표시됩니다. SECTION A A 그림. 6 MBXMP. Headquarters Italy Videotec S.p.A. Via Friuli, 6 - I-36015 Schio (VI) - Italy Tel. +39 0445 697411 - Fax +39 0445 697414 Email: info@videotec.com www.videotec.com MNVKMBXMP_1926_KO...
- Page 32 Email: info@videotec.com Tel. +33 1 60491816 - Fax +33 1 69284736 Email: info.fr@videotec.com Asia Pacific Videotec (HK) Ltd Americas Videotec Security, Inc. Flat 8, 19/F. On Dak Industrial Building, No. 2-6 Wah Sing Street Gateway Industrial Park, 35 Gateway Drive, Suite 100 Kwai Chung, New Territories - Hong Kong Plattsburgh, NY 12901 - U.S.A.
Need help?
Do you have a question about the MBXMP and is the answer not in the manual?
Questions and answers