Aiwa XR-M200 Operating Instructions Manual
Aiwa xr-m200 stereo systems: operating instruction
Hide thumbs
Also See for XR-M200:
- Service manual (22 pages) ,
- Operating instructions manual (22 pages) ,
- Service manual (47 pages)
Table of Contents
Advertisement
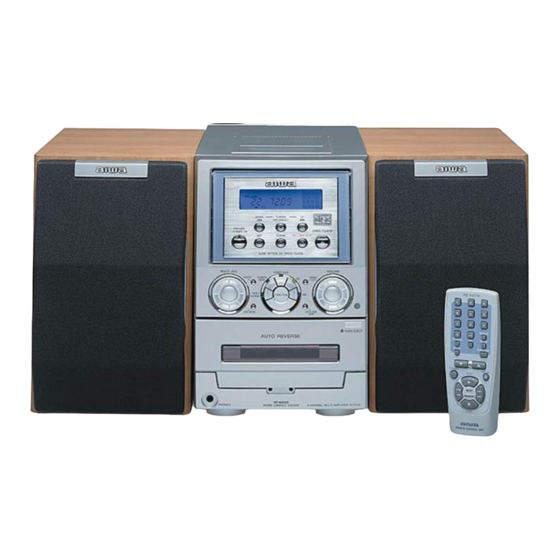
COMPACT DISC STEREO SYSTEM
SISTEMA ESTEREO CON REPRODUCTOR DE DISCOS COMPACTOS
CHAINE STEREO AVEC LECTEUR DE DISQUES COMPACTS
XR-M200
8A-CL8-901-01
991020AWW-X6
00COVER/XR-M200<U>/ESF
For assistance and information,
call toll free 1-800-BUY-AIWA.
(United States and Puerto Rico)
U
1
OPERATING INSTRUCTIONS
MANUAL DE INSTRUCCIONES
MODE D'EMPLOI
10/4/2000, 6:01 PM
En
En
(English)
E
(Español)
F
(Français)
Advertisement
Table of Contents

Subscribe to Our Youtube Channel
Related Manuals for Aiwa XR-M200


Summary of Contents for Aiwa XR-M200
- Page 1 COMPACT DISC STEREO SYSTEM SISTEMA ESTEREO CON REPRODUCTOR DE DISCOS COMPACTOS CHAINE STEREO AVEC LECTEUR DE DISQUES COMPACTS XR-M200 For assistance and information, call toll free 1-800-BUY-AIWA. 8A-CL8-901-01 991020AWW-X6 00COVER/XR-M200<U>/ESF OPERATING INSTRUCTIONS MANUAL DE INSTRUCCIONES MODE D’EMPLOI (United States and Puerto Rico)
-
Page 2: Precautions
Quick stops, excessive force, and uneven surfaces may cause the unit or cart to overturn or fall. ENGLISH 01-04/XR-M200<U>/Eng 7 Condensation — Moisture may form on the CD pickup lens when: - The unit is moved from a cold spot to a warm spot... -
Page 3: Table Of Contents
For your convenience, record the model number and serial number (you will find them on the rear of your set) in the space provided below. Please refer to them when you contact your Aiwa dealer in case of difficulty. Model No. -
Page 4: Preparations
SPEAKERS LOW FREQ R 0terminal and the black cord to the 9 terminal. Right speaker ENGLISH 01-04/XR-M200<U>/Eng 2 Connect the left speaker to the main unit. Connect the speaker cord with plug to the SPEAKERS HIGH FREQ L terminal, and another speaker cord to the SPEAKERS LOW FREQ L terminals in the same manner as step 1. -
Page 5: Remote Control
For better FM reception, use of an outdoor antenna is recommended. Connect the outdoor antenna to FM 75 To connect other optional equipment 01-04/XR-M200<U>/Eng REMOTE CONTROL Inserting batteries Detach the battery cover on the rear of the remote control and insert two size AA (R6) batteries. -
Page 6: Before Operation
This separate construction gives a clear, rich definiton to bass reproduction and it can realize clear, well-defined mid-to-high frequency signals. And AIWA’s built-in subwoofer system incorporates a subwoofer capable of powerful, satisfying bass performance with true stereo , press DEMO/ECO separation. -
Page 7: Sound
(off) Low frequency sound may be distorted when the T-BASS system is used for a disc or tape in which low frequency sound is originally emphasized. In this case, cancel the T-BASS system. 05-08/XR-M200<U>/Eng GRAPHIC EQUALIZER MULTI JOG DISPLAY JOG MODE This unit provides the following three different equalization curves. -
Page 8: Radio Reception
Press POWER while pressing TUNER during power on. To reset the interval, repeat this procedure. When the AM tuning interval is changed, all preset stations are cleared. The preset stations have to be set again. ENGLISH 05-08/XR-M200<U>/Eng PRESETTING STATIONS d DIR/ PRESET MODE... -
Page 9: Cd Playing
MULTI JOG. To remove disc, press z z z OPEN/CLOSE. 05-08/XR-M200<U>/Eng To start play when the power is off (Direct Play Function) Press CD. The power is turned on and play of the loaded disc begins. -
Page 10: Programmed Play
PROGRAMMED PLAY Up to 30 tracks can be programmed from the inserted disc. Use the remote control. ENGLISH 09-14/XR-M200<U>/Eng 1 Press MODE repeatedly in stop mode until “PRGM” appears on the display. “PRGM” flashes on the display. 2 Press numbered buttons 0-9 and +10 to program a track. -
Page 11: Tape Playback
When using the remote control, press MODE. To play one side only, select To play from front side to back side once only, select To play both sides repeatedly, select 09-14/XR-M200<U>/Eng PLAYING BACK A TAPE Insert a tape. Then press d Playback side of the tape MODE c : The front side is being played (forward). -
Page 12: Recording
To pause recording, press a (applicable when the source is TUNER, VIDEO/AUX or MD). To resume recording, press it again. ENGLISH 09-14/XR-M200<U>/Eng Sound adjustment during recording The output volume and tone of the speakers or headphones may be freely varied without affecting the recording. -
Page 13: Ai Edit Recording
In a few seconds, the tracks to be recorded on each side of the tape are determined. • f, g or MULTI JOG are also available to designate the tape length. 09-14/XR-M200<U>/Eng Tape length 5 Press w w REC/REC MUTE to start recording. -
Page 14: Programmed Edit Recording
• The f, g or MULTI JOG are also available to designate the tape length. Tape length Tape side A (front side) ENGLISH 09-14/XR-M200<U>/Eng 5 Press the numbered buttons 0-9 and +10 to program a track. Example : To select the 10th track, press +10 and 0. Selected track... -
Page 15: Clock And Timer
If power is interrupted for more than approximately 24 hours, all settings stored in memory after purchase need to be reset. 09-14/XR-M200<U>/Eng SETTING THE SLEEP TIMER MULTI JOG The unit can be turned off automatically at a specified time. -
Page 16: Setting The Timer
After you select a source, the duration for the timer-activated period flashes on the display. ENGLISH 15-18/XR-M200<U>/Eng 4 Select the duration for the timer-activated period with f or g, then press ENTER. The duration for the timer-activated period can be set between 5 and 240 minutes in 5-minute steps. -
Page 17: Other Connections
Connect the red plug to the VIDEO/AUX R jack, and the white plug to the VIDEO/AUX L jack. When connecting a turntable Use an Aiwa turntable equipped with a built-in equalizer amplifier. MD JACKS This jack is recommended to connect with an MD player. -
Page 18: To Reset
If the power cannot be turned off in step 1 because of a malfunction, reset by disconnecting the AC cord, and connect it again. Then carry out step 2. ENGLISH 15-18/XR-M200<U>/Eng TROUBLESHOOTING GUIDE If the unit fails to perform as described in these Operating Instructions, check the following guide. -
Page 19: Specifications
SPECIFICATIONS Main unit XR-M200 FM tuner section Tuning range 87.5 MHz to 108 MHz Usable sensitivity (IHF) 13.2 dBf Antenna terminals 75 ohms (unbalanced) AM tuner section Tuning range 530 kHz to 1710 kHz (10 kHz step) 531 kHz to 1602 kHz (9 kHz step) Usable sensitivity 350 µV/m... -
Page 20: Parts Index
OPEN/CLOSE ... 8 DEMO/ECO ... 5,14 CD BLANK SKIP ... 8 VOLUME ... 6 z PUSH EJECT ... 10 For assistance and information, call toll free 1-800-BUY-AIWA. Printed in China 00COVER/XR-M200<U>/ESF Page/Páginas/Page Name/Piezas/Nom 0-9, +10 ... 7-9,12,13 DISPLAY ... 6,8,14 EQ ...
Need help?
Do you have a question about the XR-M200 and is the answer not in the manual?
Questions and answers