Table of Contents
Advertisement
Quick Links
Advertisement
Table of Contents

Related Manuals for thomann Harley Benton AirBorne Go


Summary of Contents for thomann Harley Benton AirBorne Go
- Page 1 AirBorne Go guitar combo user manual...
- Page 2 Musikhaus Thomann Thomann GmbH Hans-Thomann-Straße 1 96138 Burgebrach Germany Telephone: +49 (0) 9546 9223-0 E-mail: info@thomann.de Internet: www.thomann.de 11.05.2021, ID: 488083 (V2)
-
Page 3: Table Of Contents
Table of contents Table of contents General information..........................5 1.1 Further information........................... 6 1.2 Notational conventions........................7 1.3 Symbols and signal words....................... 8 Safety instructions..........................11 Features............................... 14 Installation and starting up........................ 15 4.1 Dealing with lithium batteries..................... 17 Connections and controls........................19 Operating.............................. - Page 4 Table of contents Protecting the environment......................37 guitar combo...
-
Page 5: General Information
Our products and user manuals are subject to a process of continuous development. We there‐ fore reserve the right to make changes without notice. Please refer to the latest version of the user manual which is ready for download under www.thomann.de. AirBorne Go... -
Page 6: Further Information
General information 1.1 Further information On our website (www.thomann.de) you will find lots of further information and details on the following points: Download This manual is also available as PDF file for you to download. Use the search function in the electronic version to find the topics of Keyword search interest for you quickly. -
Page 7: Notational Conventions
General information 1.2 Notational conventions This manual uses the following notational conventions: Letterings The letterings for connectors and controls are marked by square brackets and italics. Examples: [VOLUME] control, [Mono] button. Displays Texts and values displayed on the device are marked by quotation marks and italics. Examples: ‘24ch’... -
Page 8: Symbols And Signal Words
General information Instructions The individual steps of an instruction are numbered consecutively. The result of a step is indented and highlighted by an arrow. Example: Switch on the device. Press [Auto]. ð Automatic operation is started. Switch off the device. 1.3 Symbols and signal words In this section you will find an overview of the meaning of symbols and signal words that are used in this manual. - Page 9 General information Signal word Meaning DANGER! This combination of symbol and signal word indicates an immediate dangerous situation that will result in death or serious injury if it is not avoided. WARNING! This combination of symbol and signal word indicates a pos‐ sible dangerous situation that can result in death or serious injury if it is not avoided.
- Page 10 General information Warning signs Type of danger Warning – danger zone. guitar combo...
-
Page 11: Safety Instructions
Safety instructions Safety instructions Intended use This device is intended to be used for amplification and playback of signals from musical instruments with electromagnetic pickups. Any other use or use under other operating condi‐ tions is considered to be improper and may result in personal injury or property damage. No liability will be assumed for damages resulting from improper use. - Page 12 Safety instructions WARNING! Incorrect handling of lithium batteries can result in injury In the event of a short circuit, overheating or mechanical damage, lithium batteries can cause severe injuries. Follow the advice on the correct handling of lithium batteries in the present section. CAUTION! Possible hearing damage The device can produce volume levels that may cause temporary or permanent hearing impairment.
- Page 13 Safety instructions NOTICE! External power supply The device is powered by an external power supply. Before connecting the external power supply, ensure that the input voltage (AC outlet) matches the voltage rating of the device and that the AC outlet is protected by a residual current circuit breaker. Failure to do so could result in damage to the device and possibly the user.
-
Page 14: Features
Features Features Special features of the device: HD modeling desktop guitar amplifier Built-in AirBorne 2.4 GHz instrument (wireless plug-n-play transceiver system) Bluetooth® 5.0 dual mode connectivity Drum computer and metronome with 9 patterns Great features for wireless practice and play along with streamed music Ideal for electric guitar and acoustic guitar with pickup 3 W (RMS) output power 1 ×... -
Page 15: Installation And Starting Up
Installation and starting up Installation and starting up Unpack and check carefully there is no transportation damage before using the unit. Keep the equipment packaging. To fully protect the product against vibration, dust and moisture during transportation or storage use the original packaging or your own packaging material suitable for transport or storage, respectively. - Page 16 Installation and starting up NOTICE! Magnetic fields The device generates strong magnetic fields that can interfere with the function of poorly shielded devices. The strongest magnetic fields are directly above and below the power amplifier. Therefore, never place sensitive devices such as pre- amplifiers, radio transmission systems, or tape decks directly above or below the power amplifier.
-
Page 17: Dealing With Lithium Batteries
Installation and starting up NOTICE! Distance to WiFi router Place the device at a distance of at least three meters from a WiFi router to avoid impairing data transmission. 4.1 Dealing with lithium batteries WARNING! Incorrect handling of lithium batteries can result in injury In the event of a short circuit, overheating or mechanical damage, lithium bat‐... - Page 18 Installation and starting up Store lithium batteries away from heat sources (e.g. radiators or sunlight). Lithium batteries are hermetically sealed. Never attempt to open a lithium battery. If the battery housing is damaged small amounts of the electrolyte may leak out. If this should happen, seal the lithium battery in airtight packaging and wipe up the traces of electrolyte using absorbent paper towels.
-
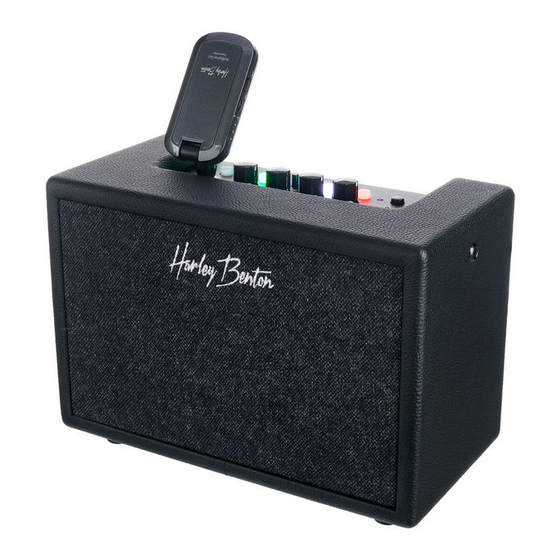
Page 19: Connections And Controls
Connections and controls Connections and controls Top side ö $ % & ( ) * AirBorne Go... - Page 20 Connections and controls 1 [RX CHANNEL] Illuminated push button to switch the wireless receiver on and off and to select the RX channel 2 [1]…[4] LEDs for the selected channel 3 [OD/DIST] Illuminated push button for selecting one of the three channels [CLEAN] (green), [OD] (orange) or [DIST] (red). Press and hold the pushbutton to activate or deactivate the Bluetooth®...
- Page 21 Connections and controls 8 Indicator LED. Lights up when the device is turned on. Main switch. Turns the device on and off. 10 [AUX IN] AUX input, designed as a 3.5 mm jack socket, for connecting an MP3 player 11 [PHONES] Headphones output, designed as 3.5 mm jack socket.
- Page 22 Connections and controls 14 [VOLUME] Rotary volume control 15 [GAIN] Rotary control to adjust the input sensitivity 16 [INPUT] Connection for an instrument via cable. If you use this connection instead of wireless transmission, the wireless signal is ignored and only the cable signal is processed. guitar combo...
- Page 23 Connections and controls Rear panel AirBorne Go...
- Page 24 Connections and controls 17 Socket for connecting the supplied plug-in power supply 18 USB port for charging the AirBorne wireless transmitter NOTICE! The device is not suitable for charging further devices via the USB port. guitar combo...
- Page 25 Connections and controls AirBorne 2.4 GHz Instrument (transmitter) 19 On / off switch 20 Button for channel selecting 21 Indicator LEDs to display the selected channel and for charge status display UNLOCK 22 1/4" jack for connection to the instrument. Depending on the desired use, it can be folded into the appropriate position (max.
-
Page 26: Operating
Operating Operating 6.1 Drum adjusting Adjusting the volume Press to play the set drum style. While playing, turn the [DRUM] control to adjust the volume. Setting the tempo Press to play the set drum style. While playing, press [TAP] to adjust the tempo. The push button flashes at a changing frequency to indicate the current tempo. - Page 27 Operating Metronome Green Blue Metal Yellow Blues Dark yellow Country Pink Rock Light red Ballad Light green radio Bright blue Light yellow Latin Delay adjusting Press and hold the red illuminated [TAP] pushbutton. ð The pushbutton turns yellow. AirBorne Go...
-
Page 28: Airborne 2.4 Ghz Instrument
Operating Now turn the [DRUM] control to set a delay time. The push button turns red again and the [DRUM] control adjusts the volume again. 6.2 AirBorne 2.4 GHz Instrument The receiver of the AirBorne 2.4 GHz instrument is integrated in the device. Reception is acti‐ vated automatically when the device is switched on. -
Page 29: Airborne Go Mobile App ("Mighty Amp")
Operating Connecting and coupling the transmitter Plug the transmitter into the 1/4" jack socket of the instrument whose signal is to be transmitted and bring the on / off switch on the transmitter to the [ON] position. ð The transmitter flashes five times. The LED indicator lights up during transmission. When the data transmission is stable, the LED indicator on the receiver lights up constantly. - Page 30 Operating With the app, advanced sound settings can be made for the device. Some functions, such as selecting the existing models, are only available via the app. Download the app and install it on your smartphone or tablet. Open the app and select ‘AirBorne GO’ from the home screen to connect your smart‐ phone or tablet to your device.
-
Page 31: Technical Specifications
Technical specifications Technical specifications Speaker 1 × 3" full-range speaker Input connections Power supply Power adapter AUX in 1 × 3.5 mm phone socket USB port Type A (5 V, 500 mA) Output connections Headphones 1 × 3.5 mm phone socket Input impedance 1 MΩ... - Page 32 Technical specifications Power supply External power adapter, 100 - 240 V 50/60 Hz Operating voltage / 1.2 A, centre negative Dimensions (W × H × D) 220 mm × 114 mm × 155 mm Weight 1.34 kg Ambient conditions Temperature range 0 °C…40 °C Relative humidity 20 %…80 % (non-condensing)
- Page 33 Technical specifications Operating range max. 30 m Frequency range 20 Hz…20 kHz Latency <5 ms Power supply Micro USB 5 V / 500 mA Battery / rechargeable battery Battery type Lithium-ion Capacity 500 mAh Operating time Dimensions (W × H × D) 73 mm ×...
- Page 34 Technical specifications Further information Reverb effect Effects processor External effects loop Microphone input Line input Food switch connection Incl. foot switch Recording output MIDI port External speaker connector guitar combo...
-
Page 35: Plug And Connection Assignment
Plug and connection assignment Plug and connection assignment Introduction This chapter will help you select the right cables and plugs to connect your valuable equip‐ ment in such a way that a perfect sound experience is ensured. Please note these advices, because especially in ‘Sound & Light’ caution is indicated: Even if a plug fits into the socket, an incorrect connection may result in a destroyed power amp, a short circuit or ‘just’... - Page 36 Plug and connection assignment Since the interference affects both cores equally, by subtracting the phase-shifted signals, the interfering signal is completely neutralized. The result is a pure signal without any noise inter‐ ference. 1/4" TS phone plug (mono, unbalanced) Signal Ground, shielding Three-pole 1/8"...
- Page 37 Protecting the environment Protecting the environment Disposal of the packaging mate‐ rial For the packaging, environmentally friendly materials have been chosen that can be supplied to normal recycling. Ensure that plastic bags, packaging, etc. are properly disposed of. Do not just dispose of these materials with your normal household waste, but make sure that they are collected for recycling.
- Page 38 Protecting the environment Disposal of your old device This product is subject to the European Waste Electrical and Electronic Equipment Directive (WEEE) in its currently valid version. Do not dispose with your normal household waste. Dispose of this device through an approved waste disposal firm or through your local waste facility.
- Page 40 Musikhaus Thomann · Hans-Thomann-Straße 1 · 96138 Burgebrach · Germany · www.thomann.de...
Need help?
Do you have a question about the Harley Benton AirBorne Go and is the answer not in the manual?
Questions and answers