Table of Contents
Advertisement
Quick Links
Advertisement
Table of Contents

Subscribe to Our Youtube Channel
Related Manuals for IBA ibaBM-DPM-S-64


Summary of Contents for IBA ibaBM-DPM-S-64
- Page 1 Profibus Sniffer Manual Issue 2.5...
- Page 2 Required corrections are contained in the following regulations or can be downloaded on the Internet. The current version is available for download on our web site http://www.iba-ag.com. Protection note Windows® is a label and registered trademark of the Microsoft Corporation. Other product and company names mentioned in this manual can be labels or registered trademarks of the corresponding owners.
-
Page 3: Table Of Contents
About this manual ..................... 6 Target group ....................6 Designations ....................6 Used symbols ....................7 Introduction ....................... 8 ibaBM-DPM-S-64 ..................... 8 Replacement for ibaBM-DPM-64 device (DPM64) ........... 9 Safety instructions ..................10 Designated use ....................10 Special safety instructions ................10 Scope of delivery .................... - Page 4 Connection to the DP Master (unidirectional) ..........20 8.1.2 Connection to DP master and other DP slaves (unidirectional) ...... 20 ibaBM-DPM-S-64 for coupling of two DP networks ........21 ibaBM-DPM-S-64 with DP master and ibaLogic (bidirectional) ...... 22 ibaBM-DPM-S-64 for systems coupling ............23 8.4.1...
- Page 5 Manual Technical Data ....................65 13.1 Main Data ...................... 65 13.2 Connections, Indicators ................. 65 13.2.1 Basic Device ....................65 13.2.2 Profibus Module ..................... 66 13.3 Data Transmission ..................66 13.3.1 Main Circuit Board ..................66 13.4 Dimension Sheet ................... 67 Support and contact ..................
-
Page 6: About This Manual
Manual ibaBM-DPM-S-64 About this manual This manual describes the construction, the use and the operation of the device ibaBM-DPM-S-64. Target group This manual addresses in particular the qualified professionals who are familiar with handling electrical and electronic modules as well as communication and measurement technology. -
Page 7: Used Symbols
Manual Used symbols If safety instructions or other notes are used in this manual, they mean: The non-observance of this safety information may result in an imminent risk of death or severe injury: By an electric shock! ... -
Page 8: Introduction
As a member of the bus monitor family ("ibaBM-.."), the ibaBM-DPM-S-64 device is used by the iba measured value acquisition or control systems as an interface for ex- changing data on the Profibus DP ("..DPM.."). It belongs to a new generation of devices ("..-S") with a modular construction. -
Page 9: Replacement For Ibabm-Dpm-64 Device (Dpm64)
Manual Replacement for ibaBM-DPM-64 device (DPM64) The device ibaBM-DPM-S-64 can be used as a replacement for the ibaBM-DPM-64 device in all modes of operation (Modes 5, 6, 7 for “input”, modes 8, 9, 11 for “in/output” and modes 0, 1, 3 for “output). -
Page 10: Safety Instructions
Check after unpacking the completeness and intactness of the delivery. The scope of delivery includes: ibaBM-DPM-S-64 device Manual USB cable GSD files USB driver Sample parameter file *.csv Other, not in the scope of delivery contained equipment, see at www.iba-ag.com. Issue 2.5... -
Page 11: System Requirements
For further information on PC requirements, visit our homepage www.iba-ag.com. At least one fiber optic input card ibaFOB-S, -X or -D One ibaNet fiber optic patch cable for connecting ibaBM-DPM-S-64 and ibaPDA-PC For system coupling: At least one interface board ibaLink-SM… which can be used as an interface to an automation system or a second ibaBM-DPM-S-64 ... -
Page 12: Mounting And Dismounting
Manual ibaBM-DPM-S-64 Mounting and dismounting Mounting 1. Locate the DIN rail mounting clip on the rear side of the device. Place the device on the DIN rail so that the top part of the mounting clip engages the top part of the rail appropriately. -
Page 13: Device Description
Manual Device Description Device Design 2 circuit boards installed in a robust iba metal housing provide the circuitry necessary for interfacing with the Profibus. The main circuit board: Controls the device as a whole Stores the parameters ... -
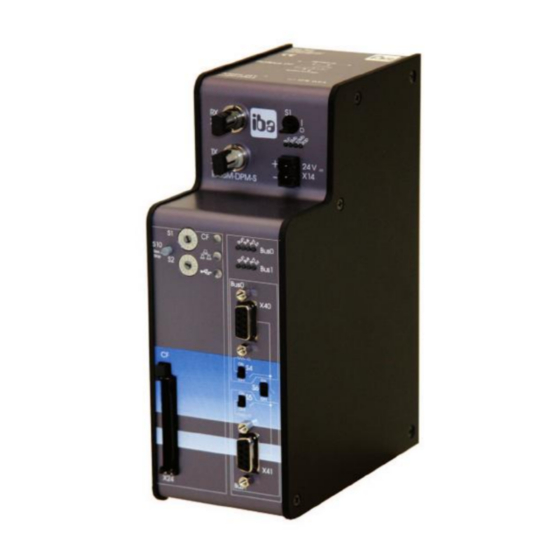
Page 14: View Of The Device, Controls And Connectors
Front plate may deviate from the one shown! LAN connector X22 Rear view Type plate Device name iba article number Serial number CE mark MAC address Hardware and software versions Figure 2: Connectors, controls and display elements Issue 2.5... -
Page 15: Fiber Optic Cable Connectors Rx/Tx
The connectors are designed for 62.5/125 m multi mode fibers with ST coupling, which can be purchased at iba too. Each connector can transmit up to 64 analog and 64 digital signals per millisecond. -
Page 16: Operating Status Display (Status Leds)
7.3.5 24 V Power Supply The ibaBM-DPM-S-64 device requires an external DC 24 V power supply (unregulated) and should be operated at a maximum of 600 mA. The operating voltage should be run through the provided 2-pin Phoenix threaded coupling connector. If desired, you can order DIN rails or plug-in power supply units from iba. -
Page 17: Push Button S10
PC. ® When the CompactFlash card is inserted into ibaBM-DPM-S-64, the configuration files stored there are used. 2. Although the cards are keyed to prevent them from being inserted incorrectly, you should insert the cards carefully and press them down until they click into place. -
Page 18: Tcp/Ip Interface (Bottom)
Manual ibaBM-DPM-S-64 7.3.10 TCP/IP Interface (bottom) The device can be connected to a PC or a network over a TCP/IP interface. The interface has a unique MAC address and is used for transferring configuration files (device parameters). Note Use a crossover cable for a direct connection to a PC! ... -
Page 19: Profibus Switches
Bus1 ibaBM-DPM-S-64 is the last device on Bus0 ibaBM-DPM-S-64 is the last device on Bus1 ibaBM-DPM-S-64 is to be looped into a PROFIBUS line, whereby only two cable ends with end plugs of the same line are available. -
Page 20: System Integration
DP Master and ibaFOB-4i-D in the measuring station PC The configuration shown above illustrates the ibaBM-DPM-S-64 device connected to a DP Master device (for example the SIMATIC S7). The measured values can be logged with a stationary ibaPDA-V6 PC using an ibaFOB-D card. -
Page 21: Ibabm-Dpm-S-64 For Coupling Of Two Dp Networks
DP master, other DP slaves and stationary PC In case those 2 Profibus DP networks should be linked, maybe over long distances, two ibaBM-DPM-S-64 provide a solution for up to 64 analog and 64 digital signals in each direction. -
Page 22: Ibabm-Dpm-S-64 With Dp Master And Ibalogic (Bidirectional)
A PC, equipped with an ibaFOB-io card or a combination of ibaFOB-4i and ibaFOB-4o and an application such as ibaLogic, can send data to a Profibus DP master via the ibaBM-DPM-S-64. In that case ibaLogic itself is neither a Profibus DP master nor a DP slave. -
Page 23: Ibabm-Dpm-S-64 For Systems Coupling
(bidirectional) In this example a typical configuration of systems coupling is shown. The iba interface board ibaLink-SM-128V-i-2o is designed for VME-based control sys- tems, like from ALSTOM, SMS or VAI. The ibaBM-DPM-S-64 controls the communication between Profibus and the VME- memory by copying the memory content from one side to the other. -
Page 24: Configuring And Parameterize The Device
The transmission of data is usually managed by message block transmission. Each DP slave uses one block for data transmission in each direction, i. e. an ibaBM-DPM-S-64 uses two blocks in total (slave 1 and 2). The data structure of these blocks for reception (outputs) and transmission (inputs) is shown in the following for each of the different operation modes. -
Page 25: Modes Of Operation Overview
Note Please note that the terms "in" and "out" refer to the point of the Profibus master’s view, i.e. "in" means signals being transmitted from the ibaBM-DPM-S-64 to the Profi- bus master (e. g. SIMATIC S7), "out" vice versa. Both slaves are always set to the same mode for the analog values! - Page 26 Manual ibaBM-DPM-S-64 The file names of the GSD files which come with our Profibus products had been re- named for standardization purposes (eff. 10/2005). If you still use the old files please refer to the following table for reference. New GSD file name Old GSD file name ibaF01n4.gsd...
-
Page 27: Mode 0 - Pda 32 Integers
Manual Mode 0 – PDA 32 Integers 9.2.2 This mode is used to read up to 32 integer values and 32 digital signals from the Profi- bus (OUT 72 Bytes). 9.2.2.1 Output data OUTPUT DATA Contents Remark Byte no. -
Page 28: Mode 1 - Pda 32 Reals
Manual ibaBM-DPM-S-64 Mode 1 – PDA 32 Reals 9.2.3 This mode is used to read up to 32 real values and 32 digital signals from the Profibus (OUT 136 Bytes). 9.2.3.1 Output data OUTPUT DATA Contents Remark Byte no. Offset... -
Page 29: Mode 3 - Pda 28 Reals
Manual Mode 3 – PDA 28 Reals 9.2.4 This mode is used to read up to 28 real values and 32 digital signals from the Profibus (OUT 120 Bytes) from a SIMATIC S7 as Profibus master. Due to limitations of the S7 real data type only 28 values can be used. -
Page 30: Mode 5 - Input 32 Integers
Analog inputs in total: 32 Words (16-bit integer), Big Endian Motorola Analog input channel 31 Integer (2 byte), Big Endian Motorola Device-ID of FO transmitter see list of iba device-IDs FO message counter-B incremented by each new FO message 9.2.5.3 GSD File... -
Page 31: Mode 6 - Input 32 Reals
Analog inputs in total: 32 Longs (Real), Big Endian Motorola Analog input channel 31 Real (4 byte), Big Endian Motorola Device-ID of FO transmitter see list of iba device-IDs FO message counter-B incremented by each new FO message 9.2.6.3 GSD File... -
Page 32: Mode 7 - Input 28 Reals
Analog inputs in total: 28 Longs (Real), Big Endian Motorola Analog input channel 27 Real (4 byte), Big Endian Motorola Device-ID of FO transmitter see list of iba device-IDs FO message counter-B incremented by each new FO message 9.2.7.3 GSD File... -
Page 33: Mode 8 - In-Out 32 Integers
Analog inputs in total: 32 Words (16-bit integer), Big Endian Motorola Analog input channel 31 Integer (2 byte), Big Endian Motorola Device-ID of FO transmitter see list of iba device-IDs FO message counter-B incremented by each new FO message 9.2.8.3 GSD File... -
Page 34: Mode 9 - In-Out 32 Reals
Manual ibaBM-DPM-S-64 9.2.8.4 Applications ibaLogic System coupling SIMATIC S7 SIMATIC TDC SIMADYN D Mode 9 – IN-OUT 32 Reals 9.2.9 This mode is used to read / write up to 32 real values and 32 digital signals from/to a Profibus master (IN 136 Bytes/OUT 136 Bytes). - Page 35 Analog inputs in total: 32 Longs (Real), Big Endian Motorola Analog input channel 31 Real (4 byte), Big Endian Motorola Device-ID of FO transmitter see list of iba device-IDs FO message counter-B incremented by each new FO message 9.2.9.3 GSD File...
-
Page 36: Mode B - In-Out 28 Reals
Analog inputs in total: 28 Longs (Real), Big Endian Motorola Analog input channel 27 Real (4 byte), Big Endian Motorola Device-ID of FO transmitter see list of iba device-IDs FO message counter-B incremented by each new FO message Issue 2.5... - Page 37 Manual 9.2.10.3 GSD File GSD file name Remark ibaF0Bn4.gsd Transfer in one block with SFC (S7-400) ibaF0Bn3.gsd Transfer in four blocks with SFC (S7-300) 9.2.10.4 Applications ibaLogic System coupling SIMATIC S7 SIMATIC TDC SIMADYN D...
-
Page 38: Communication Channels
The Ethernet TCP/IP interface on the bottom of the device is used to transfer the con- figuration data (device parameters) from and to the PC. Each ibaBM-DPM-S-64 device has its own MAC address as ID in the network. The MAC address is indicated on the type plate located on the rear of the device. -
Page 39: Usb Interface
Manual You want to connect the device directly with your PC and the network adapter in your PC is set to “Get IP address from DHCP server”. After you have connected the device with the PC it takes approximately one minute until the communication is established. - Page 40 Insert the delivered CD-ROM into your CD drive and click on <Next>. The driver for „IBA AG USB Remote NDIS Network Device“ will be found. 4. The message box which points out that „The software you are installing... has not passed the Windows Logo testing..”...
- Page 41 Manual If this message does not appear and you cannot continue the installation, check the security settings for the driver signing. They should be as follows: 5. After copying the required files click on <Finish>. Issue 2.5...
- Page 42 There, in section “LAN or High-Speed Internet” you’ll find a LAN connection with the device name “IBA AG USB Remote NDIS Network Device”. Highlight this line and select “Properties” from the “File” menu. A new dialog box “LAN-connection... Prop- erties“...
- Page 43 Manual 7. Choose „Use the following IP address“ and enter the address “192.168.0.2” into the field “IP address” and the value “255.255.255.0” into the field “Subnet mask”. 8. Then close this dialog and the previous one by click on <OK>.
-
Page 44: Configuration By Means Of The Web Interface
Suitable web pages for parameterization are stored in the device. 10.1 Access to the Web Interface 1. After you have connected PC and ibaBM-DPM-S-64 via Ethernet or USB start the Internet Explorer. 2. Type in the internet address (URL) of the device: then URL…... - Page 45 Manual The device recognizes 2 users for operating the web interface (input without quotation mark): User Rights User Password name Normal user Makes settings for analog and digital values dpms dpms as well as active slaves and operational mode of device.
-
Page 46: Home Page - Info
Manual ibaBM-DPM-S-64 10.1.1 Home page - Info Web interface – Homepage Info Figure 8: The web pages all have the same basic layout: The header section on the upper part of the page contains information about the cur- ... -
Page 47: Network Configuration Data
Manual 10.1.2 Network Configuration Data Clicking the <Network> button in the navigation section takes you to the configuration data of the network accesses. You must be logged in as “admin” in order to change network settings. Figure 9: Web interface - Page with network settings This page shows all network adapters of the device. -
Page 48: Setup Of Mode And Station Number
Manual ibaBM-DPM-S-64 10.1.3 Setup of Mode and Station Number To go to the mode of operation data, click the <Settings> button in the navigation sec- tion. This page is divided into several subpages which can be selected by clicking the tabs. -
Page 49: Administrative Functions
Manual Make sure that the two slaves are assigned to the correct bus line (bus 0 – con- nector X40, bus 1 – connector X41). Enter for each slave the slave address, as they are given in DP project engineering. -
Page 50: Time Function
Update: After you have received a firmware update from iba AG select the update file from the dialog box “browse” on the administrator’s page. Usually, it is a file with extension “.CAB”. The filename may be, for example, “update.SH4.CAB”. -
Page 51: Applications
Profibus communica- tion and finally to a complete standstill of the system. 4. Activate application-specific transfer programs in the master. 5. Connect the fiber optical links of the ibaBM-DPM-S-64 with the other application, e. g. ibaPDA, ibaLogic etc. 11.2... -
Page 52: The First Test
1. Start the “HW Config” tool in the current S7-project and install the GSD-file named “ibaF04n3.gsd “. 2. In the web interface of the ibaBM-DPM-S-64 set the operation mode to mode 3 (PDA 28 Reals). 3. Open the “Profibus DP”- folder in the hardware catalog of "HW Config". - Page 53 The same address has to be set in the Webinterface of ibaBM-DPM-S-64! 5. If you want to use both slaves in ibaBM-DPM-S-64, connect another module to the Profibus line and assign the other address configured in the Web interface of the device to this module in the “HW Config”...
- Page 54 Manual ibaBM-DPM-S-64 2. Define the local variables and call up FC105 and SFC15 (both blocks from S7 standard library) in OB1 or any other FC. The scaled temperature (0.0 - 700.0 °C) is saved as a REAL-value in DB 11.DBD8 (the first memory range for analog signals)!
- Page 55 Manual Figure 17: PLC S7 hardware configuration, Profibus slave address space 4. Now, download all modified blocks to PLC. Step 5: ibaPDA setup and test 1. In step 1 you should have already defined two modules of type Sm64 in the Module selection dialog of ibaPDA (v 5.xx) or one module “DPM64”...
- Page 56 For more information see chapter „Modes of Operation Overview“, page 25 2. In the web interface of the ibaBM-DPM-S-64 set the operation mode to mode 8. 3. Open the “Profibus DP”- folder in the hardware catalog. 4. Connect an ibaBM-DPM-S-64 module with the Profibus line by Drag & Drop and set a DP address for this module.
- Page 57 1. Connect the upper DP interface on the ibaBM-DPM-S-64 with the DP interface of your S7-PLC. 2. Activate the DP termination switch S4 on the ibaBM-DPM-S-64 if the device is the last one in the DP line. 3. Download the system data to S7-PLC with HW Config and start the PLC.
- Page 58 Manual ibaBM-DPM-S-64 3. Enter the content of OB1. Define the local variables and call up SFC14 (DP receive) and SFC15 (DP send), both blocks from S7 standard library, in OB1 or any other The unscaled temperature (0 - 32767) is saved as an INT- value in DB 12. DBW6...
- Page 59 Manual Figure 22: PLC S7 hardware configuration, Profibus slave I/O address space In this example the addresses PIW 256 and PQW256 are displayed in HW Config. For S7-300 3 ranges (2 with 32 bytes and 1 with 8 bytes) are automatically created per slave.
-
Page 60: Sample Projects
Manual ibaBM-DPM-S-64 Figure 24: ibaLogic, output signal to S7 4. Start the SIMATIC-Manager, enter a new variable table and display the transmitted generator signal (DB13.DBW6) in INT format. 11.2.2 Sample projects On the disk which is part of the delivered package you will find four sample projects with examples for the different modes: ... -
Page 61: Dp Faults With S7 Master May Cause Zeros In Data
When it comes to outgoing data the receiving systems, which are connected to the Pro- fibus via ibaBM-DPM-S-64 and interface boards like ibaLink-SM-64-io or ibaLink-SM- 128V-i-2o, can only read 32 analog and 32 digital data per slave (= module in ibaPDA) from the iba interface cards (e.g. -
Page 62: Configuration
Configuration 12.1 ibaPDA-V6 I/O Manager To measure and record data over ibaBM-DPM-S-64, you need ibaPDA-V6, ibaPDA (v5.xx) or ibaLogic 3 and 4. In older programs the configuration needs to be done like used with the predecessor device ibaBM-DPM-64. For configuration in ibaPDA-V6 you’ll find a short description as follows. -
Page 63: Outputs From Ibapda To Profibus Master (Bidirectional)
Manual 12.2 Outputs from ibaPDA to Profibus Master (bidirectional) Depending on the analog value type (Integer or Real) mode 8, 9 or B has to be set for bidirectional operation on the device. For more information see chapter 10 „Configuration by Means of the Web Inter- face“. - Page 64 Manual ibaBM-DPM-S-64 4. Choose the “Alarm” menu and add a FOB alarm module at the appropriate output link. 5. Choose the “General” tab of this module and select the correct link mode “Integer” or “Real”. Device mode Link mode Integer...
-
Page 65: Technical Data
Manual Technical Data 13.1 Main Data Order number 13.121010 Manufacturer iba AG, Germany Mechanical properties DIN IEC 68-2-6 (if properly assembled and with DIN rail) ° ° Operation temperature range C to 50 C (32 °F to 122 °F) °... -
Page 66: Profibus Module
Manual ibaBM-DPM-S-64 13.2.2 Profibus Module Profibus-DP 2 x 9-pin. D-Sub socket Terminating switch S4: Terminator network for Bus0 S5: Terminator network for Bus1 LEDs Status Bus0 Run (green); Bus (yellow), Active (white), Error (red) Bus1 Run (green); Bus (yellow), Active (white), Error (red) 13.3... -
Page 67: Dimension Sheet
Manual 13.4 Dimension Sheet (Dimensions given in mm) Issue 2.5... -
Page 68: Support And Contact
Koenigswarterstr. 44 90762 Fuerth Germany Phone: +49 911 97282-0 Fax: +49 911 97282-33 Email: iba@iba-ag.com Contact: Mr. Harald Opel Regional and Worldwide For contact data of your regional iba office or representative please refer to our web site www.iba-ag.com. Issue 2.5...
Need help?
Do you have a question about the ibaBM-DPM-S-64 and is the answer not in the manual?
Questions and answers