Table of Contents
Advertisement
Available languages
Available languages
Quick Links
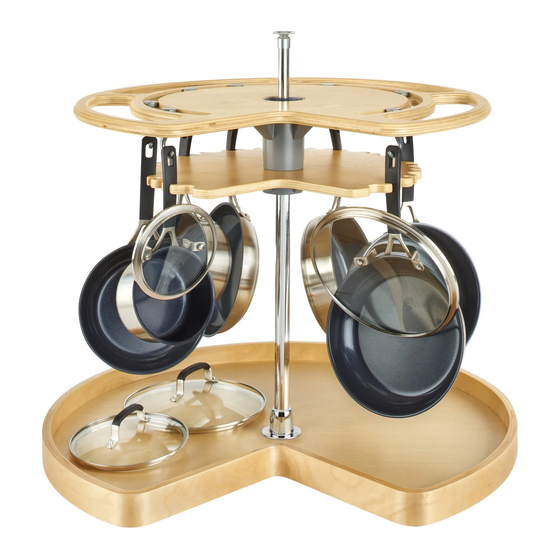
NOT-SO-LAZY SUSAN
TOOLS REQUIRED:
#2
#2
ESTIMATED ASSEMBLY TIME:
20 MIN
CARE AND MAINTENANCE:
Clean with a damp cloth and
wipe parts dry.
PARTS LIST
No.
Description
A
Upper Tray
B
Arrester Tray
C
Bottom Tray
D
Post Assembly
E
Top Hub
F
Arrester Hub
G
Detent Hub
H
Detent Stop
I
Top Pivot Bracket
J
Bottom Pivot Bracket
K
1/4-20 x 2-1/2" Pan Head Machine
Screw
L
1/4-20 Square Nut
M
Pin
N
8 x 5/8" Flat Head Wood Screw
O
8 x 5/8" Truss Head Screw
P
Chrome Hub
Q
Hook
R
1/4-20 x 3/4" Machine Head Screw
L
M
INSTALLATION INSTRUCTIONS: NOT-SO-LAZY SUSAN
Qty.
1
1
1
1
1
1
1
1
1
1
1
3
1
3
20
1
7
2
N
O
P
12400 Earl Jones Way
Louisville, KY 40299
rev-a-shelf.com
Customer Service: 800-626-1126
A
B
C
D
E
G
F
H
I
J
K
Q
R
I-NSLS-0918
Advertisement
Table of Contents

Related Manuals for Rev-A-Shelf NOT-SO-LAZY SUSAN


Summary of Contents for Rev-A-Shelf NOT-SO-LAZY SUSAN
- Page 1 Bottom Pivot Bracket 1/4-20 x 2-1/2” Pan Head Machine Screw 1/4-20 Square Nut 8 x 5/8” Flat Head Wood Screw 8 x 5/8” Truss Head Screw Chrome Hub Hook 1/4-20 x 3/4” Machine Head Screw INSTALLATION INSTRUCTIONS: NOT-SO-LAZY SUSAN I-NSLS-0918...
- Page 2 Notch shown using (4) 8 x 5/8” truss head screws in the pre-drilled hole locations. Note: Position the notch in the hub on the right side of the tray (See Figure E). Customer Service: 800-626-1126 | rev-a-shelf.com...
- Page 3 FIG. I-1 FIG. I-2 STEP 9 Place the post on the bottom pivot bracket, align the upper post and insert into the top pivot bracket then Post Screw tighten the post screw (See Figures I-1 and I-2). INSTALLATION INSTRUCTIONS: NOT-SO-LAZY SUSAN...
- Page 4 Screw the chrome hub to the bottom tray using (3) 8 x 5/8” flat head wood screws (See Figure M). FIG. N STEP 14 Insert the hooks into the slots of the upper tray (See Figure N). Customer Service: 800-626-1126 | rev-a-shelf.com...
- Page 5 REGARDER DES VIDÉOS D’INSTALLATIONS DE PRODUITS Nodo cromado / Moyeu chromé Gancho / Crochet Tornillo de cabeza para máquina de 1/4-20 x 3/4” / Vis machine à tête 1/4-20 x 3/4” WWW.REV-A-SHELF.COM/VIDEOS INSTRUCCIONES DE INSTALACIÓN / INSTRUCTIONS D’INSTALLATION: NOT-SO-LAZY SUSAN I-NSLS-0918...
- Page 6 Montez l’écrou et la vis avant de les montage du poteau (voir Figure D). fixer au plateau. Customer Service: 800-626-1126 | rev-a-shelf.com...
- Page 7 Une fois à l’intérieur, repoussez les assemblages vers le bas du poteau (voir les figures H-1 et H-2). INSTRUCCIONES DE INSTALACIÓN / INSTRUCTIONS D’INSTALLATION: NOT-SO-LAZY SUSAN...
- Page 8 8 x 5/8” (voir figure M). PASO 14 / ÉTAPE 14 Introduzca los ganchos en las ranuras de la bandeja superior (véase la figura N). Insérez les crochets dans les fentes du plateau supérieur (voir Figure N). Customer Service: 800-626-1126 | rev-a-shelf.com...
Need help?
Do you have a question about the NOT-SO-LAZY SUSAN and is the answer not in the manual?
Questions and answers