Table of Contents
Advertisement
Quick Links
Owner Manual for
ALLIANCE, ONYX, SILVER Mk3A
& ZEPHYR ARMS
I n s t r u c t i o n s b y O r i g i n l i v e ©
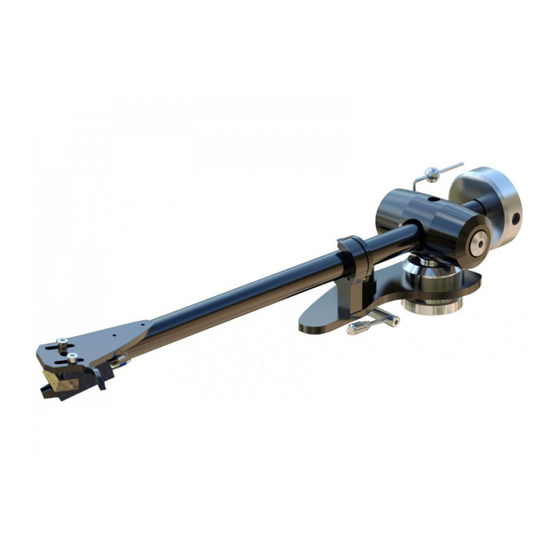
Side Bias clamping ball
Wire loop
Side Bias rod
Bearing end caps
Side Bias
weight
VTA Adjuster Ring
Notes:
You should not be unsettled if there seems to be
"play" in the bearings - this is deliberate and you
should not adjust or rotate the bearing end caps to try
and "correct" this. The bearings are high quality and
devoid of play, however the bearing housings are
carefully dimensioned to allow a loose fit, thus
"floating" the arm.
When lowering the arm onto a record, it is best not to
jam down the arm lever completely but rather, just let
it fall under its own weight.
The sound of new arms will improve significantly over the
first 2 weeks as items bed down and arm wires burn in.
Give special attention to underlined text in these
instructions.
LOOSE PARTS LIST
Counterweight
Side Bias Weight and clamp
Wire loop angle diagram
1.5mm A/F Allen key for wire loop
Large clamping nut
Cork Washer
Cable clip
Alignment gauge
Mounting the arm
If possible, refer also to the mounting instructions
from your turntable manufacturer.
HOLE DIMENSIONS
Many decks come with an arm mount hole position
intended for arms with "Rega" geometry. If this is the
case with your deck then the Origin Live arm will fit
perfectly as it shares the same geometry as Rega.
Counterweight
Yoke
Arm Clip
Lift Lower device
Lift lever
Arm plate
However if this is not the case then mount your arm
using the following dimensions :
Centre of platter to centre of arm hole is approx
222mm ( 295.6mm for 12 inch versions ) plus or
minus 1.5mm tolerance. The hole diameter for the
arm is 23mm to 25 mm. If you need to modify your
existing arm board to enable the arm to fit, please
refer to our web site tonearm pages and see side
menu for "fitting guidance".
DIAGRAM OF ARM MOUNTED
Insert the arm through the arm-board hole and fit the
cork washer underneath followed by the large
clamping nut. Turn the nut to finger tight as hard as
you can (see above diagram).
Leave final height adjustment till later.
For decks that differ from the illustration, you may
need to contact the turntable manufacturer for
instructions or parts to enable you to fit your OL arm
- Ask how to fit an "old style Rega geometry,
threaded base mounting" and they should understand
Headshell
Advertisement
Table of Contents

Related Manuals for Origin live ALLIANCE


Summary of Contents for Origin live ALLIANCE
- Page 1 “Rega” geometry. If this is the instructions or parts to enable you to fit your OL arm case with your deck then the Origin Live arm will fit - Ask how to fit an “old style Rega geometry, perfectly as it shares the same geometry as Rega.
- Page 2 SET TRACKING FORCE your requirement as all Origin Live arms are drop in replacements for all Rega arms. Find the recommended tracking force for your cartridge from the manufacturers instructions. Connecting the arm For Origin Live arms you will need a stylus force gauge (stylus balance).
- Page 3 When tightening it helps to keep a firm grip on the where it is parallel to the record, and then so the back cartridge and headshell together so nothing shifts. of the cartridge is tilting up. Keep track of your Slightly tighten each screw in turn, then repeat until settings so you can return to the one you like best tight.
- Page 4 VTA adjusted. GE NE RA L N OT ES WARRANTY As Origin Live supply most makes of hi-fi cartridge we get asked questions from time to time about We guarantee arms supplied by ourselves to be free various issues regarding set up and care.
- Page 5 are audible they are generally of a relatively low across the record must maintain the stylus in the same order, however tracking force and VTA in particular relation to the groove as that of the cutting stylus’s are worth fine tuning should you feel anything is straight-line tracking;...
- Page 6 jeweller’s screwdriver into the open end of its RE CO R D C AR E A ND C L EAN IN G longitudinal slot until you see this widen very The stylus itself does a pretty good job of cleaning slightly.
Need help?
Do you have a question about the ALLIANCE and is the answer not in the manual?
Questions and answers