Advertisement
Quick Links
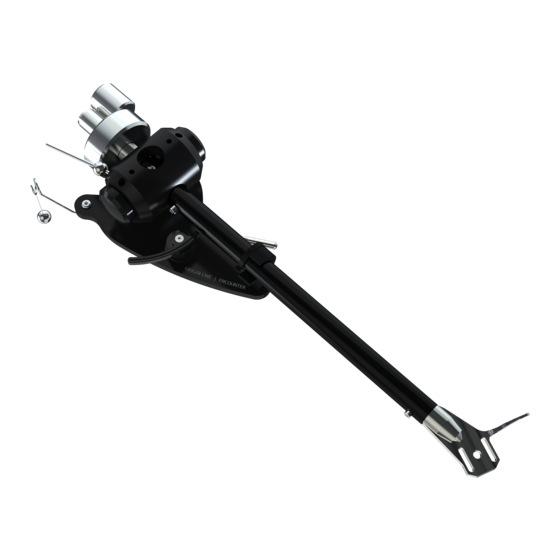
Instructions for
ENCOUNTER, ILLUSTRIOUS,
& CONQUEROR
I n s t r u c t i o n s b y O r i g i n l i v e 1 1 / 2 0 1 6 ©
COUNTERWEIGHT
REAR STUB
INTRODUCTION
Thank you for ordering an Origin Live arm. We trust you
will enjoy getting closer to the original sound and
appreciating your music in a new way.
Please give special attention to underlined text in these
instructions.
Notes:
a) It may seem there is "play" in the bearings - this is a
design feature. The dual pivot bearings for vertical
movement allow for a great deal of arm movement but
always re-centre themselves.
The conventional bearings for horizontal arm swing are
very high grade. However they are "floated" inside the
vertical bearing house to allow slight movement rather
than rigidly coupling it to the structure. Again these
bearings are self centering so you need not be concerned
about apparent movement.
b) You should handle the arm in exactly the same way as
a conventional gimballed arm.
c) The sound of new arms and rewires will improve
significantly over the first 40 to 100 hours of running
time as wires burn in.
Page 1
***essential reading***
YOKE
LIFT LOWER CURVED REST
LIFT LOWER LEVER
ARM CLIP
ARM
ARM
PLATE
TUBE
Mounting Requirements
Arm mounting varies depending on the make of
your turntable. This section caters for various
scenarios.
Geometry & dimensions
You do not need a mounting template.
For standard Origin Live arms with effective
length of 9.5 inch (240mm)
The arm mounting hole diameter should be 23mm
to 24.5 mm.
Centre of mounting hole to centre of platter should
be 222mm (plus or minus 1mm tolerance).
HEADSHELL
Advertisement

Subscribe to Our Youtube Channel
Related Manuals for Origin live ENCOUNTER


Summary of Contents for Origin live ENCOUNTER
- Page 1 LIFT LOWER CURVED REST Mounting Requirements INTRODUCTION Arm mounting varies depending on the make of Thank you for ordering an Origin Live arm. We trust you your turntable. This section caters for various will enjoy getting closer to the original sound and scenarios.
- Page 2 Accessories > Vinyl > Adaptors centre of platter is 295.6mm Mounting the Arm Height consideration Origin Live arms can be raised by approx 16mm using Refer to diagram below. VTA adjustment. However performance is optimized 1. Insert arm through mounting hole in the with the arm raised as little as possible.
- Page 3 Enterprise Front View of Dual Pivot YOKE RIGIDLY FIXED TO ARM TUBE Arrangement ALLEN SCREW HOLDING PIVOT POINT Rotating clockwise raises this side of the yoke. NOTE It's not necessary PIVOT POINT IN THREADED to understand SCREW Adjusts Azimuth these diagrams. They're for HARDENED BEARING CUP information only.
- Page 4 disconnected. CONNECT THE ARM If hum still persists disconnect blue wires from earth and connect only the thin black wire sprouting from the “white RCA plug” to the phono Fit Cable Clip earth. For optimal performance, support the arm cable with a Then try the options A to C but with the black wire clip fastened underneath the plinth.
- Page 5 At this stage the headshell screws should be just Freeing the yoke tensioned sufficiently to hold the cartridge against the headshell, but loose enough for the cartridge to Remove the 2 “Transit bolts” located in the top of the be rotated and moved. yoke (with white nylon washers under the heads for protection).
- Page 6 Ensure that the clamping Allen grub screw is oriented at Once you pull the lever back down to just past it's the nearside of the arm as shown (not the top). vertical point, the arm will gently fall till the stylus lands on the record surface.
- Page 7 From this number you can assess whether you need to Set arm height increase the tracking force or vice-versa. Move the tonearm counterweight accordingly and re-measure the How to raise and lower arm base to set VTA tracking force. Repeat this procedure until the correct reading is obtained.
- Page 8 Above photo shows correct orientation of alignment card Use the alignment gauge or a ruler to judge this measurement. In the above photo, notice that the ruler is butted against the spindle although it's the centre of the spindle that we need to measure from. To compensate for this simply add 3.5mm (half the diameter of the spindle) to measurement readings.
- Page 9 Align Cartridge Align stylus or cartridge body? Once overhang is set, place the alignment gauge on the Most cartridge bodies have faces that are perfectly platter as shown below. aligned with the cantilever so you can align the cartridge body on the gauge. However this does not apply to all cartridges and some brands do not build their stylus aligned symmetrically with the body.
- Page 10 Enterprise Adjustments DO NOT ADJUST PIVOT ADJUSTER SCREW Do Not adjust without specific instructions – or damage will result. Remove cork packing strips and keep them for AZIMUTH CLAMPING transit purposes SCREWS Do Not adjust without reading instructions – These should never need adjustment.
- Page 11 Fit the “clamp ball” which slides along the side bias rod. you do not adjust this. Lightly clamp in position (approx 5mm away from the Setting azimuth correctly is tricky at the best of yoke) using a 1.5mm Allen key in the tiny set screw of times and you need a certain amount of expertise to the ball.
-
Page 12: Warranty
Optional reading for less experienced users been modified by any party other than ourselves and has not received maltreatment of any kind. General Notes Origin Live offer most makes of Hi-Fi cartridge so we get asked questions about various issues Page 12... - Page 13 Cartridge alignment regarding set up and care. To help newcomers to this area we have published the following notes. These Alignment for Hi-Fi cartridges needs to be guidelines are of a general nature - we publish them only optimised in three different planes. The final to be of help and although widely accepted they are not authority should always be your ears and preferably formally authoritative - we cannot accept liability if you...
- Page 14 To help on this conduction is essential and joints can be critical. we've produced Youtube videos which can be found on the Origin Live Youtube channel (use google to Make sure that the arm’s wires, wire clips, and solder find this).
-
Page 15: Record Care And Cleaning
(which is a very precise and delicate mechanism). Remove the counterweight and wind the VTA adjuster wheel up as high as possible. Origin Live Ltd, Unit 5, 362b Spring Road, Sholing, Southampton, SO19 2PB www.originlive.com originlive@originlive.com Page 15...
Need help?
Do you have a question about the ENCOUNTER and is the answer not in the manual?
Questions and answers