Table of Contents
Advertisement
Advertisement
Table of Contents

Related Manuals for AIPTEK Pocket DV3300


Summary of Contents for AIPTEK Pocket DV3300
-
Page 2: Users Manual
Preparing Your Camera Getting Started Digital Video Mode Digital Camera Mode Voice Recording Mode Playback Mode MP3 Mode Camera Settings TV Output Copying Files to PC Using PC Camera PocketDV 3300 Users Manual English... - Page 3 Welcome Dear user, thanks for purchasing this product. Much investment in time and effort has gone into its development, and it is our hope that it will give you many years of trouble-free service. Safty Notice 1. Do not drop, puncture or disassemble the camera; otherwise the warranty will be voided. 2.
-
Page 4: Package Contents
Package Contents Users guide Earphone Camera USB cable AV cable AA Alkaline Tripod Wrist Strap batteries x 4 Driver CD ~ 2 ~... -
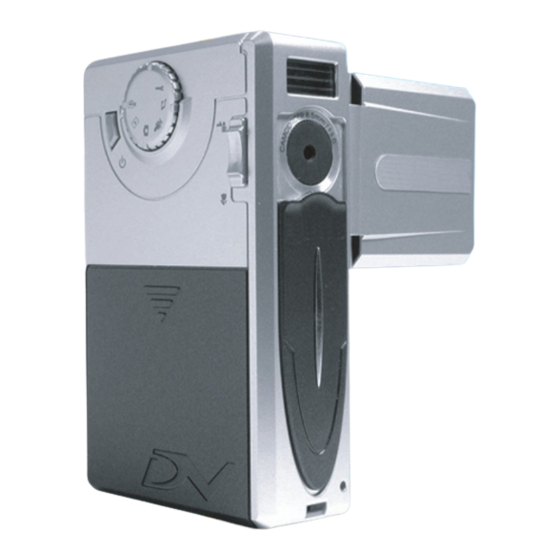
Page 5: Camera Parts
Camera Parts Microphone Back LED Shutter/Record Button Direction Buttons OK Button Menu Button Wrist Strap Hook SD/MMC Card Slot Video-out Connector USB Connector Earphone Connector Speaker LCD Panel LCD On/Off Detector Flash Strobe Lens Lens Cover Front LED Battery Cover Focus Switch Power On/Off Button Mode Switch... -
Page 6: Preparing Your Camera
Preparing Your Camera Loading the batteries Your camera runs on four AA alkaline batteries. High performance batteries are recommended for this camera for maximum battery life. Slide the battery compartment cover open in the direction as indicated. Place the batteries into the compartment. Note that the positive and negative ends cannot be reversed. -
Page 7: Inserting The Sd/Mmc Card (Optional)
Inserting the SD/MMC card (optional) In addition to 16MB (128Mbits) built-in flash memory, your camera can store data on a Secure Digital (SD) card or a MultiMedia card (MMC). The supported memory size ranges from 8MB to 256MB. To insert a SD/MMC card, gently push the card as indicated until the card reaches the end of the slot. -
Page 8: Attaching The Wrist Strap
Attaching the wrist strap Please unfasten and separate the strap into two parts. To attach the wrist strap to the camera, thread the strap through the hook on the side of the camera, and then the one on the bottom part. After threading the strap, fasten the strap and then use the leather wrap to hold the strap. -
Page 9: Using The Tripod
Using the bag The accessory bag comes handy if you are planning to carry the camera with you while you are travelling around. Simply put the camera into the bag as indicated, and you are ready to carry the camera with you. Avoid severe impact to the camera body even it is placed in the bag. -
Page 10: Getting Started
Getting Started Turning on your camera Press and hold down the power button for 2 ~ 3 seconds to turn on the camera. The LED will light up. If the camera is not turned on after pressing the power button, please check: 1. -
Page 11: Setting The Date And Time
Setting the date and time When you power on the camera for the first time, you need to set up the date and time: Set the Mode Switch to Setting mode. Setting Press the Up or Down button Beep to highlight Date, and then Boot-up press the OK button or the Auto Off... - Page 12 Checking the media and power status The LCD display varies according to the operation mode. However, you can easily check the media type and power status on the LCD display. Storage media indicator: : The camera is using the built-in memory for file storage.
- Page 13 Storage capacity chart The following chart is estimated based on a 64MB SD card. Actual capacity may vary (up to +5%) depending on the environment and color condition. ~ 11 ~...
-
Page 14: Lcd Display
Digital Video (DV) Mode LCD display DV mode indicator Recording indicator QVGA 00:00 Fine Recording time lapse Image resolution Image quality Battery life indicator 1. 00 06:20 Storage media type Remaining capacity (mm:ss) Zoom ratio ~ 12 ~... -
Page 15: Recording An Avi Movie
Recording an AVI movie Set the Mode Switch to Digital Video mode. Press the Shutter/Record button to start recording. Shutter/Record button Recording Minute indicator Second 00:00 QVGA Fine 1. 00 While recording, you can press the Up or Down button to zoom in/out the screen. Press the Shutter/Record button again to stop recording. -
Page 16: Function Buttons
Function buttons The following function buttons are available while the camera is in Digital Video mode: Zoom In DV Menu DV menu While in Digital Video mode, press the Menu button to bring up the DV menu. Start/Stop Recording Zoom Out The following table illustrates all items and their functions. -
Page 17: Digital Camera Mode
Digital Camera Mode LCD display Digital Camera mode indicator Self-timer indicator 1280 Fine Flash indicator White balance indicator Image resolution Image quality 1. 00 Battery life indicator EV+1 Storage media type Remaining capacity (pic.) Exposure compensation value Zoom ratio ~ 15 ~... - Page 18 Taking a still Set the Mode Switch to Digital Camera mode. Use the Focus Switch to set focus as appropriate. 16"~ (40cm~ 12"~16" (30cm~40cm) Before shooting, you can press the Up or Down button to adjust the zoom ratio. Press the Shutter/Record button to take a still. Shutter/Record button ~ 16 ~...
- Page 19 Using the flash strobe When the lighting is not sufficient for your shooting environment, the flash can provide the extra light you need. Using the hot button While in Digital Camera mode, pressing the Left button allows you to switch the flash mode without entering the options menu.
-
Page 20: Setting White Balance
Setting white balance Under certain conditions, you may need to manually select the white balance setting to take pictures with the correct color balance. Using the hot button While in Digital Camera mode, pressing the Right button allows you to change the white balance setting without entering the options menu. -
Page 21: Using The Self-Timer
Using the self-timer While in Digital Camera mode, press the Menu button to bring up the Camera menu. Camera Highlight the SelfTimer item, Strobe and then select ON in the ImageSize sub-menu. Then press the SelfTimer Menu button to exit. DateStamp Display When the Shutter/Record button is pressed, the... -
Page 22: Camera Menu
Function buttons The following function buttons are available while the camera is in Digital Camera mode: Zoom In Flash Mode Camera Menu Camera menu The Camera menu provides several items for you to fine- tune the camera function. To bring up the Camera menu, press the Menu button while in Digital Camera mode. - Page 23 Camera menu (continued) The following table illustrates all items and functions of the basic camera settings. The following table illustrates all items and functions of the advanced camera settings. ~ 21 ~...
- Page 24 Voice Recording (VR) Mode LCD display 001/001 WAVE0001.WAV 10:52 VR mode indicator Current file / All files 123K File size Battery life indicator Storage media type Sound volume Remaining capacity (mm:ss) ~ 22 ~...
-
Page 25: Recording A Sound Clip
Recording a sound clip Press the Shutter/Record button again to stop recording. Set the Mode Switch to Voice Recording mode. Press the Shutter/Record button to start recording. Shutter/Record button Microphone Avoid blocking the microphone while recording voice. ~ 23 ~... - Page 26 Deleting sound clips When highlighting a sound clip, press the Menu button and a sub-menu will pop up asking if you want to delete one or all files. Select Delete One to delete the highlighted file. Select Delete All to delete all recorded sound clips.
-
Page 27: Playback Mode
Playback Mode LCD display Playback mode indicator File type 00:00 Play/Pause/Stop indicator 1.00 VOL15 Playing time Sound volume Battery life indicator 001/006 Storage media type Current file / All files Zoom (lock or unlock) / Zoom ratio ~ 25 ~... -
Page 28: Thumbnail Browser
Thumbnail browser Set the Mode Switch to Playback mode. After entering the Playback mode, you will see the thumbnail interface. Use the direction buttons to highlight a thumbnail. You can tell the file type by the color of the encircling square: Red: AVI files. - Page 29 Viewing a JPG picture While in thumbnail mode, highlight a JPG picture and press the OK button to view the file in full-screen mode. When viewing a JPG picture in full-screen mode, you can use the function buttons as illustrated: Zoom In Previous File Go Back to...
-
Page 30: Deleting Files
Deleting files When highlighting a thumbnail, press the Menu button and a sub-menu will pop up asking if you want to delete one or all files. Select Delete One to delete the highlighted file. Select Delete All to delete all stored files. Delete Delete One Delete All... -
Page 31: Mp3 Mode
MP3 Mode LCD display MP3 mode indicator Playing time / File size Bass 3D 00:00 Bass boost indicator 4500K 3D enhancement indicator TRACK01.MP3 Battery life indicator Storage media type 01/01 Sound volume Current file / All files Play list item indicator ~ 29 ~... -
Page 32: Playing Mp3 Music
Uploading MP3 files To upload MP3 files to the camera, you need to connect the camera to a PC using the USB cable. For more information on USB connection, please refer to Chapter After connecting the camera to the computer and selecting DISK mode, you can locate a "MP3"... -
Page 33: Mp3 Menu
MP3 menu The MP3 menu provides several items for you to enhance the Select File quality of MP3 music. To bring up Bass Boost the MP3 menu, press the Menu 3D Enhance OFF button while in MP3 mode. The following table illustrates all items and their functions. MP3 Menu ~ 31 ~... -
Page 34: Camera Settings
Camera Settings Basic settings The basic camera settings allow you to configure some elemental functions of the camera. To access the menu, set the Mode Switch to Setting mode. Setting Beep Boot-up Auto Off Date Time The following function buttons are available while configuring the camera settings. -
Page 35: Advanced Settings
Advanced settings The advanced settings involve with more complicated options. To access the menu, open the basic setting menu, highlight the tab, and then press the Right button. Advanced TV Type Format Media NTSC Flicker Reset Default 60Hz LCD Bright USB Mode MENU Language The following table illustrates the items and functions of... - Page 36 TV Output Connecting the camera to TV Connect your camera and TV via an AV cable for real- time display. You can export your video clips, still pictures and audio recordings directly to your TV to share them with friends and family. AV Mode Turn on your TV and switch to AV mode.
-
Page 37: Copying Files To Pc
Copying Files to PC Installing the driver (for 98SE) If you are using Windows 98 SE, you need to install DV 3300 Driver before your camera connects to your computer for the first time. Please follow these steps to complete the installation. Turn on your computer. - Page 38 Installing the driver (for 98SE) (continued) The Install Shield Wizard will then appear and automatically install the program. Please click on Next to continue the installation. After the driver installation is completed, the program will prompt you to install Direct X 8.0 or above. If you are not sure if this program has been installed in your computer, please click Yes to continue.
-
Page 39: Connecting The Camera To Your Pc
Connecting the camera to your PC Turn on your computer, and then connect the USB cable to the USB port of your computer. Connect the other end of the USB cable to your camera. If the camera's USB mode is set to MENU (please refer to the Advanced settings in Chapter 8), a menu will pop up when the camera is connected to your computer. -
Page 40: Copying Files To Your Pc
Copying files to your PC By copying files from the camera to your computer, you can permanently save your creative works in the hard disk. To copy files from the camera, you must select DISK (removable disk) mode when connecting the camera to your This step varies according to your operation system. - Page 41 Copying files to your PC (continued) Double-click on the DCIM file folder. Windows XP Windows 2000/ME/98 SE Double-click on the 100MEDIA file folder. Windows XP Windows 2000/ME/98 SE Drag the pictures to your desired target folder. Copy pictures to "My Documents" Windows 2000/ME/98 SE ~ 39 ~ Windows XP...
-
Page 42: File Locations
File locations The following figure shows where different types of files are located in different folders. For JPG, AVI, and WAV files For MP3 files Uploading/Deleting MP3 files The "MP3" folder is for storing the MP3 files. To upload or delete a MP3 file, you must connect the camera to a PC and set the camera to DISK (removable disk) mode. -
Page 43: Viewing/Playing Files On Your Pc
Viewing/Playing files on your PC Double-click on My Documents or other folder that stores your files. Windows 2000/ME/98 SE Double-click on the desired file, and the file will be opened by the program matching the file's type. Windows XP ~ 41 ~ Windows XP Windows 2000/ME/98 SE... -
Page 44: Using Pc Camera
Using PC Camera Installing the application You need to install DV 3300 PC Camera to take advantage of the PC camera function. Please follow these steps to install the application. Turn on your computer, and then place the accessory CD into the CD-ROM drive. (Please see step 1 in Chapter 10 - Installing the driver for reference.) After the title screen appears, click on the install the application. - Page 45 Installing the application (continued) Notice for Windows ME users: When the following screen appears, please select Automatic search for a better driver and click Next to continue. Notice for Windows 98SE users: 1. Click Next when the following screen appears. 2.
-
Page 46: Starting The Application
Starting the application Connect the camera to your computer with the USB cable. Select CAMERA mode when prompted in the camera LCD screen. If the camera is set to DISK mode when connected to the PC, you can press the Menu button and switch to CAMERA mode manually. - Page 47 Using DV 3300 PC Camera To view pictures taken by DV 3300 PC Camera, please click to open the photo album. Or, as an alternate option, go to the "Work Temp" folder to find files taken by the program. The full path is as following: C:/Program Files/DV3300 PC Camera/Work Temp Preview Start recording a video clip...
- Page 48 Recording an AVI movie or taking a snapshot Recording an AVI movie: 1. Click on the icon. 2. Specify the path and name of the AVI file. 3. Set the frame rate and recording time according to your needs. 4. Press the Start Record button to begin recording. 5.
- Page 49 Advanced settings in PC Camera (continued) Source: The Source sub-menu provides several options for you to set the color adjustments to retain the best image quality. You can use the default settings, or change the settings (such as brightness, contrast, saturation, and sharpness) on your own.
-
Page 50: Troubleshooting
Troubleshooting ~ 48 ~... - Page 51 Troubleshooting (continued) ~ 49 ~...
-
Page 52: Flicker Settings Table
Flicker Settings Table LED Event Table The flicker setting is based on the frequency standard of your local power supply. ~ 50 ~... -
Page 53: System Message Table
System Message Table ~ 51 ~... - Page 54 Specifications Main Functions ~ 52 ~...
-
Page 55: Aiptek Service
If you have any problems, please contact AIPTEK office to which your country is assigned. Please note: If you reside outside of the United States or Germany, please contact AIPTEK International Inc. AIPTEK International GmbH Halskestrasse 6 47877 Willich, Germany...
Need help?
Do you have a question about the Pocket DV3300 and is the answer not in the manual?
Questions and answers