Table of Contents
Advertisement
Quick Links
WARNINGS AND CAUTIONS
• TO AVOID DEATH, SERIOUS PERSONAL INJURY OR PROPERTY DAMAGE, DO NOT RECHARGE, DISASSEMBLE OR INCINERATE BATTERY, NOR HEAT
IT ABOVE 100˚C (212˚F). Dispose of used battery promptly. DO NOT dispose of battery in normal household waste. Keep away from children. Please contact
your local waste provider or recycling facility for proper disposal of used battery.
• To be installed and/or used in accordance with appropriate electrical codes and regulations.
• If you are unsure about any part of these instructions, consult an electrician.
• For indoor applications only.
• SAVE THESE INSTRUCTIONS.
OVERVIEW
The Leviton
®
LURPC-00W Wireless Photosensor is a battery powered light sensor that
transmits and receives wireless messages in the Lumina™ RF network wireless lighting
control system. It is intended to be mounted to the ceiling, to measure the light level in the
space. No wiring, adjustment or calibration is needed.
As part of the Lumina™ RF network system and using open, standards based Lumina™
RF wireless communications, the LURPC-00W reports real-time light measurements.
Designed to work with the Lumina™ RF network daylight harvesting solution, the
LURPC-00W enables automatic and continuous adjustment of electric light levels to auto-
defined or user-defined setpoints.
• Suitable for many applications: office, retail, education, etc.
• Ceiling surface mount, completely wireless installation.
PLACEMENT
Place the Photosensor so that it views the daylight and the electric light available in the
controlled area.
In areas with pendant fixtures providing uplighting, place the Photosensor at least 4 feet
(1.2m) away from the nearest uplighting fixture.
In areas where the primary light source is through a window, place the Photosensor
between 6 feet and 15 feet (1.8m to 4.5m) from the window.
6'
Window
SPECIFICATIONS
Power supply
Battery life
Radio Properties
Operating Environment
Temperature
Light Sensor Range
Lens
Mounting
Dimensions
© 2017 Leviton Mfg. Co., Inc.
Lumina™ RF Wireless Photosensor
4'
Light
Fixture
60˚
60˚
Daylighting area
12'
(2) AA 3.6V Lithium-thionyl chloride
battery (included)
5 years
2.4 GHz, +7dBm transmit power
Indoor, dry location
14˚ to 122˚F (-10˚ to 50˚C)
1 to 2000 lux (0.092 to 185 fc)
Field of view: 60˚ cone
(2) Screw holes on base plate; ceiling
mount; twist-lock sensor
Diameter: 3.7 inches (95mm)
Depth: 1.3 inches (32mm)
For Technical Assistance Call: 1-800-824-3005 (U.S.A. Only) www.leviton.com
Cat. No. LURPC-00W
INSTALLATION
INSTALLATION
1. Determine the mounting location for the sensor based on daylight availability and task
area. See Placement for details.
2. Remove the sensor from the base by twisting it.
3. Attach the mounting base to the ceiling in the specified location. Be sure the label is
visible after mounting the base.
4. Install the batteries in the orientation
(+ -) shown on the bottom of the battery
compartments.
5. Secure the sensor to the ceiling by twisting it
onto the base.
6. Initiate the Installation Test Mode:
momentarily press the Utility button. The
green LED flashes once then the red LED
10'
starts flashing.
NOTE: The test mode times out after 5
minutes.
• Decrease the light at the Photosensor by
covering the lens with your hand.
NOTE: The LED flashes slower.
• Increase the light at the Photosensor by
moving your hand away from the lens.
NOTE: The LED flashes faster.
7. If you observe the behaviors described in step 6, the sensor has passed the installation
test. Exit Installation Test Mode by momentarily pressing the Utility button again. If you
do not observe the proper behavior, see Troubleshooting.
8. Complete the installation by resetting the device to factory defaults. Press and hold the
Utility button for 5 seconds. Release the button when the Network LED (green) begins to
flash rapidly. The sensor attempts to join a Lumina™ RF network for up to 30 seconds.
If it is able to join, the Network LED (green) turns ON solid for 10 seconds. If it is unable
to join, it automatically retries every 15 minutes until it succeeds in joining a network.
NOTE: The sensor will not be able to join a network until a Lumina™ RF compatible
gateway is commissioned. See LED Operation table.
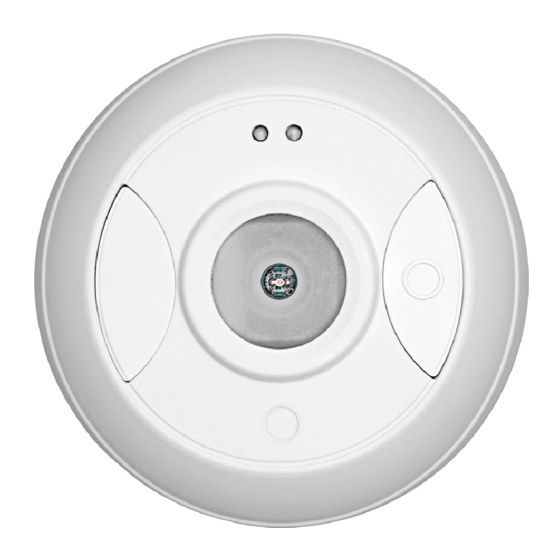
Photosensor
Lens
Utility
Button
DI-000-LURPC-02A
ENGLISH
Network LED
(green)
Test Mode LED
(red)
Wireless Photosensor
Cat. No.: LURPC-00W
Power Supply: Battery Li-SOC12 AA 3.6V (2)
FCC ID: NRH-ZB Z1-B
IC ID: 8984A-Z100B
ICES/NMB-003 CLASS B
For Indoor Use Only
DI-000-LURPC-02A
Advertisement
Table of Contents

Related Manuals for Leviton Lumina LURPC-OOW


Summary of Contents for Leviton Lumina LURPC-OOW
- Page 1 Field of view: 60˚ cone Mounting (2) Screw holes on base plate; ceiling mount; twist-lock sensor Dimensions Diameter: 3.7 inches (95mm) Depth: 1.3 inches (32mm) © 2017 Leviton Mfg. Co., Inc. For Technical Assistance Call: 1-800-824-3005 (U.S.A. Only) www.leviton.com DI-000-LURPC-02A...
- Page 2 Installation of non-Leviton software or modification of the operating system voids this warranty. Leviton’s obligation under this Limited Warranty is limited to the repair or replacement, at Leviton’s option, of Product that fails due to defect in material or workmanship. Leviton reserves the right to replace product under this Limited Warranty with new or remanufactured product.
Need help?
Do you have a question about the Lumina LURPC-OOW and is the answer not in the manual?
Questions and answers