Advertisement
Quick Links
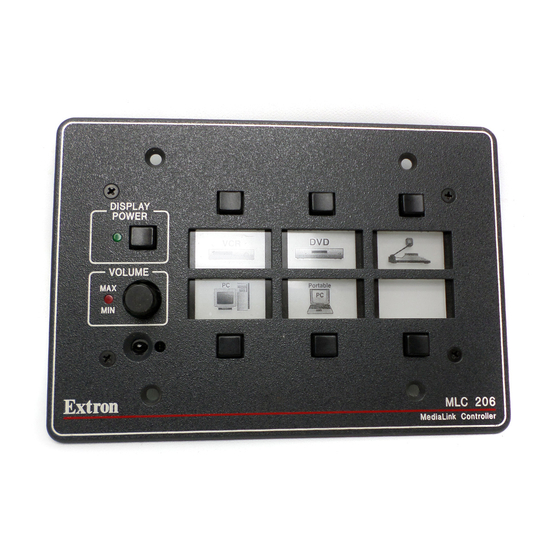
MLC 206 Backlight Replacement Guide
Replacement kits are available from Extron for the MLC's backlights. The MLC 206
is shown in the examples, but the instructions apply to all models. Follow the
steps below to replace the backlight.
1.
2.
3.
4.
MLC 206 with
LED Backlight Circuit Board
(part #20-497-01)
Remove the MLC from the furniture or wall (if it was previously installed) by
removing the four screws marked
Use a small Philips screwdriver to remove the four faceplate attachment
screws marked
in the picture at
2
right, and keep them for later use.
Do not remove these screws (
while the MLC is installed in a
wall or furniture, or the controller
may fall down into the wall/
furniture or wall box.
Lift the faceplate off the MLC.
Lift off the transparent,
protective, plastic
window that
covers the
labels.
MLC 206 with
Electroluminescent
Backlight Circuit Board
(part #20-440-01)
LED Backlight
Circuit Board
n u
M e
p 1
1
p t o
e t
e s
L a
P r
p 2
p t o
L a
MLC 206 • Backlight Replacement Guide
in the picture below.
1
1
2
DISPLAY
)
2
POWER
VOLUME
MAX/
MIN
2
1
Extron
Electroluminescent
Backlight Circuit Board
D
D V
n u
M
M e
C A
D V
n u
1
e t
M e
e s
P r
p 2
p t o
L a
P L
D IS
W E
P O
L U
V O
X /
M A
M IN
n
t r o
E x
Foam
Label Holder
Plastic Window
Faceplate
D
D V
M
C A
D V
A Y
P L
D IS
R
W E
P O
6
2 0
C
r
M L
ll e
tr o
o n
k C
M E
L in
L U
d ia
V O
M e
X /
M A
M IN
n
t r o
E x
Remove four screws.
1
2
VCR
DVD
Laptop
2
1
MLC 206
MediaLink Controller
Plastic Label Frame
Labels
Plastic Window
Faceplate
A Y
R
6
2 0
C
r
ll e
M L
tr o
o n
k C
M E
L in
d ia
M e
Remove four screws.
68-728-01 Rev. B
Printed in the USA
12 02
1
Advertisement

Related Manuals for Extron electronics MLC 206


Summary of Contents for Extron electronics MLC 206
- Page 1 MLC 206 Backlight Replacement Guide Replacement kits are available from Extron for the MLC’s backlights. The MLC 206 is shown in the examples, but the instructions apply to all models. Follow the steps below to replace the backlight. Remove the MLC from the furniture or wall (if it was previously installed) by removing the four screws marked in the picture below.
- Page 2 MLC 206 Backlight Replacement Guide, cont’d Lift off the transparent, rectangular labels; save them for later use. You may need a small, flat bladed screwdriver to gently pry the labels out. Note which labels were in which window so you can put them back in the same locations during reassembly.
- Page 3 Orient the new backlight board in the same direction as the old board had been (as shown below), align the connectors, screw holes, and button holes, then gently and firmly press it into place. LED Backlight Circuit Board MLC 206 • Backlight Replacement Guide...
- Page 4 MLC 206 Backlight Replacement Guide, cont’d Install the new label-holding frame from the replacement kit. Insert the existing input window labels into the proper places in the frame (where noted in step 5), or install new window labels. Peel off the protective film from the new clear plastic window (if applicable) and place the window onto the MLC to cover the labels.
Need help?
Do you have a question about the MLC 206 and is the answer not in the manual?
Questions and answers