Table of Contents
Advertisement
Quick Links
Advertisement
Table of Contents

Related Manuals for Union Community UBio-X Face


Summary of Contents for Union Community UBio-X Face
- Page 1 UBio-X Face User Guide Version Eng-1.0 Copyright 2000 By UNIONCOMMUNITY Co., LTD.
-
Page 2: Revision History
UBio-X Face User Guide <Revision History> Version Date Description Firmware Version 2020-12-04 Initial Release 0.0.0-61.01-000.06 UNIONCOMMUNITY Co., Ltd. Address: 12F, Munjeong Daemyeong Valeon bldg, 127 Beobwon-ro Songpa-gu, Seoul, Korea (zip code: 05836) Tel: +82-2-6488-3000, Fax: +82-2-6488-3099, E-Mail: sales@unioncomm.co.kr; http://www.unioncomm.co.kr... -
Page 3: Glossary
UBio-X Face User Guide <Glossary> Admin, Administrator - A user who can enter into the terminal menu mode, he/she can register/modify/delete terminal users and change the operating environment by changing settings. - If there is no administrator for a terminal, anyone can change the settings. In this regard, it is recommended to register at least one administrator. -
Page 4: Table Of Contents
UBio-X Face User Guide Table of Contents <Revision History> ....................2 <Glossary> ........................ 3 1. Before use ......................6 1.1. Safety Precautions ....................6 1.2. Specific names of the terminal ................7 1.3. Windows after operation ..................8 1.3.1. Icons ....................... 9 1.3.2. - Page 5 UBio-X Face User Guide 3.6.5.1. Delete all users ..................46 3.6.5.2. Delete setting ..................47 3.6.5.3. Delete Log ..................... 47 3.6.5.4. Delete image log ................... 48 3.6.5.5. Factory init .................... 48 3.7. Terminal ........................ 49 3.7.1. Sound ......................49 3.7.2. Option ......................50 3.7.3.
-
Page 6: Before Use
UBio-X Face User Guide 1. Before use 1.1. Safety Precautions Warning Handling with wet hands or allowing liquid to flow into Do not place a fire source it is prohibited. near the terminal. -> It may cause -> It may cause a fire. -
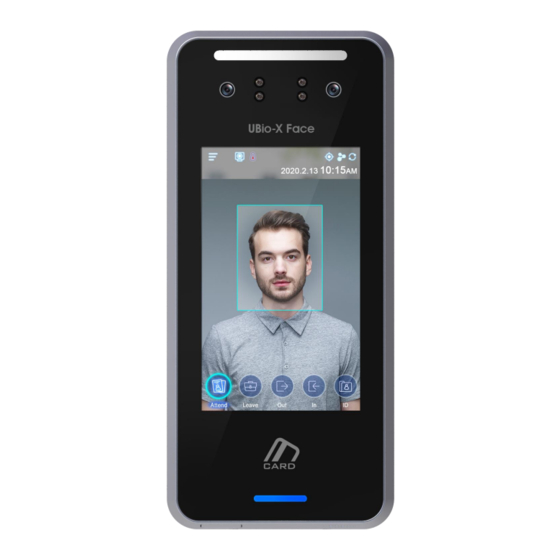
Page 7: Specific Names Of The Terminal
UBio-X Face User Guide 1.2. Specific names of the terminal Illumination sensor Dual camera IR LED Touch LCD Card sensing area Speaker USB Input UNIONCOMMUNITY Co., Ltd. Address: 12F, Munjeong Daemyeong Valeon bldg, 127 Beobwon-ro Songpa-gu, Seoul, Korea (zip code: 05836) Tel: +82-2-6488-3000, Fax: +82-2-6488-3099, E-Mail: sales@unioncomm.co.kr;... -
Page 8: Windows After Operation
UBio-X Face User Guide 1.3. Windows after operation ① Icon for Wi-Fi status ② ② Icon for illumination detection ③ ③ Warning icon for fire alarm ④ ④ Warning icon for tamper switch ⑤ Icon for door status ⑤ ⑥ Icon for network status Menu button Time &... -
Page 9: Icons
UBio-X Face User Guide 1.3.1. Icons None : There is no connected Wi-Fi dongle. : Wi-Fi connection is not activated ① Wi-Fi Status : Wi-Fi connection is activated None : Detect the high illumination status. ② Illumination Detection : Detect the low illumination status : Fire Alarm is activated. - Page 10 UBio-X Face User Guide - When authentication is successful - When authentication is failed - When unregistered user ID is entered - When unregistered card is entered - Passback error when using anti-passback function UNIONCOMMUNITY Co., Ltd. Address: 12F, Munjeong Daemyeong Valeon bldg, 127 Beobwon-ro Songpa-gu,...
- Page 11 UBio-X Face User Guide - When using for meal management When a user tried the authentication more than twice in one meal time when using as meal management When server does respond during authentication attempt to the server When network...
- Page 12 UBio-X Face User Guide - When it is not the meal time when setting in the meal personnel management - The waiting status for the input of user ID - The waiting status for the input of password UNIONCOMMUNITY Co., Ltd.
-
Page 13: Voice Sounds In Operation
UBio-X Face User Guide - The waiting status for the input of card Verify Card Place your card - When the terminal program is being upgraded Upgrading... Do not power off ! (In this state, you should not turn off the terminal.) 1.4. - Page 14 UBio-X Face User Guide Notes - It is recommended to register and authorize at the location where the terminal is installed. - If you pose differently with the registered face, the recognition rate of face can decrease. It is good to locate the full face as much as possible...
-
Page 15: Product Introduction
UBio-X Face User Guide 2. Product introduction 2.1. Product characteristics Walk-through product and face authentication is possible by passing and staring at the camera. FHD(2M) Display resolution is adapted. Live detection feature with Dual Camera (Color & IR) ... - Page 16 UBio-X Face User Guide Face or Password Face, password registration Face authentication input> Face authentication > failed, password authentication Face & Password Face, password registration Password authentication after face authentication ID input > Face authentication > Password authentication UNIONCOMMUNITY Co., Ltd.
-
Page 17: Product Components
UBio-X Face User Guide 2.2. Product components 2.2.1. Standalone use (Access) DC15V / 4A Adapter Electric lock (Lock+, Lock-, Monitor) 2.2.2. Connected with Server (Access, Attendance, Meal management) TCP/IP TCP/IP Authentication server TCP/IP (Static IP) UDB server Internet / database (MDB or MSSQL) -
Page 18: Product Specification
UBio-X Face User Guide Product specification 2.3. Types SPEC REMARK Cortex-A9 Quad Core, 1.4GHz 5.0 inch Touch LCD(854*480) 16G Bytes Flash MEMORY 2GBytes RAM USB 2.0 OTG support Backup data / FW upgrade Camera Dual Camera (Color & IR) Micro B 5pin 500,000 User / 500,000 Card 20,000 Face (1:N1:20,000) -
Page 19: Environment Setting
UBio-X Face User Guide 3. Environment setting 3.1. Checks before setting the environment 3.1.1. Entering the menu If you click the [ ] icon at the basic window, you can enter the main menu window as follows. You can enter the subdivision menu by clicking each button. -
Page 20: Administrator Authentication
UBio-X Face User Guide 3.1.2. Administrator authentication If the administrator is registered, the following administrator authentication window appears at first. ▶ Administrator authentication If you enter the administrator ID, the administrator authentication fulfilled along with authentication method of the administrator such as card, face, or password. -
Page 21: How To Save The Set Values
UBio-X Face User Guide ③ Click the icon at the basic window to enter the administrator authentication window in <Fig. 3-2>, and fill the administrator ID with ‘0’ and click [ ] button, then you can enter the menu window. -
Page 22: Menu Composition
UBio-X Face User Guide 3.2. Menu composition 1.User 1. Add 2. Modify 3. Delete 4. Delete All 5. View 2. Network IP address Static IP / DHCP ▶IP address ▶Subnet Mask ▶Gateway ▶DNS server 1 ▶DNS server 2 Server IP ▶Server IP... - Page 23 UBio-X Face User Guide 2. Face ▶Matching Level [1~4] ▶Face Size □Multi Face Detection □Mask Detection ▶AE flicker frequency [0/50/60] ▶Liveness detection level [0~9] 3. Auth ▶Auth Type [None / Card / Face] 4. Date/Time ▶Time synchronization ▶Display Format ▶Set Date ▶Set Time...
- Page 24 UBio-X Face User Guide ▶Save Option □ Save success log □ Save failed log Save failed face [0~5] 3. Language ▶Language 4. Option ▶Power saving mode ▶Display Option ▶Touch Calibration Message display ▶Message Display time Time (ms) 7. Info 1. System ▶System Info...
-
Page 25: User Management
UBio-X Face User Guide 3.3. User Management When you select [User] at the main menu, the following window appears. The number of all the users is shown at the top of screen including administrator. Click [Add] button to add the new user, [Modify] button... - Page 26 UBio-X Face User Guide If you enter ID which is already registered, the failure message appears, and if the ID is not registered, the following screen appears. The icons in the left side mean as follows : The number of registered faces...
-
Page 27: Photo Registration
UBio-X Face User Guide 3.3.1.1. Photo registration Register by clicking [ ] button at the [Add User] screen. Click the [Save] button to register with the present camera image. Click [Cancel] or [Back] button to cancel the registration and return. -
Page 28: Face Registration
UBio-X Face User Guide 3.3.1.3. Face registration Register the face referring ‘1.6 How to register and authorize the face properly’. ① As shown on the left screen, align the face to the blue outline and register it. ② Press the [Start] button to register the face. - Page 29 UBio-X Face User Guide ③ When the registration is ended, ‘Completed!’ message is shown on the screen. If you click [OK] button, the face registration is completed and the screen is moved to the previous screen. If you want to register again, click [Start] button to start from the procedure of ②.
-
Page 30: Password Registration
UBio-X Face User Guide 3.3.1.4. Password registration If you enter the password in 1~8 characters into the password input window and click [OK] button, the input focus is moved to the ‘password confirm’ window at below. Enter the same password again and click [OK] button. -
Page 31: Auth Type
UBio-X Face User Guide 3.3.1.6. Auth type Set by clicking [Auth type] at the [Add User] window. (But, it can be set when there are more than 1 authentication methods registered) Click [BACK] button to cancel and return. This shows all the authentication methods already registered, and the buttons at the lower side shows the buttons [OR] / [AND] which can be selected. -
Page 32: Delete
UBio-X Face User Guide When you clicked the [Save] button, the case registration was failed : The case none of authentication methods such as face, card, and password is registered. Failed! When you clicked the [Auth method] button, the case none of the authentication method was registered. -
Page 33: Modify
UBio-X Face User Guide When it is deleted normally. Deleted! When unregistered ID was entered Unregistered! 3.3.3. Modify The following window appears if you click the [User] [Modify] in the main menu. Input the user ID to be modified and click [OK] button. -
Page 34: Delete All
UBio-X Face User Guide The icons at the left side means as follows. : The number of registered faces : Existence of password registration (1: Registered / X: Not registered) : The number of registered cards (X,1~10) : The user ID to register... -
Page 35: View
UBio-X Face User Guide 3.3.5. View If you click the [User] -> [View] in the main menu, all the users registered can be searched as follows. The user list appears by the order of ID, and if you slide the screen upward, you can search the additional user list. -
Page 36: Network Setting
UBio-X Face User Guide ▶[Name]: If you input the user name by clicking [Name] button, the registered user list including the characters is shown. If you click [BACK] button in this window, you can move to the ‘3.3. User management’ menu. - Page 37 UBio-X Face User Guide the default value is ‘1’. It should be the same with the ID of the terminal registered, and the characters can be up to 9 digits. If you touch the item you want to change, the keypad appears at the bottom.
-
Page 38: Application Mode
UBio-X Face User Guide 3.5. Application mode 3.5.1. Application If you select the [Application] in the main menu, the following window appears. In the application mode, you can select the [Access / TnA / Meal] according to the purpose. 3.5.1.1. Access or TnA setting It is the screen appearing when you select the Access. -
Page 39: Meal Setting
UBio-X Face User Guide ▶Schedule (00:00~23:59): You can set the time for each authentication mode and if you do not need the function, set ’00:00-00:00’. During the set time, the set mode is always shown unless clicking another function button, and it is convenient for the TnA management because the indication mode is changed to the set authentication mode automatically though another mode was authorized by clicking another function key. -
Page 40: Function Key
UBio-X Face User Guide 3.5.2. Function key The following window appears if you select the [Application] [Function key] in the main menu. ▶Basic setting: Same with the window at the left side. ▶▶Fn key It means the [F1] ~ [F4], Access button used to... - Page 41 UBio-X Face User Guide ▶When you press button, you can add the access mode as you set in ‘Extended key’. When you select the access mode that you selected, the access mode is changed as you selected. UNIONCOMMUNITY Co., Ltd.
-
Page 42: System
UBio-X Face User Guide 3.6. System 3.6.1. System The following window appears if you select the [System] [System] in the main menu. ▶Basic setting: Same with the window at the left side ▶User ID Length It sets the length of the user ID, and it can be 2~8 characters and should be the same with the length of the registered ID of the server program. -
Page 43: Face
UBio-X Face User Guide 3.6.2. Face ▶Basic setting: Same with the window at the left side ▶Matching level It is the level used in face authentication, and it can be set 1~4 levels according to the accordance degree with registered face. -
Page 44: Auth
UBio-X Face User Guide 3.6.3. Auth If you select the [System] [Auth] in the main menu, the following window appears. ▶Basic setting: Same with the window at the left side ▶ Auth Type: Select the authentication method of the terminal. -
Page 45: Date/Time
UBio-X Face User Guide 3.6.4. Date/Time If you select the [System] [Date/Time] in the main menu, the following window appears. ▶Basic setting: Same with the window at the left side ▶Time synchronization It determines the synchronization method between the present time of terminal and server. -
Page 46: Database
UBio-X Face User Guide 3.6.5. Database If you select the [System] [Database] in the main menu, the following window appears. If you want to delete all the users, click [Delete all users] button. If you want to initialize the settings, click [Delete setting] button. -
Page 47: Delete Setting
UBio-X Face User Guide In this case, both the users and administrator are deleted, and the restoration is impossible once the data is deleted. 3.6.5.2. Delete setting If you select the [System] [Database] [Delete setting] in the main menu, the following screen appears. -
Page 48: Delete Image Log
UBio-X Face User Guide 3.6.5.4. Delete image log If you select the [System] [Database] [Delete image log] in the main menu, the following window appears. If you want to delete all the authentication record in the terminal, click [YES] button, and if you want to cancel, click the [NO] or [ ] button. -
Page 49: Terminal
UBio-X Face User Guide 3.7. Terminal 3.7.1. Sound If you select the [Terminal] [Sound] in the main menu, the following window appears. ▶Basic setting: Same with the window at the left side. ▶Voice volume Scroll from side to side in 0~15 degrees to set the voice volume. - Page 50 UBio-X Face User Guide 3.7.2. Option If you select the [Terminal] [Option] in the main menu, the following window appears. ▶Basic setting: Same with the window at the left side. ▶Read Card number: If the user put the card on the screen, the card number is displayed on the LCD.
-
Page 51: Input
UBio-X Face User Guide 10 Digit Decimal 1386022627 hexadecimal 529D06E3: 10 digits decimal 3,5 Digit Decimal 3808861522 hexadecimal E3069D52: 10 digits decimal 6 Digit Hexadecimal 069D52 Locate the foremost 3bytes backwards. Click [OK] button to apply the set value, and click [BACK] button to cancel and return. - Page 52 UBio-X Face User Guide ▶M1/M2: Set when connecting the external access point to DM1/DM2 (When using motor lock, set [Lock NO] or [Lock NC].) - None: When nothing is connected. - Lock NO or Lock NC: When the lock monitoring pin was connected.
-
Page 53: Lock
UBio-X Face User Guide 3.7.4. Lock If you select the [Terminal]->[Lock] in the main menu, the following windows appears. ▶Basic setting: Same with the window at the left side. ▶Lock 1 Option - None: When it is not used - Strike/Auto/OK: When the warning light is connected to indicate the strike type, auto door, or authentication success/failure on Lock1. -
Page 54: External Device
UBio-X Face User Guide ▶Lock 2 duration (ms) It sets the signaling time when Lock 2 is set ‘Authentication failure notification’. Click [OK] button to apply the set value, and click [BACK] button to cancel and return. Because it is set in ms unit, if you want to set 3 seconds, you should set 3000. - Page 55 UBio-X Face User Guide ▶Site code It sets the site code value sent in Wiegand output below. ▶Wiegand Output It is used only when the special controller is equipped running by the Wiegand input. When the authentication is finished, the data of the following format is sent to the Wiegand port of the terminal.
-
Page 56: Etc.(Thermal)
UBio-X Face User Guide 3.7.6. ETC.(Thermal) If you select [Terminal] -> [ETC.(Thermal)] in the mail screen, the following window appears. ▶Basic setting: Same with the window at the left side ▶Thermal Camera Use When checking ( ) this option, you can use the thermal camera. - Page 57 UBio-X Face User Guide ▶Display -You can select Celsius or Fahrenheit. ▶thermal setting When the guide button ( ) is turned ON, a square is displayed on the main screen to indicate the authenticable area. When the preview button ( ) is turned ON, the preview image of the thermal camera is displayed on the bottom right of the main screen.
-
Page 58: Display
UBio-X Face User Guide 3.8. Display 3.8.1. Theme If you select [Display] [Theme] in the main menu, the following window appears. ▶Basic setting: Same with the window at the left side. ▶Background Since the camera is basically displayed, it is not available to select the background. -
Page 59: Camera
UBio-X Face User Guide 3.8.2. Camera If you select the [Display] [Camera] in the main menu, the following window appears. ▶Basic setting: Same with the window at the left side. ▶Display Option Select the image displayed in the message window... -
Page 60: Language
UBio-X Face User Guide 3.8.3. Language If you select the [Display] [Language] in the main menu, the following window appears. ▶Basic setting: ‘English’ ▶Language If you change the language and click ‘OK’ button, the voice message and language are changed to the set language. - Page 61 UBio-X Face User Guide 3.8.4. Option If you select [Display] [Option] in the main menu, the following window appears. ▶Basic setting: Same with the window at the left side. ▶Power saving mode (5sec ~ 10min) If there is no input for set duration, the LCD screen is turned off automatically.
-
Page 62: Message Display Time
UBio-X Face User Guide 3.8.5. Message display time If you select the [Display] [Message display time] in the main menu, the following window appears. ▶Basic setting: Same with the window at the left side. ▶Message Display (ms) It sets the time for which the authentication result window to be displayed. -
Page 63: Terminal Info
UBio-X Face User Guide 3.9. Terminal Info 3.9.1. System If you select the [Terminal info] [System] in the main menu, the following window appears. ▶System info The hardware and firmware version of terminal is shown. ▶Disk (using size / Total size) It shows the using size of the hard disk. -
Page 64: Terminal
UBio-X Face User Guide 3.9.2. Terminal If you click the [Terminal info] [Terminal] in the main menu, the following window appears. ▶Terminal info It represents the option setting value of the terminal. Click [Close] or [BACK] button to finish the inquiry and move to the upper menu. -
Page 65: User
UBio-X Face User Guide ▶Network info It shows the setting value of the terminal. If you want to finish the inquiry and move to the upper menu, click [CLOSE] or [BACK] button. 3.9.4. User If you select the [Terminal info]->[User] in the main menu, the following window appears. -
Page 66: Log
UBio-X Face User Guide ▶User - User: The number of users registered (including administrator) - Admin: The number of the administrators registered. - Face: The number of the users who registered the face - Face 1toN: The number of users who can be... - Page 67 UBio-X Face User Guide ▶Log Log: The number of logs saved in the terminal Image Log: The number of image logs saved in the terminal. (Max means the maximum number of items which can be saved in each item.) ▶View Log Displays log time and authentication result ▶Log Search...
-
Page 68: About
UBio-X Face User Guide ▶View Log Log search result shows the information such as the date, time, ID and access result (success or failure). Click [BACK] or [NEXT] button to see the search information. If you want to finish the inquiry and move to the upper menu, click [Close] or [BACK] button. -
Page 69: Usb
UBio-X Face User Guide 3.10. USB If you select the [USB] at the main menu, the following screen appears. When USB is inserted When USB is not inserted < > < > ※ It works only if USB is inserted and use the C-type of conversion gender to insert it. - Page 70 UBio-X Face User Guide It is the feature to back up the data of the terminal via [Export]. You can copy the back-up data to the terminal via [Import]. ▶ Export It copies the data from the terminal to the external USB.
- Page 71 UBio-X Face User Guide - Picture: The image log data is saved in the folder ‘UbioXface / Terminal ID (8 digits) / log / pictures’ in USB as jpg file. - Export all: It can export all things User Data, Event Log, and image log to USB.
-
Page 72: Download The User File
UBio-X Face User Guide - F/W upgrade: It upgrades the firmware via USB. (The firmware should be in the ‘UbioXface’ folder in USB.) If you want to finish working and move to the upper menu, click the [OK] or [BACK] button. -
Page 73: How To Use Terminal
UBio-X Face User Guide 4. How to use terminal The background image and composition of the basic window can be changed according to the administrator’s setting. In addition, if the administrator set the screen saver time, the LCD screen is turned off automatically if there is no action for set time, and when the user accessed to the terminal, tried the authentication with card, or touched the main screen, the LCD screen is turned on automatically. -
Page 74: How To Input User Id
UBio-X Face User Guide 4.2. How to input user ID If you click the button [ID] on the basic window, following the window “Input User ID” as below. Enter the user ID to be certified and click [OK] button, then the input screen of face, card, or password depending on the authentication method of the user. -
Page 75: Card Authentication
UBio-X Face User Guide 4.3.2. Card authentication Place the card on the card picture <Fig. 4-1>. 4.3.3. Password authentication Input your ID by clicking [ID input] button as follows and input password when the password input window appears. -
Page 76: Multi-Mode Authentication
UBio-X Face User Guide 4.3.4. Multi-mode authentication For user who needs to authenticate via more than 2 methods, the preferential priority of the authentication after the ID is typed is as follows: cardfacepassword in order. This type is activated even if face authenticates firstly. - Page 77 UBio-X Face User Guide FCC compliance information Virdi / UBio-X Face This device complies with Part 15 of the FCC regulations. Operation is subject to the following two conditions: (1) This terminal does not cause harmful interference. (2) This terminal accepts any interference, including interference that may cause undesired operation.
Need help?
Do you have a question about the UBio-X Face and is the answer not in the manual?
Questions and answers