Table of Contents
Advertisement
IDS Xwave
IIdgjI
Training Manual
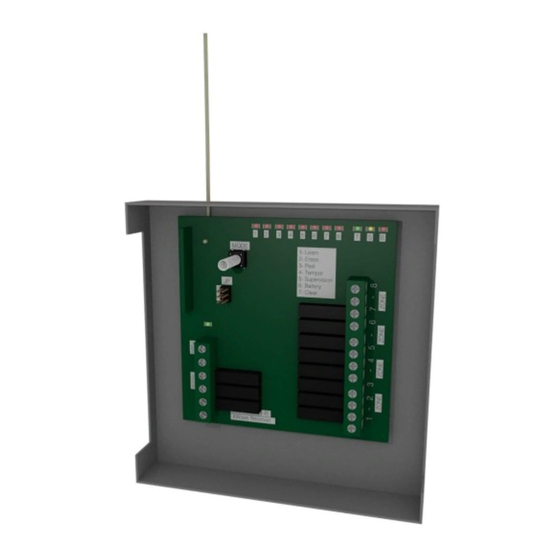
Xwave 8 Channel Standalone Wireless Receiver
The IDS Xwave 8 Channel Standalone Wireless Receiver is capable of learning up to 8
IDS Xwave detectors. The receiver has 8 zone outputs and 3 trouble outputs. In this
guide we will discuss all functions as well as installation and programming of the
receiver.
Advertisement
Table of Contents

Related Manuals for IDS Xwave


Summary of Contents for IDS Xwave
- Page 1 Training Manual Xwave 8 Channel Standalone Wireless Receiver The IDS Xwave 8 Channel Standalone Wireless Receiver is capable of learning up to 8 IDS Xwave detectors. The receiver has 8 zone outputs and 3 trouble outputs. In this guide we will discuss all functions as well as installation and programming of the...
- Page 2 1. Installation 1.1. Hardware Zone/Detector LED's Trouble LED's MODE/Tamper Switch Jumpers Power LED Zone Outputs Power Input Trouble Outputs...
- Page 3 1.2. Jumpers The IDS Xwave 8 Channel Standalone Wireless Receiver has 3 jumpers that allow you to set the supervision time, enable tamper and enable RF Jam detection. JP 1 - Supervision Time Supervision Time is set to 3 hours.
- Page 4 After 2 minutes of inactivity the receiver will return to normal operation. 2.1. Mode 1 - Learn Mode 1 is used to learn detectors into the IDS Xwave 8 Channel Standalone Wireless Receiver. To learn a detector to the IDS Xwave 8 Channel Standalone Wireless Receiver: 1.) Hold the MODE button until LED 1 is lit, then release it.
- Page 5 2.2. Mode 2 - Erase Mode 2 is used to erase detectors from the IDS Xwave 8 Channel Standalone Wireless Receiver. To erase a detector from the IDS Xwave 8 Channel Standalone Wireless Receiver: 1.) Hold the MODE button until LED 2 is lit, then release it.
- Page 6 All LEDs with the selected trouble will come on. 2.5. Mode 7 - Clear Troubles If you want to clear any troubles that are displayed on the IDS Xwave 8 Channel Standalone Wireless Receiver: 1.) Hold the MODE button until LED 7 is lit, then release it.
- Page 7 IDS Xwave Door Contact The 860-07-587 door contact has a built-in wireless transmitter. 1. Hardware Transmit LED Supervision Jumper J1 On – 90 mins IDS Wireless J1 Off – 12 hrs Transmitter Tamper Switch LED Jumper On – Enables the LED Off –...
- Page 8 ) Set the jumper settings (seen in the Hardware section) to your needs. IDS Xwave Universal Transmitter The IDS Xwave Universal Transmitter connects to a wired device allowing it to transmit wirelessly.
- Page 9 Number Jumpers Detector Tamper Power Input & Trigger Inputs 12v DC Note: The IDS Xwave Universal Transmitter will work with a voltage as low as 9V but you will receive a low battery signal if the voltage is below 10.5V.
- Page 10 1.2. Jumpers The IDS Xwave Universal Wireless Transmitter has 3 jumpers that allow you to set the supervision time, select the mode and select normally open/close inputs. JP 1 - Supervision Time Supervision Time is set to 90 minutes Supervision Time is set to 12 hours The Supervision Time is how often the transmitter will send a supervision signal.
- Page 11 1.4. Learning to a Receiver There are two ways you can learn the IDS Xwave Universal Transmitter to an Xwave Receiver. 1.) Serial Number: When connecting to the Xwave Bus Receiver you can just type the serial number into location 260 in the installer programming.
- Page 12 1. Hardware Overview The Xwave repeater requires a contain 12v DC supply due to the repeater needing to be in a continuous “listen” mode. The batteries are only used as a battery backup due to AC power failure. To open the Xwave repeat cover, remove the two screws from underneath the unit. The drawing below shows the inside of the Xwave repeater with the jumper and LEDs functions.
- Page 13 The Xwave repeater is now defaulted. 3. Learning Detectors To learn a detector to the Xwave Repeater put a jumper on S1 and press the S2 button. Once LED4 comes on press and release the wireless detector's tamper switch, LED1 and LED2 will flash alternately and then LED1 will come on for 3 seconds followed by LED2 coming on for 3 seconds then both LED1 and LED2 will turn on for 3 seconds.
Need help?
Do you have a question about the Xwave and is the answer not in the manual?
Questions and answers